STOP FONT PANIC READ THE INSTRUCTIONS SLE A t Taken at Underwent Bridge TAS by Lost nomads any questions.
Congratulations on purchasing a high quality diesel heater from Diesel heat. Your kit contains everything you need to complete a professional, quiet, reliable installation. Remember help isn’t far away, read the instructions first, but then feel free to call us if you need further help. TIPS FOR A GREAT JOB o Be super careful when putting screws into cabinets and from the bottom up in the floor floors and cabinets can be as thin as 12mm so long screws can protrude through.
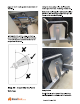
Part A Fixed Points Get all the parts that are end points and have fixed locations installed first. Step A1 Select a location for the heater and make the 145mm hole When mounting the heater, it can go under a seat area, under bed, or in a low traffic area. Measure your proposed location carefully above and below the floor to check you have clearance for the heater above and for the ring on the mounting plate below. Avoid chassis rails, water tanks, gas pipes etc.
2KW HEATER ONLY The power supply for the fuel pump exits out of the combustion air inlet pipe in the 2kW units. Follow these steps to set up the combustion air inlet pipe, with the heater on its back on a bench: 1. Push the fuel pump wires slightly back up in the air inlet pipe (to allow a bit of slack) and then jam them into the slot in the side of the pipe. 2.
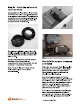
Step A4 Install the hot air and return air vents Using a 60mm hole saw drill holes for the hot air vent and the inlet air vent. Think about the outlet location to minimize the duct length and to keep the duct as straight as possible. Pop off the front of the directional (eyeball) vent and attach with 3 small screws. Use silicone or sinkable to glue in the return air (flat) vent. Alternatively drill 2 small holes in the flange on the vent and screw it in with small screws.
pipes to return back up onto the underside of Using the 3 mounting holes, bolt the wafer the floor. tank to your front box, mounting bracket etc. Ensure the outlet nipple is tightened firmly but be careful not to over tighten as it will spin the ferrule in the tank destroying it. It is important to get the angle on the fuel pump correct, the outlet should be between 15 and 35 degrees upwards to allow air fo purge from the pump.
around the holes before screwing it down. Screw or rivet the breather pipe so it is above the tank. These tanks are designed to be inside, if you are installing it outside, cover the quick disconnect fittings with a bit of corrugated conduit for UV protection. In this photo the splash box has been cut down to facilitate easy tank removal. Part B Make the connections Well done!!! You have done the hardest parts, now you just need to connect it all together.
rubber cable grommet fitting sits in the slot properly. 2.2kW, 4kW and 5kW Heaters The main wiring loom has 3 cables, the controller, the main power and the fuel pump. The main wiring loom plugs into the matching loom coming from the heater, slide the locking catch to retain the main loom. I Generally the fuel pump and main power cables need fo go through a small hole in the floor to be routed to the fuel pump and battery (unless the battery is in the same compartment).
2KW HEATER ONLY The fuel pump power cable exits the heater under the floor via the inlet air pipe. The 2kW heater has its own separate fuel pump extension cable with matching plugs on each end. You can either use the whole cable, and loop up any excess length and cable tie it out of the way under the floor, or shorten it. Make sure you push the plugs hard home and the wire clip is secure when installing the cable.
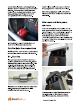
Replace the knob, note it will only go back on when properly aligned to it's shaft. Digital Controller Put a small amount of silicon on the back of the control switch this will stop it from moving on the screw. Mount the control switch through a wall using the provided screw ensuring it is pushed down and to the right so it covers all of the hole drilled for the cables. BS Duct Fit the duct between the heater outlet and the directional vent, secure with the supplied clamps.
Finishing Off All cable holes should be sealed with silicon, all fuel lines, power cables, combustion pipes, exhaust pipes should be cable tied or clipped securely in place. Make sure that the exhaust is separated from the combustion air and the fuel inlet. Make sure the exhaust cannot contact any other wiring, pipework etc. as it will melt plastic. Put at least 2L of Diesel in the fuel tank to ensure the fuel straw is down into the fuel.