High-Speed Mode Wireless G Notebook Network Card Connect your laptop computer to a FASTER wireless network User Manual F5D7011
Table of Contents 1 Introduction. . . . . . . . . . . . . . . . . . . . . . . . . . . . . . . . . . . . . . . . . . . . . . 1 Advantages of a Wireless Network . . . . . . . . . . . . . . . . . . . . . . . . . 1 Placement of your Wireless Networking Hardware for Optimal Performance. . . . . . . . . . . . . . . . . . . . . . . . . . . . . . . . . . . . 2 2 Overview . . . . . . . . . . . . . . . . . . . . . . . . . . . . . . . . . . . . . . . . . . . . . . . . Product Features . . . . . . . . . . . . . . . .
Introduction Advantages of a wireless network • Mobility – you no longer need a dedicated “computer room”— you can work on a networked laptop or desktop computer anywhere within your wireless range • Easy installation – Belkin Easy Installation Wizards make setup simple • Flexibility – set up and access printers, computers, and other networking devices from anywhere in your home • Easy Expansion – the wide range of Belkin networking products let you expand your network to include devices such as pri
Introduction Placement of your Wireless Networking Hardware for Optimal Performance Your wireless connection will be stronger the closer your computer is to your Wireless Router (or Access Point). Typical indoor operating range for your wireless devices is between 100 and 200 feet. In the same way, your wireless connection and performance will degrade somewhat as the distance between your Wireless Router (or Access Point) connected devices increases. This may or may not be noticeable to you.
Introduction Avoid Obstacles and Interference Avoid placing your Wireless Router (or Access Point) near devices that may emit radio “noise”, such as microwave ovens.
Introduction networks, and move your Wireless Router (or Access Point) and computers to a channel as far away from other networks as possible. Experiment with more than one of the available channels, in order to find the clearest connection and avoid interference from neighboring cordless phones or other wireless devices. Use the detailed Site Survey and wireless channel information included in your User Guide for more information. 5.
Overview 1 Product Features • 2.
Overview Applications and Advantages • Wireless roaming with a laptop around the home or office Offers the freedom of networking without cables • Connection rates of up to 54Mbps or 125Mbps* using HSM provides immediate, higher-speed wireless connectivity at home, work, and hot spot locations without compromising the use of existing 802.11b products • Compatibility with 802.11b products 802.11g wireless LAN solutions are backward-compatible with existing Wi-Fi (IEEE 802.
Overview (b) 1 2 3 4 (c) 5 6 (a) Power LED Lights up when the Card receives power (b) Link LED Lights up when the Card links to a wireless network Slowly flashes when not linked to a wireless network (c) Card Connector Part of the Card that fits into your computer’s CardBus slot System Requirements • • PC-compatible laptop with one available CardBus slot Windows ® 98SE, Me, 2000, XP Package Contents • High-Speed Mode Wireless G Notebook Network Card • Quick Installation Guide • Installation S
Installing and Setting up the Card Step 1 Install the Software WARNING: INSTALL THE SOFTWARE BEFORE INSERTING THE CARD. 1.1 Insert the Installation Software CD into your CD-ROM drive. 1. 2 The Belkin Setup Utility will automatically appear. Note: If the Setup Utility screen does not appear within 20 seconds, open your CD-ROM drive by double-clicking on the “My Computer” icon and insert the CD. Double-click on the CD-ROM drive that the installation CD has been placed in to start the installation.
Installing and Setting up the Card 1.4 The installer will now start. Click “Next” and follow the on-screen instructions. 1 2 4 Step 2 Plug the Card in an Available CardBus Slot of your Laptop 5 6 2.1 During the install process, you will be prompted to insert your Card. Insert the Card, label side UP, into your computer’s CardBus slot firmly until it stops. The power light on the top will turn on when it is inserted properly.
Installing and Setting up the Card Step 3 Let Windows Finish the Installation 3.1 Depending on the version of Windows you are using, you might see the “Found New Hardware Wizard” screen. Select “Install the software automatically (Recommended)” and click “Next”. 3.2 You might also see a screen similar to this one. This DOES NOT mean there is a problem. Select “Continue Anyway” and follow the on-screen instructions. 3.3 If you are using Windows 98SE or Me, you will be asked to restart your computer.
Installing and Setting up the Card 3.5 Select the network you want to connect to under “Available networks” and click “Connect”. 1 2 4 5 3.6 The Signal Indicator icon in your system tray should now turn green (yellow if the signal is weak.
Using the Belkin Wireless LAN Utility How to Access the Belkin Wireless LAN Utility Double-click the Signal Indicator icon to bring up the “Wireless Network” screen. The following screen will appear: Next, click on the “Advanced” button to enable the Belkin Wireless LAN Utility. This utility will allow you to view and configure the wireless settings of your card.
Using the Belkin Wireless LAN Utility 1 Setting Wireless Network Preferences Click on the “Wireless Networks” tab. 2 (a) 3 (c) (d) (i) 4 (j) 5 (e) (k) (f) (g) (h) (m) (l) 6 7 8 9 (a) Enable Radio Use this option to turn your wireless network radio ON or OFF. You may want to turn the radio off while in airplanes or to conserve the battery life of your mobile computer.
Using the Belkin Wireless LAN Utility name in the “Preferred Networks” list then clicking on the “Move Up” and “Move Down” (k) buttons. Networks appearing higher on the list will be preferred over networks listed lower on the list. If a preferred network is unavailable, the Card will attempt to connect to the next available network on the list. (e, f) Add, Remove You may “Add” (e) and “Remove” (f) networks from the Preferred Networks list by using these buttons.
Using the Belkin Wireless LAN Utility 1 2 3 Any Available Network (access point preferred) 5 When this option is selected, the Card will attempt to connect to any available network in the area. Access point networks will be preferred over ad-hoc networks.
Using the Belkin Wireless LAN Utility Securing your Wi-Fi® Network Here are a few different ways to maximize the security of your wireless network and protect your data from unwanted intrusion. This section is intended for the home, home office, and small office user. At the time of publication, three encryption methods are available.
Using the Belkin Wireless LAN Utility 128-Bit Encryption As a result of 64-bit WEP’s potential security weaknesses, a more secure method of 128-bit encryption was developed. 128-bit encryption includes a key length of 104 bits plus 24 additional bits of system-generated data (128 bits total). Some hardware manufacturers refer to 128-bit as 104-bit encryption. 2 3 4 5 Encryption Keys After selecting either the 64-bit WEP or 128-bit encryption mode, it is critical that you generate an encryption key.
Using the Belkin Wireless LAN Utility WPA (Wi-Fi Protected Access) WPA (Wi-Fi Protected Access) is a new Wi-Fi standard that improves upon the security features of WEP. To use WPA security, the drivers and software of your wireless equipment must be upgraded to support it. These updates will be found on your wireless vendor’s website. There are two types of WPA security: WPA-PSK (no server), and WPA (with radius server). WPA-PSK (no server) uses what is known as a pre-shared key as the network key.
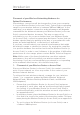
Using the Belkin Wireless LAN Utility The following diagram shows the effect of not having the correct network key throughout your network. 2 Network key= MyPassword 3 4 5 Network key= MyPassword Wireless G Router Wireless G Notebook Network Card 6 7 Network key= WRONG Password 8 Wireless G Desktop Network Card The Card cannot access the network because it uses a different network key than the one configured on the wireless router.
Using the Belkin Wireless LAN Utility WEP Setup 64-Bit WEP Encryption 1. Select “64-bit WEP” from the drop-down menu. 2. After selecting your WEP encryption mode, you can enter your key by typing in the hex key manually, or you can type in a passphrase in the “Passphrase” field and click “Generate” to create a key. A hex (hexadecimal) key is a mixture of numbers and letters from A–F and 0–9. For 64-bit WEP, you need to enter 10 hex keys. For instance: AF 0F 4B C3 D4 = 64-bit WEP Key 3.
Using the Belkin Wireless LAN Utility 1 128-Bit WEP Encryption Select “128-bit WEP” from the drop-down menu. 2. 2 After selecting your WEP encryption mode, you can enter your key manually by typing in the hex key manually, or you can type in a passphrase in the “Passphrase” field and click “Generate” to create a key. 3 A hex (hexadecimal) key is a mixture of numbers and letters from A–F and 0–9. For 128-bit WEP, you need to enter 26 hex keys.
Using the Belkin Wireless LAN Utility WPA-PSK (no server) Choose this setting if your network does not use a radius server. WPA-PSK (no server) is typically used in home and small office networking. 1. From the Security Mode drop-down menu, select “WPA-PSK (no server)”. 2. Enter your network key. This can be from 8 to 63 characters and can be letters, numbers, or symbols. This same key must be used on all of the clients (network cards) that you want to include in your wireless network. 3.
Using the Belkin Wireless LAN Utility WPA (with server) Settings 1 Choose this setting if your network uses a radius server to distribute keys to the clients (network cards). WPA (with server) is typically used in business networks. 2 From the Security Mode drop-down menu, select “WPA (with Radius Server)”. 3 2. Enter the IP address of the radius server into the “Radius Server” fields. 4 3. Enter the radius key into the “Radius Key” field. 4. Enter the key interval.
Using the Belkin Wireless LAN Utility Configuring your Belkin Wireless G Notebook and Wireless G Desktop Network Cards to Use Security At this point, you should already have your wireless router or access point set to use WPA or WEP. In order for you to gain wireless connection, you will need to set your Wireless G Notebook and Wireless G Desktop Network Cards to use the same security settings. Connecting your Computer to a Wireless Router or Access Point that requires a 64-Bit or 128-Bit WEP Key: 1.
Using the Belkin Wireless LAN Utility 5. Type your WEP key in the “Network key” box. 1 2 3 5 6 7 8 Important: A WEP key is a mixture of numbers and letters from A–F and 0–9. For 128-bit WEP, you need to enter 26 keys. For 64-bit WEP, you need to enter 10 keys. This network key needs to match the key you assign to your wireless router or access point. 6. Click “OK”, and then “Apply” to save the settings.
Using the Belkin Wireless LAN Utility Connecting your Computer to a Wireless Router or Access Point that uses WPA-PSK (no server) 1. Double-click the “Signal Indicator” icon to bring up the “Wireless Network Properties” screen. The “Advanced” button will allow you to view and configure more options of your Card. 2. Under the “Wireless Networks” tab, select a network name from the “Available networks” list and click “Configure”. The following screen will appear. 3.
Using the Belkin Wireless LAN Utility Connecting your Computer to a Wireless Router or Access Point that uses WPA (with Radius Server) 1 1. 2 Double-click the “Signal Indicator” icon to bring up the “Wireless Network Properties” screen. The “Advanced” button will allow you to view and configure more options of your Card. 3. 4. 5. 27 Under the “Wireless Networks” tab, select a network name from the “Available networks” list and click “Configure”. The screen to the left will appear.
Using the Belkin Wireless LAN Utility Monitoring the Status of your Network Connection Click on the “Link Status” tab. (a) (b) (c) (d) (e) (f) (g) (h) (i) (j) (a) Network Name (SSID) The SSID is the wireless network name. This field shows the current network name that you are connected to. (b) AP’s MAC Address Shows the MAC address of the wireless router or access point that you are connected to. (c) WEP Shows whether the network you are associated with has WEP encryption enabled or disabled.
Using the Belkin Wireless LAN Utility (f) Client IP Address Shows the IP address of the computer. The IP address is obtained automatically by default. You may set the IP address manually through Windows Networking Properties. (g) Network Connection Type (h) Radio State 2 3 4 5 Shows whether the radio of your wireless client is enabled or disabled. 6 (i) Signal 7 Displays the wireless signal strength in decibels (dBm).
Using the Belkin Wireless LAN Utility Monitoring Data Transfer Click on the “Statistics” tab. The Statistics tab shows you how much data has been sent and received and if any errors occurred. This screen is mostly for diagnostics. Note that the number of data packets lost is recorded. A large number of lost data packets may indicate that there is a problem or interference in your area. (See the Troubleshooting section for tips on how to improve performance.