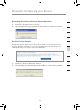
Manually Configuring your Router Connecting your Computer to a Wireless Network that Requires WPA (with radius server) 1. Double-click the “Signal Indicator” icon to bring up the “Wireless Network” screen. The “Advanced” button will allow you to view and configure more options of your wireless card. 2. Under the “Wireless Networks” tab, select a network name from the “Available networks” list and click “Configure”. 3. Under “Network Authentication” select WPA. 4.
Manually Configuring your Router Important: You also need to ensure that the wireless card manufacturer supports WPA and that you have downloaded and installed the latest driver from their support site. Supported Operating Systems: • Windows XP Professional • Windows XP Home Edition Setting Up Windows XP Wireless Network Utility to Use WPA-PSK In order to use WPA-PSK, ensure you are using Windows Wireless Network Utility by doing the following: 1.
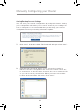
Manually Configuring your Router 4. Under the “Wireless Networks” tab, click the “Configure” button, and you will see the following screen. 1 2 3 4 5 6 5. For a home or small business user, select “WPA-PSK” under “Network Authentication”. Note: Select “WPA” if you are using this computer to connect to a corporate network that supports an authentication server such as a radius server. Please consult your network administrator for further information. 6. Select “TKIP” or “AES” under “Data Encryption”.
Manually Configuring your Router Firewall Your Router is equipped with a firewall that will protect your network from a wide array of common hacker attacks including: • IP Spoofing • Land Attack • Ping of Death (PoD) • Denial of Service (DoS) • IP with zero length • Smurf Attack • TCP Null Scan • SYN flood • UDP flooding • Tear Drop Attack • ICMP defect • RIP defect • Fragment flooding The firewall also masks common ports that are frequently used to attack networks.
Manually Configuring your Router 1 Virtual Servers Virtual servers allow you to route external (Internet) calls for services such as a web server (port 80), FTP server (Port 21), or other applications, through your Router to your internal network. Since your internal computers are protected by a firewall, machines from the Internet cannot get to them because they cannot be “seen”.
Manually Configuring your Router Client IP Filters The Router can be configured to restrict access to the Internet, email, or other network services at specific days and times. Restriction can be set for a single computer, a range of computers, or multiple computers. (1) (2) (3) (4) To restrict Internet access to a single computer for example, enter a name of the filter in “Filter Name” box (1) and IP address of the computer you wish to restrict access to in the IP field (2).
Manually Configuring your Router 1 DMZ (Demilitarized Zone) If you have a client PC that cannot run an Internet application properly from behind the firewall, you can open the client up to unrestricted two-way Internet access. This may be necessary if the NAT feature is causing problems with an application such as a game or video conferencing application. Use this feature on a temporary basis. The computer in the DMZ is not protected from hacker attacks.
Manually Configuring your Router Utilities The “Utilities” screen lets you manage different parameters of the Router and perform certain administrative functions. Restart Router Sometimes it may be necessary to restart or reboot the Router if it begins working improperly. Restarting or rebooting the Router will NOT delete any of your configuration settings.
Manually Configuring your Router Restarting the Router to Restore Normal Operation 1. Click the “Restart Router” button. 2. The following message will appear. Click “OK” to restart your Router. 1 2 3 4 5 Restore Factory Defaults 6 7 8 9 1. Click the “Restore Defaults” button. 2. The following message will appear. Click “OK” to restore factory defaults. 10 11 12 59 section Using this option will restore all of the settings in the Router to the factory (default) settings.
Manually Configuring your Router Saving/Backup Current Settings You can save your current configuration by using this feature. Saving your configuration will allow you to restore it later if your settings are lost or changed. It is recommended that you back up your current configuration before performing a firmware update. 1. Click “Save”. A window called “File Download” will open. Click “Save”. 2. A window will open that allows you to select the location in which to save the configuration file.
Manually Configuring your Router 3. When the save is complete, you will see the window below. Click “Close”. 1 2 3 4 5 The configuration is now saved. 6 This option will allow you to restore a previously saved configuration. 7 1. 8 Click “Browse”. A window will open that allows you to select the location of the configuration file. All configuration files end with a “.bin”. Locate the configuration file you want to restore and double-click on it. 9 10 11 12 2. Then, click “Open”.
Manually Configuring your Router Firmware Update From time to time, Belkin may release new versions of the Router’s firmware. Firmware updates contain feature improvements and fixes to problems that may have existed. When Belkin releases new firmware, you can download the firmware from the Belkin update website and update your Router’s firmware to the latest version. Updating the Router’s Firmware 1. In the “Firmware Update” page, click “Browse”.
Manually Configuring your Router 1 System Settings The “System Settings” page is where you can enter a new administrator password, set the time zone, enable remote management, and turn on and off the UPnP function of the Router. Setting or Changing the Administrator Password The Router ships with NO password entered. If you wish to add a password for greater security, you can set a password here.
Manually Configuring your Router Setting the Time and Time Zone The Router keeps time by connecting to a Simple Network Time Protocol (SNTP) server. This allows the Router to synchronize the system clock to the global Internet. The synchronized clock in the Router is used to record the security log and control client filtering. Select desired NTP time servers and the time zone that you reside in, then click “Apply Changes”. The system clock may not update immediately.
Manually Configuring your Router Click on the “Apply Changes” button to save your settings. 1 2 3 4 5 Enabling/Disabling UPnP Click on the “Change Setting” button to bring up the “UPnP Setting” page. Then select “On” for “Enable UPnP”. Click on the “Apply Changes” button to save your settings. 65 6 7 8 9 10 11 12 section UPnP (Universal Plug-and-Play) is yet another advanced feature offered by your Belkin Router.
Troubleshooting Problem: The ADSL LED is not on. Solution: 1. Check the connection between the Router and ADSL line. Make sure the cable from the ADSL line is connected to the port on the Router labeled “DSL Line”. 2. Make sure the Router has power. The Power LED on the front panel should be illuminated. Problem: The Internet LED is not on. Solution: 1. Make sure the cable from the ADSL line is connected to the port on the Router labeled “DSL Line” and the ADSL LED is on. 2.
Troubleshooting 1 Problem: My wireless PC cannot connect to the Router. Solution: 1. Make sure the wireless PC has the same SSID settings as the Router, and you have the same security settings on the clients such as WPA or WEP encryption. 2. Make sure the distance between the Router and wireless PC are not too far away. Problem: The wireless network is often interrupted. Solution: Move your wireless PC closer to the Router to find a better signal. 2.
Troubleshooting Does the name of your wireless network appear in the results? Yes, my network name is listed—go to the troubleshooting solution titled “I can’t connect to the Internet wirelessly, but my network name is listed”. No, my network name is not listed—go to the troubleshooting solution titled “I can’t connect to the Internet wirelessly, and my network name is not listed”. Problem: I can’t connect to the Internet wirelessly, but my network name is listed.
Troubleshooting correct network name now appears under “Available Networks”, you may have a range or interference problem. Please see the suggestions discussed in Appendix B entitled “Important Factors for Placement and Setup”. 2. Using a computer that is connected to the Router via a network 1 2 3 cable (as opposed to wirelessly), ensure that “Broadcast SSID” is enabled. This setting is found on the Router’s wireless “Channel and SSID” configuration page.
Troubleshooting Limiting the wireless transmit rate - Limiting the wireless transmit rate can help improve the maximum wireless range, and connection stability. Most wireless cards have the ability to limit the transmission rate. To change this property, go to the Windows Control Panel, open “Network Connections” and double-click on your wireless card’s connection.
Troubleshooting and 0-9. For 128-bit WEP, you need to enter 26 hex keys. For example: C3 03 0F AF 4B B2 C3 D4 4B C3 D4 E7 E4 = 128-bit key 6. Click “Apply Changes” to finish. Encryption in the Wireless Router is now set. Each of your computers on your wireless network will now need to be configured with the same security settings.
Troubleshooting 5. Under “Data Encryption” select “WEP”. 6. Ensure the check box “The key is provided for me automatically” at the bottom is unchecked. If you are using this computer to connect to a corporate network, please consult your network administrator if this box needs to be checked. 7. Type your WEP key in the “Network key” box. Important: A WEP key is a mixture of numbers and letters from A–F and 0–9. For 128-bit WEP, you need to enter 26 keys.
Troubleshooting 1 Problem: I am having difficulty setting up Wi-Fi Protected Access (WPA) security on a Belkin Wireless Router or Belkin Access Point for a home network. Solution: 1. From the “Security Mode” drop-down menu, select “WPA-PSK (no server)”. 2. For “Encryption Technique”, select “TKIP” or “AES”. This setting will have to be identical on the clients that you set up. 3. Enter your pre-shared key. This can be from eight to 63 characters and can be letters, numbers, or symbols or spaces.
Troubleshooting Problem: I am having difficulty setting up Wi-Fi Protected Access (WPA) security on a Belkin Wireless Card for a home network. Solution: Clients must use the same key that the wireless router or access point uses. For instance if the key is “Smith Family Network Key” in the wireless router or access point, the clients must also use that same key. 1. Double-click the “Signal Indicator” icon to bring up the “Wireless Network” screen.
Troubleshooting Utility will appear. This Utility will allow you to manage all the advanced features of the Belkin Wireless Card. 4. Under the “Wireless Network Properties” tab, select a network name from the “Available networks” list and click the “Properties” button. 5. Under “Network Authentication” select “WPA”. 6. In the “Authentication” tab, select the settings that are indicated by your network administrator. 7. Click “OK, then “Apply” to save the settings.
Troubleshooting 3. Under the “Wireless Networks” tab, click the “Configure” button, and you will see the following screen. 4. For a home or small business user, select “WPA-PSK” under “Network Administration”. Note: Select WPA (with radius server) if you are using this computer to connect to a corporate network that supports an authentication server such as a radius server. Please consult your network administrator for further information. 5. Select “TKIP” or “AES” under “Date Encryption”.
Troubleshooting 1 Common household devices such as cordless phones 5GHz and microwave uncrowded band ovens may interfere with the unlicensed band 2.4GHz 108Mbps Common household devices such as cordless phones and microwave ovens may interfere with the unlicensed band 2.4GHz 4 5 6 7 8 Compatibility 9 Compatible with 802.11g Depends on interference - typically 100–200 ft. indoors Less Depends on interference interference - range is - typically 100– typically 200 ft. indoors 50-100 ft.
Technical Support Information Technical Support For latest software updates or if you have any further questions regarding installation of this product, please visit www.belkin.com/networking or contact: US: 877-736-5771 or 310-898-1100 ext.
Appendixes 1 Appendix A: Glossary 2 IP Address The “IP address” is the internal IP address of the Router. To access the advanced setup interface, type this IP address into the address bar of your browser. This address can be changed if needed. To change the IP address, type in the new IP address and click “Apply Changes”. The IP address you choose should be a non-routable IP. Examples of a non-routable IP are: 192.168.x.x (where x is anything between 0 and 255) 10.x.x.
Appendixes 3. You have to double-click on a desktop icon other than your browser to get on the Internet. To set the Router to use PPPoE, type in your user name and password in the spaces provided. After you have typed in your information, click “Apply Changes”. After you apply the changes, the “Internet Status” indicator will read “connection OK” if your Router is set up properly. PPPoA Enter the PPPoA information in the provided spaces, and click “Next”. Click “Apply” to activate your settings. 1.
Appendixes 1 ESSID Broadcast Many wireless network adapters currently on the market possess a feature known as site survey. It scans the air for any available network and allows each computer to automatically select a network from the survey. This occurs if the computer’s SSID is set to “ANY”. Your Belkin Router can block this random search for a network.
Appendixes Client IP Filters The Router can be configured to restrict access to the Internet, email, or other network services at specific days and times. Restriction can be set for a single computer, a range of computers, or multiple computers. URL Blocking To configure the URL blocking feature, specify the websites (www. somesite.com) and/or keywords you want to filter on your network. Click “Apply Changes” to activate the change.
Appendixes NAT feature is causing problems with an application such as a game or video conferencing application. Use this feature on a temporary basis. The computer in the DMZ is not protected from hacker attacks. To put a computer in the DMZ, enter the last digits of its LAN IP address in the “Static IP” field and click “Apply Changes” for the change to take effect. If you have only one public (WAN) IP address, then you can leave the public IP to “0.0.0.0”.
Appendixes immediately. Allow at least 15 minutes for the Router to contact the time servers on the Internet and get a response. You cannot set the clock yourself. Remote Management Before you enable this function, MAKE SURE YOU HAVE SET THE ADMINISTRATOR PASSWORD. Remote management allows you to make changes to your Router’s settings from anywhere on the Internet.
Appendixes Appendix B: Important Factors for Placement and Setup Note: While some of the items listed below can affect network performance, they will not prohibit your wireless network from functioning; if you are concerned that your network is not operating at its maximum effectiveness, this checklist may help. 1.
Appendixes If your wireless signal seems weak in some spots, make sure that objects such as these are not blocking the signal’s path (between your computers and Wireless Router or access point). 3. Cordless Phones If the performance of your wireless network is impaired after attending to the above issues, and you have a cordless phone: • Try moving cordless phones away from Wireless Routers (or access points) and your wireless-enabled computers.
Appendixes These guidelines should allow you to cover the maximum possible area with your Wireless Router (or access point). Should you need to cover an even wider area, we suggest the Belkin Wireless Range Extender/Access Point. 5. Secure Connections, VPNs, and AOL 1 2 3 Secure connections typically require a user name and password, and are used where security is important.
Appendixes Country Connection Protocol VPI/VCI Encapsulation ISPs France PPPoE 8/35 LLC Various Germany PPPoE 1/32 LLC T-Online, various Holland 1483 Bridged 0/35 0/32 0/34 LLC LLC LLC BBNed, XS4all Versatel DHCP Baby XL, Tiscali (start/ Surf/ Family/ Live) PPPoA 8/48 VC MUX KPN, Hetnet, HCCNet, Tiscali (lite/ Basis/Plus) Wanadoo PPPoA 0/32 VC MUX Versatel PPP, Zonnet PPPoE 8/35 LLC Various Belgium PPPoA 8/35 LLC Belgacom, Tiscali, Scarlet Italy PPPoE or PPPoA 8/35 VC
Information FCC Caution: Any changes or modifications not expressly approved by the party responsible for compliance could void the user's authority to operate this equipment. This transmitter must not be co-located or operating in conjunction with any other antenna or transmitter.
Information • • • • Reorient or relocate the receiving antenna. Increase the distance between the equipment and the receiver. Connect the equipment to an outlet on a circuit different from that to which the receiver is connected. Consult the dealer or an experienced radio/TV technician for help.
Information Belkin Corporation Limited Lifetime Product Warranty Belkin Corporation warrants this product against defects in materials and workmanship for its lifetime. If a defect is discovered, Belkin will, at its option, repair or replace the product at no charge provided it is returned during the warranty period, with transportation charges prepaid, to the authorized Belkin dealer from whom you purchased the product. Proof of purchase may be required.
ADSL Modem with High-Speed Mode Wireless G Router Designed to Meet ADSL2+ Specification Belkin Ltd. Express Business Park, Shipton Way Rushden, NN10 6GL, United Kingdom Tel: +44 (0) 1933 35 2000 Fax: +44 (0) 1933 31 2000 Belkin GmbH Hanebergstrasse 2 80637 Munich, Germany Tel: +49 (0) 89 143405 0 Fax: +49 (0) 89 143405 100 Belkin B.V.