Belkin Corporation 501 West Walnut Street Compton • CA • 90220 • USA Tel: 310.898.1100 Fax: 310.898.1111 Belkin Components, Ltd. Express Business Park • Shipton Way • Rushden NN10 6GL • United Kingdom Tel: +44 (0) 1933 35 2000 Fax: +44 (0) 1933 31 2000 Belkin Components B.V. Starparc Building • Boeing Avenue 333 1119 PH Schiphol-Rijk • The Netherlands Tel: +31 (0) 20 654 7300 Fax: +31 (0) 20 654 7349 Belkin, Ltd.
-Port KVM Switch with Built-In Cabling Control two computers using one video monitor, and a PS/2 keyboard and mouse User Manual F1DK102P
TABLE OF CONTENTS Introduction Package Contents . . . . . . . . . . . . . . . . . . . . . . . . . . . . . . . . . . . . . .1 Overview Feature Overview . . Operating Systems . Unit Display Diagram Specifications . . . . . . . . . . . . . . . . . . . . . . . . . . . . . . . . . . . . . . . . . . . . . . . . . . . . . . . . . . . . . . . . . . . . . . . . . . . . . . . . . . . . . . . . . . . . . . . . . . . . . . . . . . . . . . . . . . . . . . . . . . . . . . . . . . . . . .
INTRODUCTION Congratulations on your purchase of this Belkin 2-Port KVM Switch with Built-In Cabling (the Switch). The diverse line of market-leading KVM solutions from Belkin exemplifies our commitment to delivering high-quality, durable products at a competitive price. Engineered to give you control over multiple computers and/or servers from one console, Belkin KVM switches come in a variety of capacities suitable for all configurations, large or small.
OVERVIEW The Belkin 2-Port KVM Switch with Built-In Cabling allows you to control multiple computers with one keyboard, monitor, and mouse. The Switch supports PS/2 input devices (keyboard and mouse), VGA, SVGA, XGA, and PS/2 computers. Feature Overview Complete Compact Solution Built-in cables and color-coded connectors make operation and organization easy. Hot Keys Hot keys allow you to select ports using designated key commands.
OVERVIEW Operating Systems Your Switch is for use on CPUs using: Platforms • Windows® 95, 98, 2000, Me, NT®, XP • DOS • Linux® • Novell® NetWare® 4.x/5.
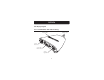
OVERVIEW Unit Display Diagram The 2-Port KVM Switch with Built-In Cabling: Port Status Indicator LEDs Built-In Cables Console Mouse Port Console VGA Monitor Ports Console Keyboard Port 4
OVERVIEW Specifications Part No.: F1DK102P PCs Supported: 2 Keyboard Emulation: PS/2 Mouse Emulation: PS/2 Monitors Supported: VGA, SVGA, MultiSync, and LCD (with use of adapter cable) Max. Resolution: 2048x1536@65Hz Keyboard Input: 6-pin miniDIN (PS/2) Mouse Input: 6-pin miniDIN (PS/2) VGA Port: 15-pin HDDB type LED Indicators: 2 Enclosure: Plastic Dimensions: (H) 27.5 x (W) 82 x (D) 81.25mm Weight: 1.3 lbs.
INSTALLATION Pre-Configuration Where to Place the Switch The Switch is designed for positioning on the desktop. The exact placement will be based on the location of your CPUs and length of your cables. Cable Distance Requirements For PS/2 computers: VGA signals are best retained when transmitted up to eight feet. Beyond eight feet, probability of video degradation increases with an increase in distance. For this reason, your PS/2 computer should be placed within eight feet of the KVM Switch.
INSTALLATION Step-by-Step Installation Guide This section provides complete instructions for the hardware setup of a single Switch. Important Note Before attempting to connect anything to the Switch or to any computer, make sure that everything is powered off. Plugging and unplugging cables while computers are powered on can cause irreversible damage to your computers, data, and/or to the Switch. Belkin Corporation will not be responsible for damage caused in this way. Connecting the Console 1.
INSTALLATION Connecting the Computer 1. Using the attached cables, take the VGA cable and connect it to the VGA port on the first computer. 2. Connect the PS/2 keyboard KVM cable to the keyboard port on the computer. 3. Connect the PS/2 mouse KVM cable to the mouse port on the computer. Repeat Steps 1 through 3 for the additional computer to be connected to the Switch.
USING YOUR SWITCH Powering Up the Systems Once all cables have been connected, power up your CPUs that are attached to the Switch. All computers can be powered on simultaneously. The Switch emulates a mouse and keyboard on each port and will allow your computer to boot normally. Your Switch should now be ready for use. You can select which computer to operate through hot key commands. Note that it will take 1-2 seconds for the video to display after switching. This is due to the refresh of the video signal.
USING YOUR SWITCH You can switch directly to any port by entering the Switch port number you wish to use. For example, if you press “SCROLL LOCK”, “SCROLL LOCK”, “2”, the computer on port 2 will be selected. + + Switch to Port 2—(2) AutoScan Mode In AutoScan mode, the Switch remains on one port for eight seconds before switching to the next. This time interval cannot be changed. To enable AutoScan mode, press “SCROLL LOCK”, “SCROLL LOCK”, “S”.
FAQs Q: What operating system does the Switch support? A: The Switch will support any operating system that runs on a PS/2 platform. It will also work with Sun and Mac operating systems using the appropriate adapters (Belkin OmniView Sun Adapter F1D082, OmniView Mac Adapter F1D080). Operating systems include, but are not limited to, DOS, Windows 95, 98, 2000, Me, NT, XP, Linux, and Novell NetWare 4.x/5.x.
FAQs Q: What is the maximum video resolution the Switch supports? A: The advanced video circuit in the Switch supports a maximum resolution of 2048x1536@65Hz. This higher resolution support is ideal for graphic artists and designers who depend on high-quality video.
FAQs Q: Do I have to install any software to use the Switch? A: No, the Switch does not require any drivers or software to be installed on your computers. Simply connect all your computers to the PC ports on the Switch, then attach one monitor, mouse, and keyboard to the corresponding console ports and your Switch is ready for use. Q: Does the Switch require an AC adapter? A: No, the Switch is powered by the PS/2 ports of your computer.
TROUBLESHOOTING Video I am getting ghosting, shadowing, or fuzzy images on my monitor. • Check that all video cables are inserted properly. • Check that the monitor you are using supports the resolution and refresh-rate setting on your computer. • Check that the graphics card you are using supports the resolution and refresh-rate setting on your computer. • Connect the monitor directly into the computer you are having trouble with to see if the problem still appears.
TROUBLESHOOTING • If you are using the keyboard software that was included with your keyboard, uninstall it and install the standard Microsoft keyboard driver. Mouse Mouse is lost when I switch to a different channel. • Check that the mouse you are using is connected properly to the console port of the Switch. • If you are using a mouse driver that was included with your mouse, uninstall it and install the standard Microsoft mouse driver.
TROUBLESHOOTING • Make sure the mouse works when directly plugged into the computer. Rebooting may be necessary when trying this. • Try a different mouse. When I switch from one port to another, mouse movement is completely erratic. • Make sure you do not have more than one mouse driver installed. Make sure that the driver is either for a standard PS/2 mouse or a Microsoft compatible PS/2 mouse. • Make sure you do not have any mouse drivers loaded in your CONFIG.SYS or AUTOEXEC.BAT files.
INFORMATION FCC Statement DECLARATION OF CONFORMITY WITH FCC RULES FOR ELECTROMAGNETIC COMPATIBILITY We, Belkin Corporation, of 501 West Walnut Street, Compton, CA 90220, declare under our sole responsibility that the product: F1DK102P to which this declaration relates: Complies with Part 15 of the FCC Rules.
INFORMATION Belkin Corporation Limited Three-Year Product Warranty Belkin Corporation warrants this product against defects in materials and workmanship for its warranty period. If a defect is discovered, Belkin will, at its option, repair or replace the product at no charge provided it is returned during the warranty period, with transportation charges prepaid, to the authorized Belkin dealer from whom you purchased the product. Proof of purchase may be required.