RazorVision™ Video Enhancement Cable User Manual This User Manual is for the following RazorVision models: AV62300-08, AV62300-16 AV62400-08, AV62400-16 AV61400-08, AV61400-16
Table of Contents Page RazorVision™ Video Enhancement Cable Introduction ........................................................................... 2 Package Contents ............................................................. 3 Care and Maintenance ...................................................... 4 RazorVision Features ................................................... 5-6 Directions for Setup and Use ......................................7-8 Important Notes on Operation .......................
Introduction The PureAV RazorVision Cable processes the video signal coming from your source device and selectively enhances contrast and other picture elements to provide more depth to the images on your screen. Unlike the contrast control on your TV, which adjusts every pixel on your screen equally, regardless of what the image is, RazorVision uses proprietary hardware and software to analyze the image and intelligently apply change.
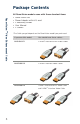
Package Contents All RazorVision models come with these standard items: RazorVision™ Video Enhancement Cable • • • • • RazorVision Unit Power Adapter with 6 ft. cord 2 Mounting Screws User Manual 2 Cables* *The Cable you get depends on the RazorVision model you purchased: If you own this model: You should have these cables...
Care and Maintenance • Do not let the unit get wet. • Clean with soft, dry cloth only. • Do not use cleaning agents, as they may damage the finish. • Use only the supplied power adapter; use of other power adapters may void warranty. • For optimal performance, use only PureAV HDMI and/or DVI Cables to connect the RazorVision to your video equipment. • Do not attempt to disassemble the RazorVision unit yourself; there are no user-serviceable parts inside the unit.
RazorVision Features RazorVision™ Video Enhancement Cable 1. Status Indicator Button a. Allows you to step through these 3 settings, each time you press the button: i. Split (display screen)—left side shows no enhancement, right side shows RazorVision enhancement ii. On—whole picture is RazorVision enhanced iii. Off—RazorVision enhancement off 2. Level Indicator Button a. Allows you to step through 3 levels of RazorVision enhancement—low, medium, and high—each time you press the button 2 1 4 3 5 3.
RazorVision Features (continued) 5 2 1 3 4 1. 24k Gold-Plated Connectors create precise contact for low loss 2. Precision-Formulated, Polyethylene Dielectric Material maintains stronger signals that yield superior video accuracy 3. Silver-Plated Conductors deliver best high-frequency response for optimal resolution 4. 99.
�������������� ������������� Directions for Setup and Use ��������������� ������������ ������������� �������������� RazorVision™ Video Enhancement Cable Here are the illustrations for connecting RazorVision by model number: ��������������� ������������ AV61400-08 and AV61400-16 ������������� ������������� ��������������� ������������ �������������� AV62300-08 and AV62300-16 �������������� �������������� �������������� �������������� �������������� ������������ ��������������� �����������
Directions for Setup and Use 4. Plug in the RazorVision AC adapter to a wall outlet or power console. Insert the DC plug into the DC receptacle on the side of the RazorVision. 5. The lights on both sides of the RazorVision will flash for a few seconds to indicate it is connecting with the video equipment. When the lights on both sides stop blinking and remain continuously on, the RazorVision is ready. 6. Some TVs will auto-detect the correct display source and you will see a picture.
Important Notes on Operation RazorVision™ Video Enhancement Cable • For the best effect, use RazorVision processing with HDTV, or with source material (such as a DVD) that has been up-converted to either 720p or 1080i. Your TV display should indicate the resolution you are watching when the source connection is first made. You can also check this in your TV’s video display settings. Consult your TV manufacturer’s user manual on how to do this.
Troubleshooting Guide Solution Status light is continuously on but the Level light blinks continuously for more than 15 seconds. This indicates that no display has been detected. 1. Check the connection between the RazorVision unit and the TV. 2. Make sure your TV is powered on. Level light is continuously on but the Status light blinks continuously for about 15 seconds; then, the lights on the RazorVision turn off. This indicates that no source input was detected.
Troubleshooting Guide (continued) RazorVision™ Video Enhancement Cable Symptom Solution I get a picture but no sound. 1. If you are using DVI connections on either your TV or your source device, then you must use separate audio cables. 2. If you are using HDMI connections on both your TV and source device, check the menu settings on your source and/or display to adjust audio for HDMI. TV and source device are both on but RazorVision is off. 1. Check power connection to RazorVision. 2.
Instructions for Mounting RazorVision Unit 1. Cut out the template on the following page along the perforated lines. 2. Place the page where you want to install the RazorVision. 3. Use a hammer and a small nail to make a starter hole for the screws. 4. Remove the template page from your cabinet or wall. 5. Tighten the supplied screws into your cabinet or wall, stopping approximately 1/8 inch (3mm) short of fully tightened. 6.
Cut along the perforated lines.
FCC Statement DECLARATION OF CONFORMITY WITH FCC RULES FOR ELECTROMAGNETIC COMPATIBILITY Belkin Corporation Limited Lifetime Product Warranty Belkin Corporation warrants this product against defects in materials and workmanship for its lifetime. If a defect is discovered, Belkin will, at its option, repair or replace the product at no charge provided it is returned during the warranty period, with transportation charges prepaid, to the authorized Belkin dealer from whom you purchased the product.
Belkin Corporation Limited Lifetime Product Warranty RazorVision™ Video Enhancement Cable 15 (continued) BELKIN IS NOT RESPONSIBLE FOR SPECIAL, INCIDENTAL, OR CONSEQUENTIAL DAMAGES RESULTING FROM ANY BREACH OF WARRANTY, OR UNDER ANY OTHER LEGAL THEORY, INCLUDING BUT NOT LIMITED TO LOST PROFITS, DOWNTIME, GOODWILL, DAMAGE TO OR REPROGRAMMING, OR REPRODUCING ANY PROGRAM OR DATA STORED IN OR USED WITH BELKIN PRODUCTS.
www.pureav.com Belkin Tech Support US: 800-223-5546 ext. 2263 310-898-1100 ext. 2263 Belkin Corporation 501 West Walnut Street Compton, CA 90220-5221, USA 310-898-1100 310-898-1111 fax Belkin Ltd. Express Business Park, Shipton Way Rushden, NN10 6GL, United Kingdom +44 (0) 1933 35 2000 +44 (0) 1933 31 2000 fax Belkin Ltd. 7 Bowen Crescent, West Gosford NSW 2250, Australia +61 (0) 2 4372 8600 +61 (0) 2 4372 8603 fax Belkin B.V.