Windows NT/2k/XP Before you install the Belkin Bitronics software, you must first make sure that each device works properly on its own with each computer. 1. Check your BIOS and make sure that the printer port on your computers is set to ECP mode. Note: Please consult your computers manufacture’s manual, tech support, or website for information on how to set your printer port to ECP mode. 2. Log in as Administrator 3.
Bitronics Switch Kit User Manual READ THIS MANUAL IN ITS ENTIRETY BEFORE ATTEMPTING TO CONNECT DEVICES, THE BITRONICS SWITCH, OR INSTALLING THE SOFTWARE. IMPROPER SETTINGS OR CONFIGURATIONS CAN CAUSE DATA CORRUPTION When connected online you can click on any Belkin logo like this one to be connected directly to Belkin’s internet information site.
I. Introduction Thank you for purchasing the Belkin Components Bitronics Auto Switch Kit! Now, you and your colleagues can share between one parallel device from your desktop. Plus, if you are using Windows 95 or 98, you will take advantage of Virtual Port Software, which allows you to print automatically! The Bitronics Auto Switch gives you the ability to auto switch between two printers at any time. Also, it allows you to switch so that you can use either device through the switching software. II.
IV.
Two Computers Sharing One Parallal Device: Click here for information about this cable Then type Cable model number: F2A046 Click here for information about these cables Then type Cable model number: F2A047 or F3D111 4
V. Details Please take note of the dip switch settings on the bottom of the autoswitch. F1U126 Dip Switch 1 ON (down) 1 to 4 mode OFF (up) 4 to 1 mode SW2 ON ON OFF OFF SW3 ON OFF ON OFF Time Out Setting 5 seconds 10 seconds 20 seconds 40 seconds F1U125 Dip Switch 1 ON (up) 1 to 2 OFF (down) 2 to 1 VI. Software Installation 1.a. Download the file BITRONICS.exe from Belkin’s download page on the web site. Click on in order to download this file.
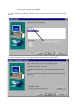
1.b. You can either download it onto your hard drive( usually C:\). 1.c. Or download it onto a blank floppy disk( usually A:\ ). 2. Put the disk into your floppy drive. Click on START, then RUN. Enter A:\BITRONIX.exe, substitute C: for A: if it is on your hard drive, then click OK 3. You will see the following window. Click SETUP. 4.
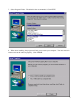
quickly and smoothly. Click NEXT. 5. Select the model of Bitronics Switch you have, which is the F1U125 or F1U126. Click NEXT 6. Select destination folder. The default folder is recommended. Click NEXT.
7. Select Program Folder. The default is the recommended. Click NEXT. 8. When done installing, the program will ask you to restart your computer. You must restart in order to activate the software properly. Click FINISH.
9. Once your computer has rebooted, the Bitronics icon will appear in your system tray. 10. Double-click on the icon to open up the setup program: 11. Click on SETTINGS.
12. If one or both of the devices being shared is a printer, you must follow the procedure below to reconfigure the port connected to the printer. If both devices are printers, then this must be done for both printers. 12.a. Click on START, SETTINGS, PRINTERS. 12.b.
13. Click on the DETAILS tab. In the pull-down menu “Print to the following port:”, select the correct port this printer is connected to on the Bitronics switch: • LPx1 – PA (auto switch) ! Select this if the printer is connected to Port A of the Bitronics switch • LPx1 – PB (auto switch) ! Select this if the printer is connected to Port B of the Bitronics switch In the image below, the printer is connected to Port B of the Bitronics switch. Therefore, LPx1 – PB (auto switch) is selected.
14. Click on SPOOL SETTINGS and click on “Start printing after last page is spooled”. 15. If NOT grayed out, click on “Disable bi-directional support for this printer”. Otherwise, ignore. 16. Click OK in the Spool Settings window, and OK again in the main properties window. VII.
Then if you wish to print to the second printer, let’s say a LaserJet for example, all you have to do is select that particular printer in the PRINT dialog box. Click OK, and the print job is automatically sent to the LaserJet printer on Port A of the Bitronics switch.
Zip drive is connected to Port A, and that the device type is MASS STORAGE DEVICE. Type anything you want in Display Name. Click OK when done. 2. Click on the port that has the mass storage device connected. In this case, it is a Zip drive on Port A. As you can see, the Display Name entered above appears below as you had entered it. Click OK. Now what happens is that the Bitronics switch always keeps your computer connected to the Zip drive.
device is connected. For example, we have a scanner and a printer on the Bitronics switch: You will be connected to the scanner device indefinitely. But lets say you wish to print to the Ink Jet printer, the software will again automatically switch to the port that has the printer and send the print job. However, the switch will remain connected to the printer - it will not change back to the Scanner, unlike the mass storage device mentioned previously.
switch act as if it was a file transfer cable. You can now run programs such as Windows Direct Cable Connection, or Laplink. Please refer to their user manuals or websites for information on how to configure their software. Just remember that your Bitronics switch setup mimics the file transfer cable requirement.
Belkin Components Limited Lifetime Warranty Belkin Components warrants this product against defects in materials and workmanship for its lifetime. If a defect is discovered, Belkin will, at its option, repair or replace the product at no charge provided it is returned during the warranty period, with transportation charges prepaid, to the authorized Belkin dealer from whom you purchased the product. Proof of purchase may be required.