The OmniView™ SE 4-Port User Manual P72464 F1D104
Introduction Thank you for purchasing the Belkin Components OmniView ™ SE KVM switch. Controlling multiple PCs from one keyboard, mouse and monitor has never been easier! The OmniView ™ SE puts you in control. Compatible with AT and PS-2 style computers, it is loaded with features such as Integrated Mouse Conversion Technology, separate DB25 daisy-chain ports, and an optional 19"(48.3cm) rackmount kit.
Technical Specifications Console Connectors: Keyboard: Mouse: Monitor: 6 pin Mini DIN female 6 pin Mini DIN female (for PS/2 mouse) DB9 male (for spare serial mouse) HDDB15 female Computer Port Connectors: Keyboard: Mouse: Monitor: 6 pin Mini DIN female 6 pin Mini DIN female (for PS/2 mouse) DB9 male (for serial mouse) HDDB15 male Dimensions: Width: Height: Depth: 9.5" (237 mm) 2.3" (58 mm) 6.0" (153 mm) Weight: Operating Temp: Storage Temp: Humidity: 2.5 lbs (1.1 kg) 32 to 104 deg. F (0~40 deg.
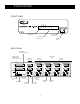
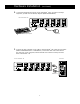
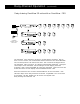
Product Detail FRONT PANEL Current Active Port LED Indicators Bank Select / Scan Button Current Active Bank LED Indicators Port Select Button REAR PANEL SLAVE INPUT DB25 Daisy-chain port MASTER INPUT SLAVE OUTPUT DB25 Daisy-chain port DC power jack PC PORT connectors CONSOLE connectors VGA monitor connector Optional serial mouse connector Keyboard output DIP switches Keyboard connector Serial mouse output PS/2 mouse connector 3 PS/2 mouse output VGA signal output
Cabling Detail Make sure you have the right cables! The OmniView ™ SE requires cables to connect the eight computers you will be controlling. Below are the Belkin part numbers and their descriptions. We recommend purchasing Cable Kits based on the type of mouse port your computer uses.
Hardware Installation PLEASE FOLLOW THIS INSTALLATION PROCEDURE EXACTLY. NOT DOING SO MAY RESULT IN KEYBOARD AND/OR MOUSE ERRORS, OR FAULTY OPERATION. WARNING: Before attempting to connect anything to the OmniView™ SE or the computers, make sure everything is powered off. Plugging and unplugging cables may cause irreversible damage to your computers and the OmniView™ SE. Belkin Components will not be held responsible for damage caused. 1. Set the DIP switches.
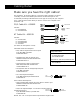
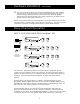
Hardware Installation (continued) 4. Connect the keyboard and mouse to the OmniView SE. If you have an AT-style keyboard, you will need an AT-PS/2 adapter (Belkin Part# F2N017). ™ Back of OmniView ™ SE PS/2 Style Keyboard PS/2 Mouse 5. Connect the first computer's VGA cable to the OmniView SE. Using the VGA cable (Belkin Part# F2N025-XX-T or A3H981-XX), connect the male end of the cable to the VGA port on the computer, and the female end on the PC1 VGA port at the back of OmniView ™ SE.
Hardware Installation (continued) 6. Connect the first computer's mouse cable to the OmniView SE. If using a PS/2 cable (Belkin Part# F2N036-XX), connect one end to the PS/2 mouse port on the computer, and the other end to the PC1 PS/2 mouse port on the back of the OmniView ™ SE. If using a serial mouse cable (Belkin Part# F2N209-XX-T), connect one end to a DB9 serial port on the computer, and the other end to the PC1 DB9 serial mouse port on the back of the OmniView ™ SE.
Hardware Installation (continued) 11. You can now power up all of your computers simultaneously. The first computer will show up on the monitor. Check to see if the keyboard and mouse work, as well as the image displayed on the screen. If this is okay, press the SELECT button and check the functionality of the other computers. If you find any errors, double-check all of the cable connections.
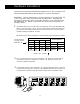
Daisy-Chained Operation (continued) Daisy-chaining OmniView SE units with an OmniView ™ PRO ™ Bank 0 (Master) Bank 1 (slave) 1 2 3 4 9 10 11 12 13 14 15 16 17 18 5 6 CONSOLE Keyboard, mouse and monitor Bank 2 (slave) Bank 3 (slave) The OmniView ™ SE is designed to be able to cascade with the OmniView ™ PRO as well. In such a scenario, it is recommended that the OmniView ™ PRO be the MASTER unit, and the OmniView ™ SE units be slave units. This is shown in the diagram above.
Daisy-Chained Operation (continued) Adding Slave Units This assumes you already have a MASTER unit (or MASTER and slave units) set-up and working properly. Below is the procedure of daisy-chaining a new slave unit. • Set the DIP switches of the slave unit to a unique slave BANK setting. • Connect the computers using the same procedure outlined in steps 5 to 9 in the previous section. DO NOT POWER UP THE COMPUTERS YET.
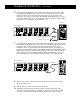
Daisy-Chained Operation (continued) Daisy-Chaining the OmniView ™ SE: MASTER (Bank 0) Cable 1 slave (Bank 1) Cable 2 slave (Bank 2) Cable 3 slave (Bank 3) 11
Usage Selecting which computer to operate can be done either by the SELECT button, or through keyboard “Hot” key commands. You will notice that after the OmniView ™ SE switches to another computer, the mouse will be inoperative for about 1-2 seconds. This is normal operation and ensures that proper mouse synchronization is established. The SELECT Button: Pressing the SELECT button cycles you through all the ports, including inactive ports.
Usage (continued) You can switch directly to any port by giving the OmniView ™ SE the BANK and PORT numbers. For instance, if you press [SCROLL LOCK] [SCROLL LOCK] [2] [2], the computer on PORT 2 of the OmniView ™ SE set to BANK 2 will be selected. In the diagram below, that is PC # 8. Hence, if you only have one OmniView ™ SE, the first key (X) must be "0".
Troubleshooting General Problems: Q: When cascading, the MASTER unit does not see the slave unit(s). A: • Refer to the Hardware Installation section for information on how to properly connect the daisy-chain cable. • Make sure that the daisy-chain cable that you are using is the F1D108-CBL. Using any other cable will not guarantee proper operation or video quality. • RESET the MASTER OmniView ™ SE (or OmniView ™ PRO), whichever the case may be.
Troubleshooting (continued) Q: The computers boot up fine, but the mouse does not work. A: • Check the cables and make sure they are inserted properly in the correct ports. • Make sure the mouse works when directly plugged into the computer. Rebooting is necessary when trying this. If the mouse pointer still does not move, then either your PS/2 mouse port or the mouse itself has a problem. • Try a different mouse. • Make sure the mouse is a true PS/2 mouse.
Troubleshooting (continued) work just as long as it is set for PS/2 mode with the correct adapter. A serialonly mouse with a combo mouse adapter WILL NOT work. • Check to make sure that the power adapter is plugged in and is working properly. It must be 9VDC, 600mA minimum. Make sure the power switch is on. • RESET the OmniView ™ SE by simultaneously pressing the BANK/SCAN and CHANNEL buttons on the front panel. Q: When I switch from one port to another, mouse movement is completely erratic.
Information Contacting Belkin Components Corporate Headquarters 501 West Walnut Street Compton • CA • 90220 Phone 310.898.1100 800.223.5546 Fax 310.898.1111 Belkin Components, Ltd. Clarke Road Mount Farm • Bletchley Milton Keynes • MK1 1LG United Kingdom Phone +44 (0) 1908367178 Fax +44 (0) 1908366564 www.belkin.com FCC Statement This equipment has been tested and found to comply with the limits for a Class B digital device, pursuant to part 15 of the FCC Rules.