P73055/F1D108-OSD/EU/man.
P73055/F1D108-OSD/EU/man.
P73055/F1D108-OSD/EU/man.qxd 4/21/00 2:25 PM Page 3 Table of Contents English . . . . . . . . . . . . . . . . . . . . . . . . . . . . . . . . . . . . . . . . . . . . . . 1 En Français (Europe) . . . . . . . . . . . . . . . . . . . . . . . . . . . . . . . . . . . . 19 Fr Deutsch . . . . . . . . . . . . . . . . . . . . . . . . . . . . . . . . . . . . . . . . . . . . 38 De Nederlands Ne . . . . . . . . . . . . . . . . . . . . . . . . . . . . . . . . . . . . . . . . . 59 Italiano . . . . . . . . .
P73055/F1D108-OSD/EU/man.
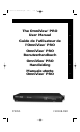
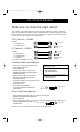
P73055/F1D108-OSD/EU/man.qxd 4/21/00 2:25 PM Page 1 Introduction Thank you for purchasing the Belkin Components OmniView™ PRO KVM switch. Controlling 8 PCs from one keyboard, mouse and monitor has never been easier! The OmniView™ PRO gives you the ultimate in control. Compatible with AT and PS/2 style computers, it is loaded with features such as On-Screen Display, Integrated Mouse Conversion Technology and separate DB25 daisy-chain ports.
P73055/F1D108-OSD/EU/man.qxd 4/21/00 2:25 PM Page 2 Technical Specifications Console Connectors: Keyboard: Mouse: Monitor: 6 pin MiniDIN 6 pin MiniDIN (for PS/2 mouse) DB9 male (for spare serial mouse) HDDB15 female Computer Port Connectors: Keyboard: 6 pin MiniDIN Mouse: 6 pin MiniDIN (for PS/2 mouse) DB9 male (for serial mouse) Monitor: HDDB15 male Dimensions: Width: Height: Depth: 444.5 mm 63.5 mm 165.1 mm Weight: Operating Temp: Storage Temp: Humidity: 2.7 kg 0~40 deg. C -20 ~ 60 deg.
P73055/F1D108-OSD/EU/man.
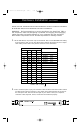
P73055/F1D108-OSD/EU/man.qxd 4/21/00 2:25 PM Page 4 List of Parts Needed Make sure you have the right cables! The OmniView ™ SE requires cables to connect the eight computers you will be controlling. Below are the Belkin part numbers and their descriptions. We recommend purchasing Cable Kits based on the type of mouse port your computer uses.
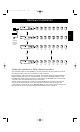
P73055/F1D108-OSD/EU/man.qxd 4/21/00 2:25 PM Page 5 Hardware Installation Bank 0 (Master) 1 2 3 4 5 6 7 8 En Bank 1 (slave) 9 10 11 12 13 14 15 16 17 18 19 20 21 22 23 24 125 126 127 128 CONSOLE Keyboard, mouse and monitor Bank 2 (slave) etc... Bank F (slave) etc...
P73055/F1D108-OSD/EU/man.qxd 4/21/00 2:25 PM Page 6 Hardware Installation (continued) PLEASE FOLLOW THIS INSTALLATION PROCEDURE EXACTLY. NOT DOING SO MAY RESULT IN KEYBOARD AND/OR MOUSE ERRORS, OR FAULTY OPERATION. WARNING: Before attempting to connect anything to the OmniView™ PRO or the computers, make sure everything is powered off. Plugging and unplugging cables may cause irreversible damage to your computers and the OmniView™ PRO. Belkin Components will not be held responsible for damage caused.
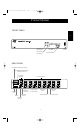
P73055/F1D108-OSD/EU/man.qxd 4/21/00 2:25 PM Page 7 Hardware Installation 3. (continued) Connect the monitor to the OmniView™ PRO. Using the attached cable, or the one included with your monitor, connect it to the HDDB15 female port on the back of the OmniView™ PRO labeled with the monitor symbol at the CONSOLE section. Back of OmniView™ PRO En 4. Connect the keyboard and mouse to the OmniView ™ PRO. If you have an AT-style keyboard, you will need an AT-PS/2 adapter (Belkin Part# F2N017).
P73055/F1D108-OSD/EU/man.qxd 4/21/00 2:25 PM Page 8 Hardware Installation 6. (continued) Connect the first computer's mouse cable to the OmniView™ PRO. If using a PS/2 cable (Belkin Part# F2N036-XX), connect one end to the PS/2 mouse port on the computer, and the other end to the PC1 PS/2 mouse port on the back of the OmniView™.
P73055/F1D108-OSD/EU/man.qxd 4/21/00 2:25 PM Page 9 Hardware Installation (continued) NOTE: Avoid pressing any keys on the keyboard or moving the mouse if the currently selected port has a computer that is in the process of booting up. This may cause the computer to not detect, or initialize the keyboard or mouse drivers properly. Daisy-Chaining the OmniView™ PRO: The OmniView™ PRO can be daisy-chained with additional OmniView™ PRO units through the DB25 daisy-chain ports.
P73055/F1D108-OSD/EU/man.qxd 4/21/00 2:25 PM Page 10 Hardware Installation (continued) • Upon connecting the daisy-chain cable to the previous unit, it should automatically power up if the previous unit is powered up. However, it is still recommended that the power supply be used with the slave unit. You will see the LED display on the front panel show the units bank address setting. • RESET the MASTER unit by pressing the BANK/SCAN and CHANNEL buttons simultaneously.
P73055/F1D108-OSD/EU/man.qxd 4/21/00 2:25 PM Page 11 Usage Selecting which computer to operate can be done either by On-Screen Display, the CHANNEL button, or through keyboard hot-key commands. You will notice that after the OmniView™ PRO switches to another computer, the mouse will be inoperative for about 1-2 seconds. This is normal operation and ensures that proper mouse synchronization is established.
P73055/F1D108-OSD/EU/man.qxd 4/21/00 2:25 PM Page 12 Usage Bank 0 (Master) Bank 1 (slave) CONSOLE (continued) 1 2 3 4 5 6 7 8 9 10 11 12 13 14 15 16 17 18 19 20 21 22 23 24 121 122 123 124 125 126 127 128 Keyboard, mouse and monitor Bank 2 (slave) etc... Bank F (slave) AutoScan Mode: Enable AutoScan mode In AutoScan mode, the OmniView™ PRO remains on one port for a number of seconds, before switching to the next.
P73055/F1D108-OSD/EU/man.qxd 4/21/00 2:25 PM Page 13 Usage (continued) On-Screen Display Menu Control: Enable the On-Screen Display Menu To get into the On-Screen Display (OSD) menu, press SCROLL LOCK, SCROLL LOCK, SPACEBAR. Immediately, the OSD overlay screen appears. This screen is generated by the OmniView™ PRO, and does not affect your computers or running software in any way. The main OSD screen menu is shown on the right. It shows the currently selected BANK.
P73055/F1D108-OSD/EU/man.qxd 4/21/00 2:25 PM Page 14 Usage SCAN TIME: Amount of time the OmniView™ PRO stays on one port before switching to the next port when in Scan Mode. DISPLAY TIME: Amount of time the OSD Menu or Port Name remains displayed on-screen after making a port selection.
P73055/F1D108-OSD/EU/man.qxd 4/21/00 2:25 PM Page 15 Troubleshooting General Problems: Q: The OSD menu does not display a "✹" on a port where a computer is connected and powered up. What do I do? A: • RESET the OmniView™ PRO by simultaneously pressing the “BANK/SCAN” and CHANNEL buttons on the front panel. Access the OSD menu again and it should have re-detected all the active ports. Q: When cascading, the MASTER unit does not see the slave unit(s).
P73055/F1D108-OSD/EU/man.qxd 4/21/00 2:25 PM Page 16 Troubleshooting (continued) PS/2 Mouse Problems at the console or computers: Q: The mouse is not detected during boot-up. A: • Check the cables and make sure they are inserted properly in the correct ports. • Check your computer/motherboard documentation making sure that the PS/2 mouse port (or IRQ) is enabled. • Make sure the mouse is directly plugged into the computer. Rebooting is necessary when trying this.
P73055/F1D108-OSD/EU/man.qxd 4/21/00 2:25 PM Page 17 Troubleshooting (continued) • Check your computer/motherboard documentation making sure that the serial ports are enabled, and that there are no IRQ or base address conflicts with other serial ports or modems. • Plug in a serial mouse directly to your computer, and reboot. If the mouse pointer still does not move, then there may be no serial mouse drivers installed, or the serial port on your computer may have other conflicts or problems.
P73055/F1D108-OSD/EU/man.qxd 4/21/00 2:25 PM Page 18 Information FCC Statement DECLARATION OF CONFORMITY WITH FCC RULES FOR ELECTROMAGNETIC COMPATIBILITY We, Belkin Components, of 501 West Walnut Street, Compton CA 90220, declare under our sole responsibility that the product: F1D108-OSD to which this declaration relates: Complies with Part 15 of the FCC Rules.
P73055/F1D108-OSD/f/man.qxd 4/21/00 2:31 PM Page 19 Introduction Nous vous remercions d’avoir choisi le commutateur OmniView™ PRO KVM de Belkin Components. Il n’a jamais été aussi facile de commander huit PC à partir d´un seul clavier, d´une seule souris et d´un seul moniteur ! L’OmniView™ PRO constitue le fin du fin en matière de commande de PC.
P73055/F1D108-OSD/f/man.
P73055/F1D108-OSD/f/man.
P73055/F1D108-OSD/f/man.qxd 4/21/00 2:31 PM Page 22 Liste des pièces nécessaires Vérifiez bien que vous avez les câbles appropriés ! Plusieurs câbles sont nécessaires pour raccorder à l´OmniView™ PRO les huit ordinateurs que vous allez commander. Vous trouverez ci-dessous les numéros de pièces Belkin ainsi que leur description. Nous vous conseillons d´acheter les kits de câbles correspondant au type de port souris utilisé par votre ordinateur.
P73055/F1D108-OSD/f/man.qxd 4/21/00 2:31 PM Page 23 Installation du matériel Banc 0 (Maître) Banc 1 (esclave) 1 2 3 4 5 6 7 8 9 10 11 12 13 14 15 16 CONSOLE Clavier, souris et moniteur Fr Banc 2 (esclave) 17 18 19 20 etc. Banc F (esclave) 21 22 23 24 125 126 127 128 etc.
P73055/F1D108-OSD/f/man.qxd 4/21/00 2:31 PM Page 24 Installation du matériel (suite) VEUILLEZ SUIVRE SCRUPULEUSEMENT CES INSTRUCTIONS. TOUT MANQUEMENT PEUT ENTRAÎNER DES ERREURS CLAVIER ET / OU SOURIS OU UN DYSFONCTIONNEMENT. AVERTISSEMENT : Avant de tenter de brancher quoi que ce soit à l´OmniView™ PRO ou aux ordinateurs, vérifiez que rien n’est sous tension.
P73055/F1D108-OSD/f/man.qxd 4/21/00 2:31 PM Page 25 Installation du matériel 3. (suite) Raccordez le moniteur à l’OmniView™ PRO. Grâce au câble inclus ou fourni avec votre moniteur, reliez-le au port HDDB15 femelle situé à l’arrière de l´OmniView™ PRO et assorti du symbole du moniteur dans la section CONSOLE. Dos de l´OmniView™ PRO Fr 4. Raccordez le clavier et la souris à l´OmniView ™ PRO.
P73055/F1D108-OSD/f/man.qxd 4/21/00 2:31 PM Page 26 Installation du matériel 6. (suite) Raccordez le câble de la souris du premier ordinateur à l´OmniView™ PRO. Si vous utilisez un câble PS/2 (numéro de pièce Belkin : F2N036fXX), insérez une extrémité dans le port souris PS/2 de l´ordinateur et l´autre extrémité dans le port souris PS/2 PC1 situé à l’arrière de l’OmniView™ PRO.
P73055/F1D108-OSD/f/man.qxd 4/21/00 2:31 PM Page 27 Installation du matériel (suite) REMARQUE : Evitez d’appuyer sur une touche du clavier ou de bouger la souris si le port sélectionné correspond à un ordinateur en cours d’initialisation. En effet, ceci pourrait empêcher l’ordinateur de détecter ou d’initialiser comme il se doit les pilotes du clavier et de la souris.
P73055/F1D108-OSD/f/man.qxd 4/21/00 2:31 PM Page 28 Installation du matériel (suite) • En raccordant le câble de mise en cascade à l’unité précédente, elle devrait automatiquement se mettre sous tension si l’unité précédente est sous tension. Il est néanmoins conseillé d’utiliser l’alimentation avec l’unité esclave. Le voyant lumineux situé à l’avant indique les paramètres de l’adresse du banc des unités.
P73055/F1D108-OSD/f/man.qxd 4/21/00 2:31 PM Page 29 Utilisation Pour sélectionner l´ordinateur désiré, vous pouvez recourir au paramétrage à l’écran, au bouton CHANNEL (Canal) ou à des raccourcis clavier. Vous constaterez qu’une fois que l´OmniView™ PRO a commuté sur un autre ordinateur, la souris ne fonctionne pas pendant 1 à 2 secondes environ. Il s´agit là d´une réaction normale qui garantit l´établissement de la synchronisation de la souris.
Utilisation (suite) CONSOLE Clavier, souris et moniteur. Activer le mode de balayage automatique En mode de balayage automatique, l’OmniView™ PRO reste sur un port pendant quelques secondes avant de passer au port suivant. Ce laps de temps est fixé dans le menu de paramétrage à l’écran. REMARQUE : Afin d’éviter toute erreur, ce mode ne permet pas de commande souris ou clavier.
P73055/F1D108-OSD/g/man.qxd 4/21/00 2:33 PM Page 38 Einleitung Vielen Dank für den Kauf des Computer-Masterswitch OmniView™ PRO von Belkin Components. Sie können damit acht PCs über nur eine Tastatur, einen Monitor und eine Maus bedienen - und zwar einfacher als je zuvor! Der OmniView™ PRO verleiht Ihnen das Optimum an Kontrolle. Der Masterswitch ist mit T- und PS/2-Computern kompatibel und bietet eine Fülle an Leistungsmerkmalen wie z.B.
P73055/F1D108-OSD/g/man.
P73055/F1D108-OSD/g/man.
P73055/F1D108-OSD/g/man.qxd 4/21/00 2:33 PM Page 41 Liste der erforderlichen Teile Verwenden Sie die richtigen Kabel! Sie benötigen für OmniView™ PRO Kabel zum Anschluß der acht Computer, die Sie über den Masterswitch bedienen werden. Die erforderlichen Kabel sind im folgenden mit ihren Belkin-Artikelnummern aufgeführt. Wir empfehlen den Erwerb von Kabelgarnituren (welche Kabelgarnitur zu verwenden ist, hängt vom Mausanschlusses Ihres Computers ab).
P73055/F1D108-OSD/g/man.qxd 4/21/00 2:33 PM Page 42 Hardware-Installation Bank 0 (Master) Bank 1 (slave) 1 2 3 4 5 6 7 8 9 10 11 12 13 14 15 16 17 18 19 20 21 22 23 24 KONSOLE Tastatur, Maus und Monitor Bank 2 (slave) etc. Bank F (slave) De etc. 121 122 123 124 125 126 127 128 Einzelbetrieb oder Kaskadierung An OmniView™ PRO können bis zu 15 weitere OmniView-Einheiten angeschlossen werden.
P73055/F1D108-OSD/g/man.qxd 4/21/00 2:33 PM Page 43 Hardware-Installation (Fortsetzung) BITTE GEHEN SIE GENAU NACH DIESER INSTALLATIONSANLEITUNG VOR. BEI NICHT ORDNUNGSGEMÄßER INSTALLATION KÖNNEN TASTATUR- ODER MAUSFEHLER UND FEHLERHAFTER BETRIEB DIE FOLGE SEIN. WARNUNG: Stellen Sie sicher daß alle Geräte ausgeschaltet sind, ehe Sie irgend etwas an OmniView™ PRO oder die PCs anschließen. Das Ein- und Ausstecken von Kabeln kann Computer und OmniView™ PRO dauerhaft beschädigen.
P73055/F1D108-OSD/g/man.qxd 4/21/00 2:33 PM Page 44 Hardware-Installation 3. (Fortsetzung) Schließen Sie den Monitor am OmniView™ PRO an. Stecken Sie hierzu das zu Ihrem Monitor gehörige Kabel im Konsolenbereich auf der Rückseite des OmniView™ PRO in die HDDB15-Buchse mit dem Monitorsymbol ein. Rückseite des OmniView™ PRO 4. Schließen Sie Tastatur und Maus am OmniView ™ PRO an. Zum Anschluß einer AT-Tastatur benötigen Sie einen AT-PS/2-Adapter (Belkin Artikel-Nr. F2N017g).
P73055/F1D108-OSD/g/man.qxd 4/21/00 2:33 PM Page 45 Hardware-Installation 6. (Fortsetzung) Schließen Sie das Mauskabel für den ersten Computer am OmniView™ PRO an. Verwenden Sie hierzu ein PS/2-Kabel (Belkin Artikel-Nr. F2N036gXX). Ein Ende des Kabels wird in den PS/2-Mausanschluß am Computer eingesteckt, das andere in den Mausanschluß für PC1 auf der Rückseite des OmniView™ PRO. Bei Verwendung eines seriellen Mauskabels (Belkin Artikel-Nr.
P73055/F1D108-OSD/g/man.qxd 4/21/00 2:33 PM Page 46 Hardware-Installation (Fortsetzung) HINWEIS: Drücken Sie keine Tasten auf der Tastatur und bewegen Sie die Maus nicht, während der Computer am ausgewählten Anschluß gerade hochfährt. Dies kann nämlich dazu führen, daß der Computer die Tastatur- und Maustreiber nicht erkennt oder nicht ordnungsgemäß initialisiert. Verkettung von OmniView™ PRO: OmniView™ PRO verfügt über DB25-Anschlüsse zur Verkettung mit weiteren OmniView™ PRO-Geräten.
P73055/F1D108-OSD/g/man.qxd 4/21/00 2:33 PM Page 47 Hardware-Installation (Fortsetzung) • Ist das Verkettungskabel in das vorgeschaltete Gerät eingesteckt, sollte das Gerät automatisch eingeschaltet werden, wenn das vorgeschaltete Gerät eingeschaltet wird. Trotzdem wird empfohlen, für das Slave-Gerät das Netzteil zu verwenden. Die LEDAnzeige auf der Gerätevorderseite zeigt die eingestellte Bankadresse des Geräts.
P73055/F1D108-OSD/g/man.qxd 4/21/00 2:33 PM Page 48 Bedienung Der zu bedienende Computer kann über das On-Screen Display, über den PCAuswahlschalter (CHANNEL) oder über Tastaturbefehle ausgewählt werden. Wenn OmniView™ PRO auf einen anderen Computer umschaltet, ist die Maus etwa 1 bis 2 Sekunden nicht funktionsfähig. Dieses Verhalten ist normal und gewährleistet die ordnungsgemäße Maussynchronisation.
Bedienung (Fortsetzung) KONSOLE Tastatur, Maus und Monitor Aktivieren des AutoScan-Modus Im AutoScan-Modus schaltet OmniView™ PRO in Intervallen von einigen Sekunden von einem Computer zum nächsten. Das Zeitintervall wird über das On-Screen Display-Menü eingestellt. HINWEIS: Die Maus- und Tastatursteuerung ist dabei deaktiviert.
P73055/F1D108-OSD/n/man.qxd 4/21/00 2:38 PM Page 59 Inleiding Belkin Components dankt u hartelijk voor de aankoop van de OmniView™ PRO KVM (Keyboard Video Mouse) schakelmodule. Nog nooit was het zo gemakkelijk en betaalbaar om met slechts één toetsenbord, muis en monitor acht PC’s aan te sturen! Met de OmniView™ PRO beschikt u over het nieuwste van het nieuwste op het gebied van computerbesturing.
P73055/F1D108-OSD/n/man.qxd 4/21/00 2:38 PM Page 60 Technische specificaties Aansluitingen console: Toetsenbord: 6-pins MiniDIN Muis: 6-pins MiniDIN (voor PS/2-muis) DB9-steker (voor afzonderlijke seriële muis) Monitor: HDDB15 contrasteker Aansluitingen computerpoorten: Toetsenbord: 6-pins MiniDIN Muis: 6-pins MiniDIN (voor PS/2-muis) DB9-steker (voor seriële muis) Monitor: HDDB15 steker Afmetingen: Breedte: Hoogte: Diepte: 444,5 mm (17,5 in.) 63,5 mm (2,5 in.) 165,1 mm (6,5 in.
P73055/F1D108-OSD/n/man.
P73055/F1D108-OSD/n/man.qxd 4/21/00 2:38 PM Page 62 Onderdelenlijst Zorg voor de juiste kabels! Voor de aansluiting van de acht computers die u met de OmniView™ PRO kunt aansturen, hebt u bepaalde kabels nodig. Hieronder vindt u de betreffende Belkin typenummers met de bijbehorende beschrijving. Wij adviseren de aanschaf van kabelsets die gebaseerd zijn op het type muispoort dat uw computer gebruikt.
P73055/F1D108-OSD/n/man.qxd 4/21/00 2:38 PM Page 63 Apparatuur installeren Bank 0 (Master) Bank 1 (slave) 1 2 3 4 5 6 7 8 9 10 11 12 13 14 15 16 17 18 19 20 21 22 23 24 126 127 128 CONSOLE Toetsenbord, muis en monitor Bank 2 (slave) enzovoort… Bank F (slave) enzovoort… 121 122 123 124 125 Vrijstaand of in serie geschakeld bedrijf De OmniView™ PRO biedt de mogelijkheid tot doorlussen van 15 extra modules (op een totaal van 16).
P73055/F1D108-OSD/n/man.qxd 4/21/00 2:38 PM Page 64 Apparatuur installeren (continued) WAARSCHUWING: VOLG DEZE INSTALLATIEPROCEDURE STIPT OP. AFWIJKING HIERVAN KAN LEIDEN TOT FOUTEN VAN MUIS EN/OF TOETSENBORD EN EEN GEBREKKIGE WERKING. WAARSCHUWING: Zorg dat alle apparaten uitgeschakeld zijn voordat u iets op de OmniView™ PRO of de computers aansluit. Het aansluiten en ontkoppelen van kabels kan onherstelbare schade toebrengen aan uw computers en de OmniView™ PRO.
P73055/F1D108-OSD/n/man.qxd 4/21/00 2:38 PM Page 65 Apparatuur installeren 3. (vervolg) Sluit de monitor aan op de OmniView™ PRO met de aanwezige kabel of met de kabel die bij uw monitor geleverd is. Sluit deze aan op de HDDB15 poort (contrasteker) aan de achterzijde van de OmniView™ PRO, in het vak CONSOLE aangeduid met het symbooltje voor ‘monitor’. Achterzijde OmniView™ PRO 4. Sluit uw toetsenbord en muis aan op de OmniView ™ PRO.
P73055/F1D108-OSD/n/man.qxd 4/21/00 2:38 PM Page 66 Apparatuur installeren 6. (vervolg) Verbind de muiskabel van de eerste computer met de OmniView™ PRO. Gebruikt u een PS/2kabel (Belkin typenummer F2N036nXX), steek dan het ene kabeleinde in de PS/2-muispoort op de computer en het andere kabeleinde in de PS/2-muispoort voor PC1 aan de achterzijde van de OmniView™ PRO.
P73055/F1D108-OSD/n/man.qxd 4/21/00 2:38 PM Page 67 Apparatuur installeren (vervolg) OPMERKING: Als een computer op de ingeschakelde poort bezig is met opstarten, raak dan de toetsen van het toetsenbord en de muis niet aan. Dit kan ertoe leiden dat de computer de stuurprogramma’s van het toetsenbord en de muis niet correct herkent en initialiseert. Doorlussen van de OmniView™ PRO: Via de DB25-busnetwerkpoorten kan de OmniView™ PRO worden doorgelust naar andere OmniView™ PRO modules.
P73055/F1D108-OSD/n/man.qxd 4/21/00 2:38 PM Page 68 Apparatuur installeren (vervolg) • Bij aansluiting van de doorluskabel op de voorafgaande module moet deze automatisch ingeschakeld worden als de voorafgaande module ingeschakeld wordt. Toch adviseren wij de voeding voor de slave-module te gebruiken. U kunt zien dat het led-display aan de voorzijde de bankadresinstelling van de module aangeeft. • RESET de MASTER-module door gelijktijdig indrukken van de knoppen ‘BANK/SCAN’ en ‘CHANNEL’ (kanaal).
P73055/F1D108-OSD/n/man.qxd 4/21/00 2:38 PM Page 69 Toepassingen De computer die u wilt aansturen, kunt u als volgt bereiken: via het OSD-beeldschermmenu, met de ‘CHANNEL’(kanaal)-knop of via sneltoetsopdrachten op het toetsenbord. Wanneer de OmniView™ SE naar een andere computer overschakelt, is de muis een tot twee seconden lang buiten werking. Dit is een normaal verschijnsel waardoor een correcte muissynchronisatie tot stand komt.
P73055/F1D108-OSD/n/man.qxd 4/21/00 2:38 PM Page 70 Toepassingen Bank 0 (Master) Bank 1 (slave) CONSOLE (vervolg) 1 2 3 4 5 6 7 8 9 10 11 12 13 14 15 16 17 18 19 20 21 22 23 24 121 122 123 124 125 126 127 128 Toetsenbord, muis en monitor Bank 2 (slave) enzovoort… Bank F (slave) Stand AutoScan: AutoScan-stand activeren In de stand AutoScan blijft de OmniView™ PRO een aantal seconden op een poort staan voordat hij doorschakelt naar de volgende.
P73055/F1D108-OSD/n/man.qxd 4/21/00 2:38 PM Page 71 Toepassingen (vervolg) Bediening OSD-beeldschermmenu: OSD-beeldschermmenu activeren Om het OSD-beeldschermmenu te activeren, drukt u achtereenvolgens op ‘SCROLL LOCK’ ‘SCROLL LOCK’ ‘SPATIEBALK’. Onmiddellijk verschijnt het OSD-overlaybeeld. Dit beeld wordt door de OmniView™ PRO gegenereerd en heeft geen enkele invloed op uw computers of gedraaide software. • Met behulp van de pijltoetsen kunt u door de actieve poorten navigeren.
P73055/F1D108-OSD/n/man.qxd 4/21/00 2:38 PM Page 72 Toepassingen ‘SCAN TIME’ (scantijd): Aantal seconden dat de OmniView™ PRO in scanstand op een poort blijft staan voordat hij naar een andere poort overschakelt. ‘DISPLAY TIME’ (weergavetijd): Aantal seconden dat het OSD-menu of een poortnaam op het beeldscherm zichtbaar blijft nadat u een poort gekozen hebt.
P73055/F1D108-OSD/n/man.qxd 4/21/00 2:38 PM Page 73 Probleemoplossing Problemen van algemene aard: V: Het OSD-menu geeft geen ‘✹’ bij een poort waarop een computer is aangesloten en ingeschakeld. Wat moet ik doen? A: • Druk gelijktijdig op de toetsen ‘BANK/SCAN’ en ‘CHANNEL’ (kanaal) aan de voorzijde van de OmniView™ PRO om deze te resetten. Activeer het OSD-menu opnieuw en dit moet nu alle actieve poorten herkend hebben. V: Bij doorlussen ziet de MASTER-module de slave-module(s) niet.
P73055/F1D108-OSD/n/man.qxd 4/21/00 2:38 PM Page 74 Probleemoplossing (vervolg) Problemen met een PS/2-muis op de console of de computers: V: Tijdens het opstarten wordt de muis niet herkend. A: • Controleer de kabels en zorg dat deze correct op de juiste poorten aangesloten zijn. • Raadpleeg de documentatie van uw computer/moederkaart en zorg dat de PS/2muispoort (of IRQ) geactiveerd is. • Zorg dat de muis rechtstreeks op de computer aangesloten is. Start de computer opnieuw als u dit probeert.
P73055/F1D108-OSD/n/man.qxd 4/21/00 2:38 PM Page 75 Probleemoplossing (vervolg) • Raadpleeg de documentatie van uw computer/moederkaart en zorg dat de seriële poorten geactiveerd zijn zonder IRQ- of beginadresconflicten met andere seriële poorten of modems. • Sluit een seriële muis rechtstreeks op uw computer aan en start deze opnieuw.
P73055/F1D108-OSD/n/man.qxd 4/21/00 2:38 PM Page 76 Informatie FCC* Verklaring *Federal Communications Commission Verklaring van conformiteit met de FCC voorschriften inzake elektromagnetische compatibiliteit Belkin Components, gevestigd 501 West Walnut Street, Compton CA 90220 (USA), verklaart onder haar uitsluitende verantwoordelijkheid dat het product: F1D108nOSD waarop deze verklaring betrekking heeft: Voldoet aan paragraaf 15 van de FCC Voorschriften.
P73055/F1D108-OSD/i/man.qxd 4/21/00 2:36 PM Page 77 Introduzione Grazie per aver acquistato lo switch OmniView™ PRO KVM della Belkin Components. Gestire 8 PC da una sola tastiera, un mouse ed un monitor non è mai stato più semplice! OmniView™ PRO è l’ultima creazione in materia di comandi.
P73055/F1D108-OSD/i/man.
P73055/F1D108-OSD/i/man.
P73055/F1D108-OSD/i/man.qxd 4/21/00 2:36 PM Page 80 Elenco delle parti necessarie Accertatevi di avere i cavi giusti! OmniView™ PRO richiede i cavi per collegare gli otto computer che vorrete gestire. Di seguito sono indicati i numeri delle parti Belkin con le relative descrizioni. Vi consigliamo di acquistare i kit di cavi in base al tipo di porta mouse del vostro computer.
P73055/F1D108-OSD/i/man.qxd 4/21/00 2:36 PM Page 81 Installazione hardware Bancata 0 (Master) Bancata 1 (slave) 1 2 3 4 5 6 7 8 9 10 11 12 13 14 15 16 17 18 19 20 21 22 23 24 125 126 127 128 CONSOLE Tastiera, mouse e monitor Bancata 2 (slave) Ecc... Bancata F (slave) etc...
P73055/F1D108-OSD/i/man.qxd 4/21/00 2:36 PM Page 82 Installazione hardware (continua) SEGUIRE ATTENTAMENTE QUESTA PROCEDURA DI INSTALLAZIONE. IN CASO CONTRARIO SI POTREBBERO VERIFICARE ERRORI DI TASTIERA E/O MOUSE O OPERAZIONI SCORRETTE. ATTENZIONE: Prima di cercare di collegare qualsiasi unità a OmniView™ PRO o ai computer, accertarsi che sia tutto spento. L’inserimento e l’estrazione dei cavi può causare un danno irreversibile dei computer e dell’OmniView™ PRO.
P73055/F1D108-OSD/i/man.qxd 4/21/00 2:36 PM Page 83 Installazione hardware 3. (continua) Collegare il monitor all’OmniView™ PRO. Utilizzando il cavo presente o quello fornito con il monitor, collegarlo alla porta della HDDB15 femmina sul retro del OmniView™ PRO contrassegnata dal simbolo del monitor nella sezione CONSOLE (CONSOLE). Retro dell’OmniView™ PRO 4. Collegare la tastiera ed il mouse all’OmniView ™ PRO. Nel caso di una tastiera AT, utilizzare un adattatore AT-PS/2 (pezzo Belkin n. F2N017i).
P73055/F1D108-OSD/i/man.qxd 4/21/00 2:36 PM Page 84 Installazione hardware 6. (continua) Collegare il mouse del primo computer all’OmniView™ PRO. Se si utilizza un cavo PS/2 (pezzo Belkin n. F2N036iXX) collegare un’estremità della porta del mouse PS/2 al computer e l’altra alla porta del mouse PC1 PS/2 sul retro dell’OmniView™. Se si utilizza un cavo per mouse seriale (pezzo Belkin n.
P73055/F1D108-OSD/i/man.qxd 4/21/00 2:36 PM Page 85 Installazione hardware (continua) NOTA: Evitare di premere qualsiasi tasto della tastiera o di muovere il mouse se il computer corrispondente alla porta selezionata è in fase di caricamento. In caso contrario il computer potrebbe non rilevare o non inizializzare i driver della tastiera o del mouse correttamente.
P73055/F1D108-OSD/i/man.qxd 4/21/00 2:36 PM Page 86 Installazione hardware (continua) • Al momento del collegamento del cavo in catena di priorità all’unità precedente, essa dovrebbe essere automaticamente alimentata se l’unità precedente viene alimentata. Tuttavia, si consiglia di utilizzare l’alimentazione con l’unità slave. Il LED sul pannello frontale visualizzerà l’impostazione dell’indirizzo di bancata delle unità.
P73055/F1D108-OSD/i/man.qxd 4/21/00 2:36 PM Page 87 Impiego Il computer con il quale operare può essere selezionato con lo strumento On-Screen Display, con il pulsante CHANNEL (CANALE) o con i comandi dei tasti hot (di cambio veloce). Noterete che una volta che l’OmniView™ PRO passa ad un altro computer, il mouse rimane bloccato per circa 1 – 2 secondi. Si tratta di un’operazione normale che garantisce una corretta sincronizzazione del mouse.
Impiego (continua) CONSOLE Tastiera, mouse e monitor Attivare la modalità AutoScan: In modalità AutoScan, l’OmniView™ PRO rimane su di una porta per diversi secondi prima di passare alla successiva. Questo intervallo di tempo viene impostato sull’On-Screen Display. NOTA: in questa modalità non è previsto nessun controllo del mouse o della tastiera. Questo particolare è necessario per evitare eventuali errori.