
User manual

8
Hardware Installation (continued)
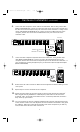
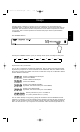
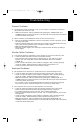
6. Connect the first computer's mouse cable to the OmniView
™
PRO. If using a PS/2 cable
(Belkin Part# F2N036-XX), connect one end to the PS/2 mouse port on the computer, and
the other end to the PC1 PS/2 mouse port on the back of the OmniView
™
. If using a serial
mouse cable (Belkin Part# F2N209-XX-T), connect one end to a DB9 serial port on the
computer, and the other end to the PC1 DB9 serial mouse port on the back of the
OmniView
™
PRO.
F2N036-XX for PS/2 mouse
OR
F2N209-XX-T for serial mouse
Back of OmniView
™
PRO
Back of PC
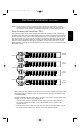
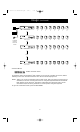
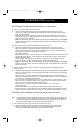
7. Connect the first computer's keyboard cable to the OmniCube
™
. Using another PS/2
cable (Belkin Part# F2N036-XX), connect one end to the PS/2 keyboard port on the
computer, and the other end to the PC1 keyboard port on the back of the OmniCube
™
. If
your computer has an AT-style keyboard port, you will need a PS/2-AT keyboard adapter
(Belkin Part# F2N018).
F2N036-XX
Back of OmniCube
™
Back of PC
8. Double check all of the connections. Make sure the keyboard and mouse cables go to the
correct ports.
9. Repeat steps 5-7 for the remainder of the computers.
10.Attach the power supply to the power supply connector at the back of the OmniView
™
PRO. Plug this into any available AC outlet. Flip the power switch on the front of the
OmniView
™
PRO. You should see the LED for Port 1 on the front panel blink, and hear a
beep. Power up your monitor.
11.You can now power up all your computers simultaneously. The first computer will show up
on the monitor. Check to see if the keyboard, mouse and monitor work.If this is okay, press
the “SELECT” button and check the functionality of the other computers. If you find any
errors, double-check all of the cable connections.
P73055/F1D108-OSD/EU/man.qxd 4/21/00 2:25 PM Page 8