
User manual

13
12
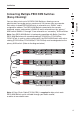
1
2
3
4
5
6
7
8
section
13
12
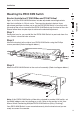
Installation
Step 2
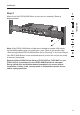
Mount the 4-Port PRO3 KVM Switch to the rack-rail assembly. (Refer to
diagram below.)
Note: If this PRO3 KVM Switch will be daisy-chained to another KVM switch,
set the BANK address prior to installing on a rack. Refer to the section titled
“Connecting Multiple PRO3 KVM Switches (Daisy-Chaining)” in this User Manual.
Your PRO3 KVM Switch is now mounted securely to the rack and you are ready
to connect the console.
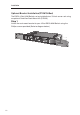
Note for Belkin PRO2 Series Owners (F1DA104Tea, F1DA108Tea, and
F1DA116Tea): Installation for the PRO2 KVM Switch has changed.
Please follow this installation manual completely to ensure proper
installation. Failure to do so may result in keyboard or mouse errors,
and/or faulty operation.