
User manual


2120
Installation
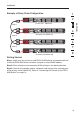
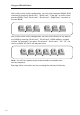
Connecting the Primary and Secondary KVM Switches:
Step 1
Using the Daisy-Chain Cable (F1D108-CBL), connect one end to the
“Daisy-Chain In” port on the primary KVM switch (BANK 00).
Step 2
Connect the other end of the Daisy-Chain Cable (F1D108-CBL) to the
“Daisy-Chain Out” port of the first secondary KVM switch (BANK 01).
Step 3
To add secondary units, connect one end of the Daisy-Chain Cable
(F1D108-CBL) to the “Daisy-Chain In” port on the first secondary KVM switch
and the other end to the “Daisy-Chain Out” port of the next secondary KVM
switch(for example, BANK 02).
Step 4
Repeat Step 3 for additional PRO3 KVM Switches you wish to
daisy-chain together.
Note: Your PRO3 KVM Switch is backward-compatible with Belkin OmniView
PRO2 KVM Switches with standard cabling (F1DA104Tea, F1DA108Tea,
F1DA116Tea). In a daisy-chain configuration, the PRO3 KVM Switch with micro-
cabling (F1DA104Zea, F1DA108Zea, F1DA116Zea) must be designated as the
primary KVM switch.