Wireless G+ MIMO ADSL2+ Modem Router ������� ���� User Manual F5D9630-4
Table of Contents 1 Introduction ............................................................................................. 1 Advantages of a Wireless Network ................................................................. 1 Placement of your Wireless G Plus MIMO ADSL2+ Modem Router .........2 2 Product Overview ..................................................................................... 5 Product Features ........................................................................................
Introduction • Share one high-speed Internet connection with all the computers in your home • Share resources, such as files and hard drives among all the connected computers in your home • Share a single printer with the entire family • Share documents, music, video, and digital pictures • Store, retrieve, and copy files from one computer to another • Simultaneously play games online, check Internet email, and chat Advantages of a Wireless Network Here are some of the advantages of setting up
Introduction Placement of your Wireless G Plus MIMO ADSL2+ Modem Router Important Factors for Placement and Setup Your wireless connection will be stronger the closer your computer is to your Router. Typical indoor operating range for wireless devices is between 100 and 200 feet. In the same way, your wireless connection and performance will degrade somewhat as the distance between your Router and connected devices increases. This may or may not be noticeable to you.
Introduction Avoid placing your Router near devices that may emit radio “noise,” such as microwave ovens. Dense objects that can inhibit wireless communication include: • Refrigerators • Washers and/or dryers • Metal cabinets • Large aquariums • Metallic-based UV tinted windows If your wireless signal seems weak in some spots, make sure that objects such as these are not blocking the signal’s path (between your computers and Router). 2 3 4 5 3.
Introduction These guidelines should allow you to cover the maximum possible area with your Router. Should you need to cover an even wider area, we suggest the Belkin Wireless Range Extender/Access Point. 5. Secure Connections, VPNs, and AOL Secure connections typically require a user name and password, and are used where security is important.
Product Overview 1 Product Features In minutes you will be able to share your Internet connection and network your computers. The following is a list of features that make your new Belkin Wireless G Plus MIMO ADSL2+ Modem Router an ideal solution for your home or small office network. Works with Both PCs and Mac® Computers The Router supports a variety of networking environments including Mac OS® 8.x, 9.x, X v10.x, Linux ®, Windows ® 98, Me, NT ®, 2000, XP, and Vista™, and others.
Product Overview Universal Plug and Play (UPnP) UPnP is a technology that offers seamless operation of voice messaging, video messaging, games, and other applications that are UPnP-compliant. Support for VPN Pass-Through If you connect to your office network from home using a VPN connection, your Router will allow your VPN-equipped computer to pass through the Router and to your office network.
Knowing your Router 1 Package Contents Belkin Wireless G Plus MIMO ADSL2+ Modem Router • Quick Installation Guide • Belkin Setup Assistant Software CD • RJ11 Telephone Cord • RJ45 Ethernet Networking Cable • ADSL (Asymmetric Digital Subscriber Line) Microfilter* • Power Supply • User Manual in CD 2 3 4 5 6 *ADSL microfilter varies by country. If it’s not included, you will need to purchase one.
Knowing your Router • Virtual circuit: VPI (Virtual Path Identifier) __________ (a number between 0 and 255) • VCI (Virtual Channel Identifier) __________ (a number between 1 and 65535) • For PPPoE and PPPoA users: ADSL account user name ________ and password _______________ • For static IP users: IP Address ___ . ___ . ___ . ___ Subnet Mask ___ . ___ . ___ . ___ Default Gateway Server ___ . ___ . ___ . • IP address for Domain Name Server ___ . ___ . ___ .
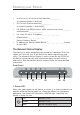
Knowing your Router 1 2. LAN Status LEDs Orange Ethernet link is up and 10Base-T device connected Orange - blinking 10Base-T device is transmitting or receiving data Green Ethernet link is up and 100Base-T device is connected Green - blinking 100Base-T device is transmitting or receiving data 2 3 4 5 6 7 8 3. WLAN Status LED The WLAN Status LED is solid GREEN when you enable the wireless LAN function. It flashes when the Router is transmitting or receiving data wirelessly.
Knowing your Router 5. Internet LED The Internet LED shows you when the Router is connected to the Internet. When the LED is OFF, the Router is NOT connected to the Internet. When the LED is solid GREEN, the Router is connected to the Internet. When the LED is blinking, the Router is transmitting or receiving data from the Internet.
Knowing your Router 1 8. Reset Button a. Resetting the Router Push and hold the “Reset” button for one second, then release it. When the “Power/Ready” light becomes solid again, the reset is complete. b. Restoring the Factory Defaults Press and hold the “Reset” button for at least five seconds, then release it. When the “Power/Ready” light becomes solid again, the restore is complete. 9. Power Plug Connect the included DC power supply to this inlet.
Connecting and Configuring your Router Verify the contents of your box. You should have the following: • Belkin Wireless G Plus MIMO ADSL2+ Modem Router • RJ11 Telephone Cord • RJ45 Ethernet Networking Cable • Power Supply • Belkin Setup Assistant Software CD • User Manual Setup Assistant Belkin has provided our Setup Assistant software to make installing your Router a simple and easy task. You can use it to get your Router up and running in minutes.
Connecting and Configuring your Router Note: Some ADSL connections require a microfilter. Your ADSL provider can tell you if you need one. Belkin includes a microfilter in regions known to use them. You may or may not have received one in your box. Step 1B: Replacing an Existing Modem or Modem Router Follow these steps if you currently have a modem or a modem router that you will be replacing with your new Router. 1B.1 Unpack your new Router from the box and place it next to your old modem.
Connecting and Configuring your Router Note for Windows Users: If the Setup Assistant does not start up automatically, select your CD-ROM drive from “My Computer” and double-click on the file named “SetupAssistant” to start the Setup Assistant. NOTE TO MAC® USERS: Double-click on the “Easy Install” icon to start the Setup Assistant. Then, follow the prompts to complete the setup. 2.3 Select Country. Select your country from the drop-down box. Click “Begin” to continue.
Connecting and Configuring your Router 2.4 Confirmation Screen. Verify that you have completed all QIG steps by checking the box to the right of the arrow. Click “Next” to continue. 1 2 3 5 6 7 8 2.5 Progress Screen. Setup Assistant will show you a progress screen each time a step in the setup has been completed.
Connecting and Configuring your Router 2.6 Checking Settings. The Setup Assistant will now examine your computer’s network settings and gather information needed to complete the Router’s connection to the Internet. 2.7 Verifying Hardware Connections. The Setup Assistant will now verify your hardware connection.
Connecting and Configuring your Router 2.8 Naming your Wireless Network. The Setup Assistant will display the default wireless network name or Service Set Identifier (SSID). This is the name of your wireless network to which your computers or devices with wireless network adapters will connect. You can either use the default or change it to something unique. Write down this name for future reference. Click “Next” to continue. 1 2 3 5 6 7 8 9 2.9 Requesting Internet Account Info (if needed).
Connecting and Configuring your Router 2.10 Configuring the Router. The Setup Assistant will now configure your Router by sending data to the Router and restarting it. Wait for the on-screen instructions. Note: Do not disconnect any cable or power off the Router while the Router is rebooting. Doing so will render your Router inoperable. 2.11 Checking Internet Connection. We are almost done. The Setup Assistant will now check your connection to the Internet.
Connecting and Configuring your Router 1 2 3 5 6 7 Congratulations 8 You have finished installing your new Belkin Router. You will see the Congratulations screen when your Router can connect to the Internet. You can begin surfing by opening your browser and going to any website. 9 You can use the Setup Assistant to set up your other wired and wireless computers to connect to the Internet by clicking “Next”.
Connecting and Configuring your Router Troubleshooting If the Setup Assistant is not able to connect to the Internet, you will see the following screen. Follow the on-screen instructions to go through the troubleshooting steps. 2.12 Optional: Assistance Connecting Other Computers This optional step will help you to connect additional wired and wireless computers to your network. Follow the on-screen instructions.
Connecting and Configuring your Router 1 Congratulations Once you have verified that your other wired and wireless computers are properly connected, your network is set up and working. You can now surf the Internet. Click “Next” to take you back to the main menu.
Alternate Setup Method Step 1: Hardware Connections – Follow the Quick Installation Guide See the QIG or Step 1A/B: Hardware Connections from the previous section. Step 2: Set your Computer’s Network Settings to Work with a DHCP Server See the section in this User Manual called “Manually Configuring Network Settings” for directions. Step 3: Configuring the Router Using the Web-Based Advanced User Interface Using your Internet browser, you can access the Router’s Web-Based Advanced User Interface.
Alternate Setup Method 1 Logging out of the Router Understanding the Web-Based Advanced User Interface The home page is the first page you will see when you access the Advanced User Interface (UI). The home page shows you a quick view of the Router’s status and settings. All advanced setup pages can be reached from this page. 2 3 4 5 6 7 8 9 10 12 1. Quick-Navigation Links You can go directly to any of the Router’s advanced UI pages by clicking directly on these links.
Alternate Setup Method 3. Help Button The “Help” button gives you access to the Router’s help pages. Help is also available on many pages by clicking “more info” next to certain sections of each page. 4. Login/Logout Button This button enables you to log in and out of the Router with the press of one button. When you are logged into the Router, this button will change to read “Logout”. Logging into the Router will take you to a separate login page where you will need to enter a password.
Alternate Setup Method Step 4: Configuring your Router for Connection to your Internet Service Provider (ISP) 2 3 4 5 6 7 8 9 10 12 Connection Type From the “Connection Type” page, you can select one of these five connection types based on the instruction provided by your ISP: • PPPoE • PPPoA • Dynamic IP (1483 Bridged) • Static IP (IPoA) • Modem Only (Disable Internet Sharing) 25 section The “Internet/WAN” tab is where you will set up your Router to connect to your ISP.
Alternate Setup Method Select the type of connection you use by clicking the radio button (1) next to your connection type and then clicking “Next” (2). Setting your ISP Connection Type to PPPoE or PPPoA PPPoE (Point-to-Point Protocol over Ethernet) is the standard method of connecting networked devices. It requires a user name and password to access the network of your ISP for connecting to the Internet. PPPoA (PPP over ATM) is similar to PPPoE, but is mostly implemented in the UK.
Alternate Setup Method 1 2. Password - Enter your password (assigned by your ISP). 2 3. Retype Password - Confirm the password (assigned by your ISP). 3 4. VPI/VCI - Enter your Virtual Path Identifier (VPI) and Virtual Circuit Identifier. (VCI) parameter here (assigned by your ISP). 4 5. Encapsulation - Select your encapsulation type (supplied by your ISP) to specify how to handle multiple protocols at the ATM transport layer.
Alternate Setup Method Setting your Connection Type to Dynamic IP (1483 Bridged) This connection method bridges your network and ISP’s network together. The Router will obtain an IP address automatically from your ISP’s DHCP server. (1) (2) 1. VPI/VCI - Enter your VPI and VCI parameter here. These identifiers are assigned by your ISP. 2. Encapsulation - Select LLC or VC MUX your ISP uses. Click “Apply Changes/Next” to save and activate your settings.
Alternate Setup Method Setting your ISP Connection Type to Static IP (IPoA) This connection type is also called “Classical IP over ATM” or “CLIP”, which comprises a fixed IP address that your ISP provides for your Router to connect to the Internet. 2 3 4 5 6 7 1. WAN IP Address – Enter an IP address assigned by your ISP for the Router WAN interface. 2. WAN Subnet Mask - Enter a subnet mask assigned by your ISP. 3. Default Gateway - Enter a default gateway IP address.
Alternate Setup Method (1) (2) 1. VPI/VCI - Enter your VPI and VCI parameter here (assigned by your ISP). 2. Encapsulation - Select LLC or VC MUX your ISP uses. Click “Apply Changes” to save and activate your settings. To go back to the original settings before saving, click “Clear Changes”; or click any of the quick-navigation links for other options. Your new settings will not be saved unless you click “Apply Changes/Next”.
Alternate Setup Method 1 Using Dynamic DNS The Dynamic DNS service allows you to create an alias dynamic IP address to a static host name in any of the many domains DynDNS.org offers, allowing your network computers to be more easily accessed from various locations on the Internet. DynDNS.org provides this service, for up to five host names, free to the Internet community. To register free for your Dynamic DNS host name, please visit http://www.dyndns.org.
Alternate Setup Method Whenever your IP address assigned by your ISP changes, the Router will automatically update DynDNS.org’s servers with your new IP address. You can also do this manually by clicking the “Apply Changes” button (4).
Using the Web-Based Advanced User Interface Using the Web-Based Advanced User Interface Using your Internet browser, you can access the Router’s Web-Based Advanced User Interface. In your browser, type “192.168.2.1” (do not type in anything else such as “http://” or “www”) then press the “Enter” key. 1 2 3 4 5 Viewing the LAN Settings Clicking on the header of the LAN tab (1) will take you to the LAN tab’s header page. A quick description of the functions can be found here.
Using the Web-Based Advanced User Interface Changing LAN Settings All settings for the internal LAN setup of the Router can be viewed and changed here. 1. IP Address The “IP address” is the internal IP address of the Router. The default IP address is “192.168.2.1”. To access the advanced setup interface, type this IP address into the address bar of your browser. This address can be changed if needed. To change the IP address, type in the new IP address and click “Apply Changes”.
Using the Web-Based Advanced User Interface 1 4. IP Pool The range of IP addresses set aside for dynamic assignment to the computers on your network. The default is 2–100 (99 computers). If you want to change this number, you can do so by entering a new starting and ending IP address and clicking on “Apply Changes”. The DHCP server can assign 100 IP addresses automatically. This means that you cannot specify an IP address pool larger than 100 computers.
Using the Web-Based Advanced User Interface Configuring the Wireless Network Settings The “Wireless” tab lets you make changes to the wireless network settings. From this tab you can make changes to the wireless network name or Service Set Identifier (SSID), operating channel, encryption security settings, and configure the Router to be used as an access point. Wi-Fi® Multimedia (WMM®) Settings Enabling the WMM allows you to prioritize the data packets of your network.
Using the Web-Based Advanced User Interface Changing the Wireless Network Name (SSID) Note: Please periodically check for new Router firmware updates from the “Utilities > Firmware update” page. Newer firmware can fix problems, add wireless features, and/or improve wireless performance (see page 51). 2 3 4 5 6 7 8 9 10 12 Changing the Wireless Channel There are a number of operating channels from which you can choose—in the United Kingdom (and most of Europe) and Australia, there are 13.
Using the Web-Based Advanced User Interface Using the Wireless Mode Switch This switch allows you to set the Router’s wireless modes. There are several modes. Note: Some modes may require firmware updates to be enabled. 1) 802.11g + 802.11b Setting the Router to this mode will allow 802.11g- and 802.11bcompliant devices to join the network. 802.11g devices will operate at the 802.11b speed only 2) 802.11g only Setting the Router to this mode will allow only 802.
Using the Web-Based Advanced User Interface 1 2 3 4 5 6 7 WPA2 Requirements IMPORTANT: In order to use WPA2 security, all your computers and wireless client adapters must be upgraded with patches, driver, and client utility software that supported WPA2. At the time of this User Manual’s publication, a couple security patches are available, for free download, from Microsoft ®. These patches work only with the Windows XP operating system. Other operating systems are not supported at this time.
Using the Web-Based Advanced User Interface Setting WPA/WPA2-Personal (PSK) Like WPA security, WPA2 is available in both WPA2-Personal (PSK) mode and WPA2-Enterprise (RADIUS) mode. Typically, WPA2-Personal (PSK) is the mode that will be used in a home environment, while WPA2-Enterprise (RADIUS) is implemented in a business environment where an external radius server distributes the network key to the clients automatically. This guide will focus on WPA2-Personal (PSK) usage.
Using the Web-Based Advanced User Interface IMPORTANT: Make sure your wireless computers are updated to work 1 with WPA2 and have the correct settings to get proper connection to the Router. 2 Setting WPA Security 3 Note: To use WPA security, your wireless network cards must be equipped with software that supports WPA. At the time this User Manual was published, a security patch from Microsoft is available for free download. This patch works only with Windows XP. Setting WPA-PSK 1.
Using the Web-Based Advanced User Interface WPA-Enterprise (RADIUS) is a configuration wherein a radius server distributes the keys to the clients automatically. This is typically used in a business environment. Setting WPA-Enterprise (RADIUS) Settings If your network uses a radius server to distribute keys to the clients, use this setting. 1. From the “Security Mode” drop-down menu, select “WPA/WPA2— Enterprise (RADIUS)”. 2. Select “WPA-RADIUS” in the “Authentication” field. 3.
Using the Web-Based Advanced User Interface Setting WPA2-Enterprise (RADIUS) Settings 1 If your network uses a radius server to distribute keys to the clients, use this setting. 2 1. From the “Security Mode” drop-down menu, select “WPA/WPA2— Enterprise (RADIUS)”. 3 2. Select “WPA2-RADIUS” in the “Authentication” field. 3. In the “Encryption Technique” field, select “AES”. This setting will have to be identical on the clients that you set up. 4 5 5. Enter the radius key into the “Radius Key” field.
Using the Web-Based Advanced User Interface 3. Encryption in the Router is now set. Each of your computers on your wireless network will now need to be configured with the same passphrase. Refer to the documentation of your wireless network adapter for information on making this change. Using a Hexadecimal Key A hexadecimal key is a mixture of numbers and letters from A–F and 0–9. 64-bit keys are 10 digits long and can be divided into five twodigit numbers.
Using the Web-Based Advanced User Interface 1 Wireless Bridge Wireless bridging or Wireless Distribution System (WDS) is used to connect wireless routers and access points (APs) together to extend a network. Click on the drop-down menu next to “Bridge Mode” to select either: 2 3 4 5 7 8 9 Disabled: To disable wireless bridging (default). Manual: To enter the wireless MAC address(es) of the APs to which to bridge, manually. 1. Wireless channels must match between the Router and AP. 2.
Using the Web-Based Advanced User Interface Configuring the Firewall Your Router is equipped with a firewall that will protect your network from a wide array of common hacker attacks including: • IP Spoofing • Land Attack Ping of Death (PoD) • Denial of Service (DoS) • IP with zero length • Smurf Attack • TCP Null Scan • SYN flood • UDP flooding • Tear Drop Attack • ICMP defect • RIP defect • Fragment flooding The firewall also masks common ports that are frequently used to attack n
Using the Web-Based Advanced User Interface Since your internal computers are protected by a firewall, computers outside your network (over the Internet) cannot get to them because they cannot be “seen”. A list of common applications has been provided in case you need to configure the Virtual Server function for a specific application. If your application is not listed, you will need to contact the application vendor to find out which port settings you need.
Using the Web-Based Advanced User Interface Setting Client IP Filters The Router can be configured to restrict access to the Internet, e-mail, or other network services at specific days and times. Restriction can be set for a single computer, a range of computers, or multiple computers. To restrict Internet access to a single computer for example, enter the IP address of the computer you wish to restrict access to in the IP fields (1). Next, enter “80” in both the port fields (2). Select “Both” (3).
Using the Web-Based Advanced User Interface 1 2 3 4 Enabling the Demilitarized Zone (DMZ) 5 6 7 8 9 10 To put a computer in the DMZ, enter the last digits of its IP address in the IP field and select “Enable”. Click “Apply Changes” for the change to take effect. If you are using multiple static WAN IP addresses, it is possible to select which WAN IP address the DMZ host will be directed to.
Using the Web-Based Advanced User Interface To turn off the ping response, select “Block ICMP Ping” (1) and click “Apply Changes”. The Router will not respond to an ICMP ping. Security Log The security log shows detailed system-monitoring information. Users can click the “Save” button to store the log as a text file for later reference purposes. The “Refresh” button refreshes the page with any new logs and the “Clear” button clears the page of any existing logs.
Using the Web-Based Advanced User Interface 1 Utilities The “Utilities” screen lets you manage different parameters of the Router and perform certain administrative functions. 2 3 4 5 7 Restarting the Router Sometimes it may be necessary to restart or reboot the Router if it begins working improperly. Restarting or rebooting the Router will NOT delete any of your configuration settings. 8 9 10 12 Restarting the Router to Restore Normal Operation 1. Click the “Restart Router” button. 2.
Using the Web-Based Advanced User Interface 3. The following message will appear. Restarting the Router can take up to 60 seconds. It is important not to turn off the power to the Router during the restart. 4. A 60-second countdown will appear on the screen. When the countdown reaches zero, the Router will be restarted. The Router home page should appear automatically. If not, type in the Router’s address (default = 192.168.2.1) into the navigation bar of your browser.
Using the Web-Based Advanced User Interface 4. A 60-second countdown will appear on the screen. When the countdown reaches zero, the Router’s defaults will be restored. The Router home page should appear automatically. If it does not, type in the Router’s address (default = 192.168.2.1) into the navigation bar of your browser. Saving a Current Configuration You can save your current configuration by using this feature.
Using the Web-Based Advanced User Interface 3. When the save is complete, you will see the window below. Click “Close”. The configuration is now saved. Restoring a Previous Configuration This option will allow you to restore a previously saved configuration. 1. Click “Browse”. A window will open that allows you to select the location of the configuration file. All configuration files end with a “.bin”. Locate the configuration file you want to restore and double-click on it. 2.
Using the Web-Based Advanced User Interface 3. A reminder window will appear. It will take up to 60 seconds for the configuration restoration to complete. Click “OK”. 1 2 3 4 5 6 7 Updating the Firmware From time to time, Belkin may release new versions of the Router’s firmware. Firmware updates contain feature improvements and fixes to problems that may have existed.
Using the Web-Based Advanced User Interface 1. To download the new version of firmware, click “Download”. A window will open that allows you to select the location where you want to save the firmware file. Select a location. You can name the file anything you want, or use the default name. Be sure to locate the file in a place where you can locate it yourself later. When you have selected the location, click “Save”. 2. When the save is complete, you will see the following window. Click “Close”. 3.
Using the Web-Based Advanced User Interface 1 Updating the Router’s Firmware 1. In the “Firmware Update” page, click “Browse”. A window will open that allows you to select the location of the firmware update file. 2 3 4 5 2. Browse to the firmware file you downloaded. Select the file by double-clicking on the file name. The “Update Firmware” box will now display the location and name of the firmware file you just selected. Click “Update”. 7 8 9 10 12 3.
Using the Web-Based Advanced User Interface 4. You will see one more message. This message tells you that the Router may not respond for as long as one minute as the firmware is loaded into the Router and the Router is rebooted. Click “OK”. 5. A 60-second countdown will appear on the screen. When the countdown reaches zero, the Router firmware update will be complete. The Router home page should appear automatically. If not, type in the Router’s address (default = 192.168.2.
Using the Web-Based Advanced User Interface The login time-out option allows you to set the period of time that you can be logged into the Router’s advanced setup interface. The timer starts when there has been no activity. For example, imagine you have made some changes in the advanced setup interface, then left your computer alone without clicking “Logout”. Assuming the time-out is set to 10 minutes, 10 minutes after you leave, the login session will expire.
Using the Web-Based Advanced User Interface manage the Router”. By typing in your WAN IP address from any computer on the Internet, you will be presented with a login screen where you need to type in the password of your Router. The second method is to allow a specific IP address only to remotely manage the Router. This is more secure, but less convenient.
Using the Web-Based Advanced User Interface 1 Enabling/Disabling UPnP 2 3 4 5 6 7 8 9 10 Enabling/Disabling Auto Firmware Update This innovation provides the Router with the built-in capability to automatically check for a new version of firmware and alert you that the new firmware is available. When you log into the Router’s advanced interface, the Router will perform a check to see if new firmware is available. If so, you will be notified. You can choose to download the new version or ignore it.
Manually Configuring Network Settings Manually Configuring Network Settings Set up the computer that is connected to the cable or DSL modem FIRST using these steps. You can also use these steps to add computers to your Router after the Router has been set up to connect to the Internet. Manually Configuring Network Settings in Mac OS up to 9.x 1. Pull down the Apple menu. Select “Control Panels” and select “TCP/IP”. 2. You will see the TCP/IP control panel.
Manually Configuring Network Settings 5. Close the window. If you made any changes, the following window will appear. Click “Save”. 1 2 3 4 Restart the computer. When the computer restarts, your network settings are now configured for use with the Router. 5 Manually Configuring Network Settings in Mac OS X 6 7 8 2. Select “Network” (1) from the “System Preferences” menu. 9 10 12 3. Select “Built-in Ethernet” (2) next to “Show” in the Network menu. 63 section 1.
Manually Configuring Network Settings 4. Select the “TCP/IP” tab (3). Next to “Configure” (4), you should see “Manually” or “Using DHCP”. If you do not, check the PPPoE tab (5) to make sure that “Connect using PPPoE” is NOT selected. If it is, you will need to configure your Router for a PPPoE connection type using your user name and password. 5. If “Manually” is selected, your Router will need to be set up for a static IP connection type. Write the address information in the table below.
Manually Configuring Network Settings 5. If “Use the following IP address” (2) is selected, your Router will need to be set up for a static IP connection type. Write the address information the table below. You will need to enter this information into the Router. 1 2 3 4 5 6 7 Your network settings are now configured for use with the Router. 8 Manually Configuring Network Settings in Windows 98 or Me 9 1. Right-click on “My Network Neighborhood” and select “Properties” from the drop-down menu.
Manually Configuring Network Settings 3. If “Specify and IP address” is selected, your Router will need to be set up for a static IP connection type. Write the address information in the table below. You will need to enter this information into the Router. 4. Write the IP address and subnet mask from the “IP Address” tab (3). 5. Click the “Gateway” tab (2). Write the gateway address down in the chart. 6. Click the “DNS Configuration” tab (1). Write the DNS address(es) in the chart. 7.
Recommended Web Browser settings Recommended Web Browser Settings 1 In most cases, you will not need to make any changes to your web browser’s settings. If you are having trouble accessing the Internet or the Web-Based Advanced User Interface, then change your browser’s settings to the recommended settings in this section. 2 Microsoft® Internet Explorer 4.0 or Higher 4 1. Start your web browser. Select “Tools” then “Internet Options”. 3 5 6 7 8 2.
Recommended Web Browser settings 3. Under the “Internet Options” screen, click on “Connections” and select “LAN Settings…”. 4. Make sure there are no check marks next to any of the displayed options: “Automatically detect settings”, “Use automatic configuration script”, and “Use a proxy server”. Click “OK”. Then click “OK” again in the “Internet Options” page.
Recommended Web Browser settings Netscape® Navigator® 4.0 or Higher 1. Start Netscape. Click on “Edit” then “Preferences”. 2. In the “Preferences” window, click on “Advanced” then select “Proxies”. In the “Proxies” window, select “Direct connection to the Internet”.
Troubleshooting Problem: Setup Assistant CD does not automatically start. Solution: If the CD-ROM does not start the Setup Assistant automatically, it could be that the computer is running other applications that are interfering with the CD drive. 1. If the Setup Assistant Welcome screen does not appear within 1520 seconds, open up your CD-ROM drive by double-clicking on the “My Computer” icon that is located on your desktop. 2.
Troubleshooting power back into the Router. Ensure that the Router’s “Power” LED is on; it should be solid GREEN. If not, check to make sure that the AC adapter is connected to the Router and plugged into a wall outlet 3. Ensure that you have a cable connected between (1) the network (Ethernet) port on the back of the computer and (2) one of the “Connections to your computers” ports on the back of the Router.
Troubleshooting and the “Internet” LED is blinking, the problem may be that your modem and Router are not connected properly. 1. Make sure the network cable between the modem and the Router is connected. The cable should be connected at one end to the Router’s “DSL Line” port, and at the other end to the network port on your modem. 2. Unplug the cable or DSL modem from its power source for three minutes. After three minutes, plug the modem back into its power source.
Troubleshooting 1 type in “ISP”. If you are still unable to access the Internet after verifying these settings, please contact Belkin Technical Support. Problem: 2 • The Setup Assistant completed, but my web browser doesn’t work. 3 • I am unable to connect to the Internet. The “ADSL” LED on my Router is blinking, and the “Internet” LED is solid. 4 Solution: 1.
Troubleshooting * The “WLAN Status” LED should be on, not blinking. 2. Open your wireless utility software by clicking on the icon in the system tray at the bottom, right-hand corner of the screen. 3. The exact window that opens will vary depending on the model of wireless card you have; however, any of the utilities should have a list of “Available Networks”—those wireless networks it can connect to.
Troubleshooting Router. Close the wireless utility, and reopen it. If the correct network name now appears under “Available Networks”, you may have a range or interference problem. Please see the suggestions discussed in the section titled “Placement of your Wireless G Plus MIMO ADSL2+ Modem Router” of this User Manual. 2. Using a computer that is connected to the Router via a network cable (as opposed to wirelessly), ensure that “Broadcast SSID” is enabled.
Troubleshooting connection stability. Most wireless cards have the ability to limit the transmission rate. To change this property, go to the Windows Control Panel, open “Network Connections” and double-click on your wireless card’s connection. In the properties dialog, select the “Configure” button on the “General” tab (Windows 98 users will have to select the wireless card in the list box and then click “Properties”), then choose the “Advanced” tab and select the rate property.
Troubleshooting 4.Click “Apply Changes” to finish. Encryption in the Router is now 1 set. Each of your computers on your wireless network will now need to be configured with the same security settings. 2 WARNING: If you are configuring the Router from a computer with a wireless client, you will need to ensure that security is turned on for this wireless client. If this is not done, you will lose your wireless connection.
Troubleshooting and 0-9. For 128-bit WEP, you need to enter 26 keys. This network key needs to match the key you assign to your Router. For example: C3 03 0F AF 4B B2 C3 D4 4B C3 D4 E7 E4 = 128-bit key 8. Click “OK”, and then “Apply” to save the settings. If you are not using a Belkin wireless client card, please consult the manufacturer’s user manual for that wireless client card.
Troubleshooting This same key must be used on all of the clients that you set up. For example, your PSK might be something like: “Smith family network key”. 4. Click “Apply Changes” to finish. You must now set all clients to match these settings. Problem: I am having difficulty setting up Wireless Protected Access (WPA) security on a Belkin wireless client card for a home network. 1 2 3 4 Solution: 5 Clients must use the same key that the Router uses.
Troubleshooting XP WPA. Note: The file that Microsoft has made available works only with Windows XP. Other operating systems are not supported at this time. You also need to ensure that the wireless card’s manufacturer supports WPA and that you have downloaded and installed the latest driver from their support site. Supported Operating Systems: • Windows XP Professional • Windows XP Home Edition 1. Under Windows XP, click “Start > Control Panel > Network Connections”. 2.
Troubleshooting 1 (draft 802.11n with MIMO) G+ MIMO(802.11g with MIMO MRC) G+ (802.11g with HSM) 5x faster than 802.11b* 10x faster than 802.11b* 10x faster than 802.11b* 15x faster than 802.11b* Common household devices such as cordless phones and microwave ovens may interfere with the unlicensed band 2.4GHz Common household devices such as cordless phones and microwave ovens may interfere with the unlicensed band 2.
Troubleshooting Technical Support Belkin Technical Support For latest software updates or if you have any further questions regarding installation of this product, please visit www.belkin.
Information 1 FCC Statement DECLARATION OF CONFORMITY WITH FCC RULES FOR ELECTROMAGNETIC COMPATIBILITY We, Belkin Corporation, of 501 West Walnut Street, Compton, CA 90220, declare under our sole responsibility that the product, F5D9630-4 to which this declaration relates, complies with Part 15 of the FCC Rules.
Information • Reorient or relocate the receiving antenna. • Increase the distance between the equipment and the receiver. • Connect the equipment to an outlet on a circuit different from that to which the receiver is connected. • Consult the dealer or an experienced radio/TV technician for help. Modifications The FCC requires the user to be notified that any changes or modifications to this device that are not expressly approved by Belkin Corporation may void the user’s authority to operate the equipment.
Information What the period of coverage is. Belkin Corporation warrants the Belkin product for the lifetime of the product. 1 What will we do to correct problems? Product Warranty. 2 Belkin will repair or replace, at its option, any defective product free of charge (except for shipping charges for the product).
Wireless G+ MIMO ADSL2+ Modem Router Free Tech Support* You can find additional support information on our website www.belkin.com through the tech-support area. If you want to contact technical support by phone, please call the number you need from the list below*.