P74080-em-F5U209-man_9-02.qxd 9/19/02 3:05 PM Page a En Fr Hi-Speed USB 2.0 External Drive Enclosure User Manual De Manuel d’utilisation du boîtier externe USB 2.0 High Speed Ne Benutzerhandbuch für externes Laufwerkgehäuse für USB 2.0 Hi-Speed Gebruikershandleiding voor houder voor extern Hi-Speed USB 2.0-station Alojamiento de unidad externa USB 2.0 de alta velocidad Manual del usuario Hi-Speed USB 2.
P74080-em-F5U209-man_9-02.
P74080-em-F5U209-man_9-02.qxd 9/19/02 3:05 PM Page c TABLE OF CONTENTS En Introduction . . . . . . . . . . . . . . . . . . . . . . . . . . . . . . . . . . . . . . . . .1 System Requirements . . . . . . . . . . . . . . . . . . . . . . . . . . . . . . . . .2 Assembling Your Drive Enclosure . . . . . . . . . . . . . . . . . . . . . . . . .3 Driver Installation . . . . . . . . . . . . . . . . . . . . . . . . . . . . . . . . . . . .8 Safe Removal of the USB Disk . . . . . . . . . . . . . . . . . . . . . . .
P74080-em-F5U209-man_9-02.
P74080-em-F5U209-man_9-02.qxd 9/19/02 3:05 PM Page 1 INTRODUCTION En The Hi-Speed USB 2.0 External Drive Enclosure (the External Drive) is a portable compact storage drive that incorporates the USB 2.0 (Universal Serial Bus 2.0) high-speed interface. The External Drive provides a fast and easy way to add more storage space to your computer.
P74080-em-F5U209-man_9-02.qxd 9/19/02 3:05 PM Page 2 SYSTEM REQUIREMENTS Hardware Notebook and desktop computer with USB 1.0 or USB 2.
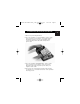
P74080-em-F5U209-man_9-02.qxd 9/19/02 3:05 PM Page 3 ASSEMBLING YOUR DRIVE ENCLOSURE En 1. Remove top of the External Drive. 2. If you are installing a 31/2-inch hard drive, check to make sure your drive is set to “Master” (see jumper setting information printed on top of your disk drive), then connect the 34-position data cable and 4-position power cable. 3.
P74080-em-F5U209-man_9-02.qxd 9/19/02 3:05 PM Page 4 ASSEMBLING YOUR DRIVE ENCLOSURE Note: There are four fine-threaded screws, and four course-threaded screws included with your Hi-Speed External Drive Enclosure Kit. Be sure to choose the screws that match the mounting holes for your drive. Do not try to force a course-threaded screw into a fine-threaded mounting hole. 5. Replace top cover and make sure it is aligned with bottom cover.
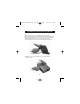
P74080-em-F5U209-man_9-02.qxd 9/19/02 3:05 PM Page 5 ASSEMBLING YOUR DRIVE ENCLOSURE En 6. Hook the first side rail around the front edge of the External Drive and press the rail into the six rectangular-shaped mounting holes on the side. 7. If you are installing a hard disk, it is necessary to install the front panel. Insert the tabs on one side of the front panel into the mounting holes in the installed side rail.
P74080-em-F5U209-man_9-02.qxd 9/19/02 3:05 PM Page 6 ASSEMBLING YOUR DRIVE ENCLOSURE 8. Insert the mounting tabs on the free end of the front panel into the second side rail, and hook the side rail onto the front of the External Drive. 9. Finish the assembly by pressing the rail into the six rectangular mounting holes in the side of the External Drive. Important Note: If you are using Windows 98 or 98 SE, DO NOT connect the External Drive to your computer until driver installation is completed.
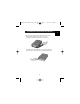
P74080-em-F5U209-man_9-02.qxd 9/19/02 3:05 PM Page 7 ASSEMBLING YOUR DRIVE ENCLOSURE En 10. Plug the square-shaped connector of the USB cable into the USB port on the rear panel of the External Drive. 11. Plug the rectangular-shaped connector of the USB cable into a Hi-Speed USB 2.0 port on your computer or Hi-Speed USB 2.0 hub. You may also connect the cable to a full-speed USB 1.1 port on your computer or full-speed USB 1.1 hub. Note: When connected to a full-speed USB 1.
P74080-em-F5U209-man_9-02.qxd 9/19/02 3:05 PM Page 8 DRIVER INSTALLATION Windows 98 SE 1. Insert the installation CD into your CD-ROM drive. 2. Open the Install CD. 3. Run the “TPPINST.EXE” to install the drivers for your USB 2.0 External Drive. 4. An installer dialog box appears. Click “Next”. 5. Choose “Complete” and click “Next”. 6. You may now connect the External Drive to your computer. 7. Windows will now detect “USB Storage Adapter”, and finish installation of the required device drivers. 8.
P74080-em-F5U209-man_9-02.qxd 9/19/02 3:05 PM Page 9 DRIVER INSTALLATION En Note: If the new drive does not appear in My Computer, you may need to partition and format the drive. Please refer to the “Format the USB 2.0 External Drive” section to prepare your USB 2.0 hard disk drive. A green “Unplug or Eject Hardware” icon will appear in the system tray. Windows Me/2000/XP 1. If you are plugging the External Drive into your computer for the first time, Windows will detect “USB 2.
P74080-em-F5U209-man_9-02.qxd 9/19/02 3:05 PM Page 10 SAFE REMOVAL OF THE USB DISK FROM WINDOWS Windows 98 1. Click the green “Unplug or Eject Hardware” icon in the system tray and select the device that you want to remove. 2. When the system prompts “You may safely remove this device”, unplug the USB cable from the USB port of your computer. Windows Me/2000/XP 1. Double-click on the “Unplug or Eject Hardware” icon in the system tray. 2. Select the “USB Mass Storage Device” then click “Stop”. 3.
P74080-em-F5U209-man_9-02.qxd 9/19/02 3:05 PM Page 11 FORMAT THE USB 2.0 EXTERNAL DRIVE Format under Windows 98/Me 1. Boot-up the computer into the Windows operating system. 2. Plug in your External Drive. There are two methods to partition and format your USB 2.0 hard disk drive. Control Panel Method 1. Click “Start” and choose “Setting”. 2. Choose “Control Panel”. 3. Double-click on “System”, then “Device Manager”. 4. The following screen will appear.
P74080-em-F5U209-man_9-02.qxd 9/19/02 3:05 PM Page 12 FORMAT THE USB 2.0 EXTERNAL DRIVE 5. Select “Disk Drives”. Your new hard disk will appear in the hard drive list (in this case as “Toshiba 1924FCV”). 6. Double-click on the entry for your hard drive. Select “Settings”. The following screen will appear. 7. Make sure there are check marks in the “Disconnect”, “Sync Data Transfer”, “Removable”, and “Int 13 unit” boxes. After making these changes, it will be necessary to restart your computer. 8.
P74080-em-F5U209-man_9-02.qxd 9/19/02 3:05 PM Page 13 FORMAT THE USB 2.0 EXTERNAL DRIVE En DOS Method (Recommended for Advanced Users Only) 1. Click on “Start”, and choose “Programs”. Select “MSDOS”. 2. At the DOS prompt, type “FDISK” and press “Enter”. Note: If the FDISK utility terminates without displaying an error message, exit back to Windows and disconnect the External Drive. Reboot your computer. When Windows restarts, reconnect the External Drive and go back to Step 1. 3.
P74080-em-F5U209-man_9-02.qxd 9/19/02 3:05 PM Page 14 FORMAT THE USB 2.0 EXTERNAL DRIVE IMPORTANT Be sure that you select option 5 and change the “Current Fixed Disk” from “Disk 1” to the disk number assigned to your External Drive. If your computer is equipped with only one internal drive, your new External Drive will be identified as “Disk 2”. If your computer is equipped with two internal disk drives, your new External Drive will be identified as “Disk 3”.
P74080-em-F5U209-man_9-02.qxd 9/19/02 3:05 PM Page 15 FORMAT THE USB 2.0 EXTERNAL DRIVE En Note: If you are viewing the Control Panel in classic mode, proceed directly to “Administrative Tools”. 2. Click on “Disk Management”. All connected disk drives will be displayed in the lower right-hand corner of the “Computer Management” window. Information regarding the status of each of your disk drives will be displayed in this window.
P74080-em-F5U209-man_9-02.qxd 9/19/02 3:05 PM Page 16 INFORMATION FCC Statement DECLARATION OF CONFORMITY WITH FCC RULES FOR ELECTROMAGNETIC COMPATIBILITY We, Belkin Corporation, of 501 West Walnut Street, Compton, CA 90220, declare under our sole responsibility that the product: F5U209 to which this declaration relates: Complies with Part 15 of the FCC Rules.
P74080-em-F5U209-man_9-02.qxd 9/19/02 3:05 PM Page 17 En Belkin Corporation 501 West Walnut Street Compton • CA • 90220 • USA Tel: 310.898.1100 Fax: 310.898.1111 Belkin Components, Ltd. Express Business Park Shipton Way • Rushden • NN10 6GL United Kingdom Tel: +44 (0) 1933 35 2000 Fax: +44 (0) 1933 31 2000 Belkin Components B.V. Starparc Building • Boeing Avenue 333 1119 PH Schiphol-Rijk • The Netherlands Tel: +31 (0) 20 654 7300 Fax: +31 (0) 20 654 7349 Belkin Components Ltd.
P74080-em-F5U209-man_9-02.
P74080-em-F5U209-man_9-02.qxd 9/19/02 3:05 PM Page 19 SOMMAIRE Introduction . . . . . . . . . . . . . . . . . . . . . . . . . . . . . . . . . . . . . . . . .1 Configuration requise . . . . . . . . . . . . . . . . . . . . . . . . . . . . . . . . .2 Montage du boîtier . . . . . . . . . . . . . . . . . . . . . . . . . . . . . . . . . . .3 Installation du pilote . . . . . . . . . . . . . . . . . . . . . . . . . . . . . . . . . .8 Retrait du disque USB . . . . . . . . . . . . . . . . . . . . . . . . . . . .
P74080-em-F5U209-man_9-02.
P74080-em-F5U209-man_9-02.qxd 9/19/02 3:05 PM Page 1 INTRODUCTION Le boîtier externe USB 2.0 High Speed (lecteur externe) est un lecteur de stockage portable et compact qui incorpore l’interface USB 2.0 (Universal Serial Bus 2.0) High Speed. Le lecteur externe vous permet d’ajouter rapidement et facilement un espace de stockage supplémentaire à votre ordinateur.
P74080-em-F5U209-man_9-02.qxd 9/19/02 3:05 PM Page 2 CONFIGURATION REQUISE Matériel Bloc-notes et ordinateur de bureau équipé d’un port USB 1.0 ou USB 2.
P74080-em-F5U209-man_9-02.qxd 9/19/02 3:05 PM Page 3 MONTAGE DU BOÎTIER 1. Enlevez le couvercle du lecteur externe. 2. Si vous installez un disque dur de 3 _ pouces, vérifiez que le cavalier du disque est positionné sur « Master » (voir l’information concernant le réglage du cavalier qui figure sur le couvercle du lecteur). Connectez le câble de données à 34 broches et le câble d’alimentation à 4 broches. 3.
P74080-em-F5U209-man_9-02.qxd 9/19/02 3:06 PM Page 4 MONTAGE DU BOÎTIER Remarque : le kit du boîtier externe High Speed comprend quatre vis à filetage fin et quatre vis à filetage épais. Choisissez les vis adaptées aux trous de montage du lecteur. N’essayez pas de faire rentrer une vis à filetage épais dans un trou à filetage fin. 5. Remettez le couvercle en place et vérifiez qu’il est aligné sur le fond.
P74080-em-F5U209-man_9-02.qxd 9/19/02 3:06 PM Page 5 MONTAGE DU BOÎTIER 6. Accrochez le premier rail latéral à l’avant du lecteur externe et enfoncez le rail dans les six trous rectangulaires situés sur les côtés. 7. En cas d’installation d’un disque dur, il est nécessaire de poser le cache. Insérez les onglets d’un côté du cache dans les trous de montage situés sur le rail latéral monté sur le châssis.
P74080-em-F5U209-man_9-02.qxd 9/19/02 3:06 PM Page 6 MONTAGE DU BOÎTIER 8. Insérez les onglets de l’extrémité libre du cache dans le second rail latéral et encliquetez le rail latéral à l’avant du lecteur externe. 9. Terminez le montage en enfonçant le rail dans les six trous de montage rectangulaires situés sur le côté du lecteur externe. Remarque importante : si vous utilisez Windows 98 ou 98 SE, connectez le lecteur externe à votre ordinateur APRÈS avoir fini d’installer le pilote.
P74080-em-F5U209-man_9-02.qxd 9/19/02 3:06 PM Page 7 MONTAGE DU BOÎTIER 10. Branchez le connecteur carré du câble USB sur le port USB situé à l’arrière du lecteur externe. 11. Branchez le connecteur rectangulaire du câble USB sur le port USB 2.0 High Speed de l’ordinateur ou le hub USB 2.0 High Speed. Vous pouvez également connecter le câble à un port USB 1.1 Full Speed de votre ordinateur ou un hub USB 1.1 Full Speed. Remarque : en cas de connexion à un port USB 1.
P74080-em-F5U209-man_9-02.qxd 9/19/02 3:06 PM Page 8 INSTALLATION DU PILOTE Windows 98 SE 1. Insérez le CD d’installation dans votre lecteur de CD-ROM. 2. Ouvrez le CD Install. 3. Exécutez le fichier « TPPINST.EXE » pour installer les pilotes de votre lecteur externe USB 2.0. 4. Une boîte de dialogue d’installation apparaît. Cliquez sur « Suite ». 5. Sélectionnez « Terminer » et cliquez sur « Suite ». 6. Vous pouvez maintenant connecter le lecteur externe à votre ordinateur. 7.
P74080-em-F5U209-man_9-02.qxd 9/19/02 3:06 PM Page 9 INSTALLATION DU PILOTE Remarque : si le nouveau lecteur ne s’affiche pas dans le Poste de travail, cela peut signifier qu’il faut le partitionner et le formater. Veuillez vous référer à la section « Formatage du lecteur externe USB 2.0 » pour préparer votre lecteur de disque dur USB 2.0. Une icône verte « Débrancher ou éjecter le matériel » s’affichera dans la barre d’état système. Windows Me/2000/XP 1.
P74080-em-F5U209-man_9-02.qxd 9/19/02 3:06 PM Page 10 RETRAIT DU DISQUE USB DE WINDOWS Windows 98 1. Cliquez sur l’icône « Débrancher ou éjecter le matériel » de la barre d’état système et sélectionnez le périphérique que vous voulez supprimer. 2. Quand le système affiche le message d’invite « Vous pouvez enlever ce périphérique », débranchez le câble USB du port USB de votre ordinateur. Windows Me/2000/XP 1.
P74080-em-F5U209-man_9-02.qxd 9/19/02 3:06 PM Page 11 FORMATAGE DU LECTEUR EXTERNE USB 2.0 Formatage sous Windows 98/Me 1. Démarrez l’ordinateur sous Windows. 2. Branchez votre lecteur externe. Il y a deux méthodes possibles de partitionnement et de formatage du lecteur de disque dur USB 2.0. Méthode du Panneau de configuration 1. Cliquez sur « Démarrer » et choisissez « Paramètres ». 2. Choisissez « Panneau de configuration ». 3.
P74080-em-F5U209-man_9-02.qxd 9/19/02 3:06 PM Page 12 FORMATAGE DU LECTEUR EXTERNE USB 2.0 5. Sélectionnez « Lecteurs de disques ». Votre nouveau disque dur s’affichera dans la liste des lecteurs de disques durs (il s’agit dans ce cas de « Toshiba 1924FCV »). 6. Cliquez deux fois sur le nom du disque dur. Sélectionnez « Paramètres ». L’écran suivant s’affiche. 7. Vérifiez que les cases « Se déconnecter », « Synchronisation du transfert de données », « Amovible » et « Unité Int 13 » sont cochées.
P74080-em-F5U209-man_9-02.qxd 9/19/02 3:06 PM Page 13 FORMATAGE DU LECTEUR EXTERNE USB 2.0 Méthode DOS (recommandée pour les utilisateurs avancés seulement) 1. Cliquez sur « Démarrer » et choisissez « Programmes ». Sélectionnez « MSDOS ». 2. À l’invite DOS, tapez « FDISK » et appuyez sur « Entrée ». Remarque : si l’utilitaire FDISK s’exécute jusqu’à la fin sans afficher de message d’erreur, revenez à Windows et déconnectez le lecteur externe. Réamorcez votre ordinateur.
P74080-em-F5U209-man_9-02.qxd 9/19/02 3:06 PM Page 14 FORMATAGE DU LECTEUR EXTERNE USB 2.0 IMPORTANT Veillez à bien sélectionner l’option 5 et à modifier le numéro du « Disque dur en cours » en remplaçant « Disque 1 » par le numéro de disque affecté à votre lecteur externe. Si votre ordinateur est équipé d’un seul disque interne, votre nouveau lecteur externe sera le « Disque 2 ». Si votre ordinateur est équipé de deux disques internes, votre nouveau lecteur externe sera le « Disque 3 ».
P74080-em-F5U209-man_9-02.qxd 9/19/02 3:06 PM Page 15 FORMATAGE DU LECTEUR EXTERNE USB 2.0 Remarque : si vous visualisez le Panneau de configuration en mode classique, passez directement à l’option « Outils d’administration ». 2. Cliquez sur « Gestion des disques ». Tous les lecteurs de disques connectés s’afficheront dans l’angle inférieur droit de la fenêtre « Gestion de l’ordinateur ». L’information concernant l’état de chacun de vos lecteurs de disques s’affichera dans cette fenêtre.
P74080-em-F5U209-man_9-02.qxd 9/19/02 3:06 PM Page 16 INFORMATION Déclaration FCC DÉCLARATION DE CONFORMITÉ AVEC LA RÉGLEMENTATION FCC CONCERNANT LA COMPATIBILITÉ ÉLECTROMAGNÉTIQUE Nous, Belkin Corporation, sis à 501 West Walnut Street, Compton, CA 90220, déclarons sous notre entière responsabilité que le produit : F5U209 auquel se rapporte cette déclaration : est conforme à la section 15 de la réglementation FCC.
P74080-em-F5U209-man_9-02.qxd 9/19/02 3:06 PM Page 17 Fr Belkin Corporation 501 West Walnut Street Compton • CA • 90220 • USA Tél. : 310.898.1100 Télécopie : 310.898.1111 Belkin Components, Ltd. Express Business Park Shipton Way • Rushden • NN10 6GL Royaume-Uni Tél. : +44 (0) 1933 35 2000 Télécopie : +44 (0) 1933 31 2000 Belkin Components B.V. Starparc Building • Boeing Avenue 333 1119 PH Schiphol-Rijk • Pays-Bas Tél. : +31 (0) 20 654 7300 Télécopie : +31 (0) 20 654 7349 Belkin Components Ltd.
P74080-em-F5U209-man_9-02.
P74080-em-F5U209-man_9-02.qxd 9/19/02 3:06 PM Page 19 INHALTSVERZEICHNIS Einführung . . . . . . . . . . . . . . . . . . . . . . . . . . . . . . . . . . . . . . . . . .1 Systemanforderungen . . . . . . . . . . . . . . . . . . . . . . . . . . . . . . . . .2 Zusammenbau Ihres Laufwerkgehäuses . . . . . . . . . . . . . . . . . . . .3 Installation des Treibers . . . . . . . . . . . . . . . . . . . . . . . . . . . . . . . .8 Sicherer Ausbau der USB-Disk . . . . . . . . . . . . . . . . . . . . . . . . . .
P74080-em-F5U209-man_9-02.
P74080-em-F5U209-man_9-02.qxd 9/19/02 3:06 PM Page 1 EINFÜHRUNG Das externe Laufwerkgehäuse für USB 2.0 Hi-Speed ist ein tragbares kompaktes Speicherlaufwerk mit einer Schnittstelle für USB 2.0 HiSpeed. Das externe Laufwerk bietet einen schnellen und einfachen Weg für zusätzlichen Speicherplatz für Ihren Computer. Die Plug-andPlay-Funktion ist auf Reisen sehr praktisch.
P74080-em-F5U209-man_9-02.qxd 9/19/02 3:06 PM SYSTEMANFORDERUNGEN Hardware Notebook und Desktop-Computer mit USB 1.0 oder USB 2.
P74080-em-F5U209-man_9-02.qxd 9/19/02 3:06 PM Page 3 ZUSAMMENBAU IHRES LAUFWERKGEHÄUSES 1. Entfernen Sie die Oberseite des externen Laufwerks. 2. Wenn Sie ein 3,5-Zoll-Laufwerk einbauen, müssen Sie sicherstellen, dass Ihr Laufwerk auf „Master“ eingestellt ist (siehe aufgedruckte Jumper-Einstellungsinformation auf der Oberseite Ihres Laufwerks), und dann das 34-polige Datenkabel und das 4-polige Netzkabel anschließen. De 3.
P74080-em-F5U209-man_9-02.qxd 9/19/02 3:06 PM Page 4 ZUSAMMENBAU IHRES LAUFWERKGEHÄUSES Hinweis: Im Bausatz für Ihr externes Hi-Speed-Laufwerkgehäuse sind vier Feingewindeschrauben und vier Grobgewindeschrauben enthalten. Stellen Sie sicher, dass Sie die Schrauben auswählen, die zu den Befestigungsbohrungen Ihres Laufwerks passen. Versuchen Sie nicht, eine Grobgewindeschraube gewaltsam in eine Feingewindebohrung einzuschrauben. 5.
P74080-em-F5U209-man_9-02.qxd 9/19/02 3:06 PM Page 5 ZUSAMMENBAU IHRES LAUFWERKGEHÄUSES 6. Haken Sie zuerst die Seitenstrebe um die Vorderkante des externen Laufwerks ein und drücken Sie dann die Strebe in die sechs rechteckigen Befestigungslöcher an der Seite. De 7. Wenn Sie eine Festplatte einbauen, muss die Frontblende eingebaut werden. Führen Sie die Kontaktnasen an einer Seite der Frontblende in die Befestigungslöcher in der eingebauten Seitenstrebe.
P74080-em-F5U209-man_9-02.qxd 9/19/02 3:06 PM Page 6 ZUSAMMENBAU IHRES LAUFWERKGEHÄUSES 8. Führen Sie die Kontaktnasen am losen Ende der Frontblende in die zweite Seitenstrebe und haken Sie die Seitenstreben vorn am externen Laufwerk ein. 9. Machen Sie mit dem Zusammenbau weiter, indem Sie die Strebe in die sechs rechteckigen Befestigungslöcher in der Seite des externen Laufwerks drücken.
P74080-em-F5U209-man_9-02.qxd 9/19/02 3:06 PM Page 7 ZUSAMMENBAU IHRES LAUFWERKGEHÄUSES 10. Stecken Sie den quadratischen Stecker des USB-Kabels in den USB-Anschluss auf der Rückwand des externen Laufwerks. 11. Stecken Sie den rechteckigen Stecker des USB-Kabels in den USB-Anschluss für USB 2.0 Hi-Speed an Ihrem Computer oder an Ihrem Hub für USB 2.0 Hi-Speed. Sie können das Kabel auch an einem USB-Anschluss für USB 1.1 Full-Speed an Ihrem Computer oder an Ihrem Hub für USB 1.1 Full-Speed anschließen.
P74080-em-F5U209-man_9-02.qxd 9/19/02 3:06 PM Page 8 INSTALLATION DES TREIBERS Windows 98 SE 1. Legen Sie die Installations-CD in Ihr CD-ROM-Laufwerk. 2. Öffnen Sie die Installations-CD. 3. Führen Sie „TPPINST.EXE“ aus, um die Treiber für Ihr externes Laufwerk für USB 2.0 zu installieren. 4. Ein Installationsdialogfeld erscheint. Klicken Sie auf „Weiter“. 5. Wählen Sie „Fertig stellen“ und klicken Sie auf „Weiter“. 6. Sie können jetzt das externe Laufwerk an Ihrem Computer anschließen. 7.
P74080-em-F5U209-man_9-02.qxd 9/19/02 3:06 PM Page 9 INSTALLATION DES TREIBERS Hinweis: Wenn das neue Laufwerk nicht unter Arbeitsplatz erscheint, müssen Sie evtl. die Festplatte partitionieren und formatieren. Lesen Sie dazu Abschnitt „Formatieren des externen Laufwerks für USB 2.0“, um Ihre USB 2.0 Festplatte vorzubereiten. Ein grünes Symbol „Hardware sicher entfernen“ erscheint im Infobereich. De Windows Me/2000/XP 1.
P74080-em-F5U209-man_9-02.qxd 9/19/02 3:06 PM Page 10 SICHERES ENTFERNEN DER USB-DISK VON WINDOWS Windows 98 1. Klicken Sie auf das grüne Symbol „Hardware sicher entfernen“ im Infobereich und wählen Sie das Gerät, das Sie entfernen wollen. 2. Nach der Systemaufforderung „Hardware kann jetzt entfernt werden“ ziehen Sie das USB-Kabel vom USB-Anschluss Ihres Computers ab. Windows Me/2000/XP 1. Doppelklicken Sie auf dem Symbol „Hardware sicher entfernen“ im Infobereich. 2.
P74080-em-F5U209-man_9-02.qxd 9/19/02 3:06 PM Page 11 FORMATIEREN DES EXTERNEN USB 2.0 LAUFWERKS Formatieren unter Windows 98/Me 1. Fahren Sie den Computer im Windows Betriebssystem hoch. 2. Stecken Sie Ihr externen Laufwerk ein. Sie können Ihre Festplatte für USB 2.0 auf zwei Arten partitionieren und formatieren. Methode Systemsteuerung 1. Klicken Sie auf „Start“ und wählen Sie „Einstellungen“. 2. Wählen Sie „Systemsteuerung“. 3. Doppelklicken Sie auf „System“ und dann auf „Geräte-Manager“. 4.
P74080-em-F5U209-man_9-02.qxd 9/19/02 3:06 PM Page 12 FORMATIEREN DES EXTERNEN USB 2.0 LAUFWERKS 5. Wählen Sie „Laufwerke“. Ihre neue Festplatte erscheint in der Festplattenliste (in diesem Fall als „Toshiba 1924FCV“). 6. Doppelklicken Sie auf dem Eintrag für Ihre Festplatte. Wählen Sie „Einstellungen“. Der folgende Bildschirm erscheint: 7. Stellen Sie sicher, dass die Kontrollkästchen „Trennen“, „Synchrondatenübertragung“, „Wechselplatte“ und „Interrupt 13-Gerät“ abgehakt sind.
P74080-em-F5U209-man_9-02.qxd 9/19/02 3:06 PM Page 13 FORMATIEREN DES EXTERNEN USB 2.0 LAUFWERKS DOS-Methode (nur für Fortgeschrittene) 1. Klicken Sie auf „Start“ und wählen Sie „Programme“. Wählen Sie „MSDOS“. 2. Auf die DOS-Aufforderung tippen Sie „FDISK“ ein und drücken „Eingabe“. Hinweis: Wenn das FDISK-Dienstprogramm ohne Anzeige einer Fehlermeldung fertig wird, kehren Sie in Windows zurück und ziehen das externe Laufwerk ab. Starten Sie Ihren Computer neu.
P74080-em-F5U209-man_9-02.qxd 9/19/02 3:06 PM Page 14 FORMATIEREN DES EXTERNEN USB 2.0 LAUFWERKS WICHTIG Stellen Sie sicher, dass Sie Option 5 wählen und ändern Sie die „Derzeitiges Festplatte“ von „Festplatte 1“ auf die Festplattennummer Ihres externen Laufwerks. Wenn Ihr Computer nur mit einem internen Laufwerk ausgestattet ist, ist Ihr neues externes Laufwerk als „Festplatte 2“ gekennzeichnet.
P74080-em-F5U209-man_9-02.qxd 9/19/02 3:06 PM Page 15 FORMATIEREN DES EXTERNEN USB 2.0 LAUFWERKS Hinweis: In Windows XP klicken Sie auf „Start“, wählen „Systemsteuerung“, klicken auf das Symbol „Leistung und Verwaltung“, dann auf das Symbol „Verwaltung“ und schließlich auf das Symbol „Computerverwaltung“. De Hinweis: Wenn Sie die Systemsteuerung als klassisches Startmenü anzeigen lassen, klicken Sie direkt auf „Verwaltung“. 2. Klicken Sie auf „Datenträgerverwaltung“.
P74080-em-F5U209-man_9-02.qxd 9/19/02 3:06 PM Page 16 INFORMATION FCC-Erklärung KONFORMITÄTSERKLÄRUNG MIT FCC-RICHTLINIEN FÜR ELEKTROMAGNETISCHE KOMPATIBILITÄT Wir, Belkin Corporation, in 501 West Walnut Street, Compton, CA 90220, USA, erklären in eigener Verantwortung, dass dieses Produkt: F5U209 auf das sich diese Erklärung bezieht, mit Abschnitt 15 der FCC-Richtlinien übereinstimmt.
P74080-em-F5U209-man_9-02.qxd 9/19/02 3:06 PM Page 17 Belkin Corporation 501 West Walnut Street Compton • CA • 90220 • USA Tel: 310.898.1100 Fax: 310.898.1111 Belkin Components, Ltd. Express Business Park Shipton Way • Rushden • NN10 6GL Großbritannien Tel: +44 (0) 1933 35 2000 Fax: +44 (0) 1933 31 2000 Belkin Components B.V. Starparc Building • Boeing Avenue 333 1119 PH Schiphol-Rijk • Niederlande Tel: +31 (0) 20 654 7300 Fax: +31 (0) 20 654 7349 Belkin Components Ltd.
P74080-em-F5U209-man_9-02.
P74080-em-F5U209-man_9-02.qxd 9/19/02 3:06 PM Page 19 INHOUDSOPGAVE Inleiding . . . . . . . . . . . . . . . . . . . . . . . . . . . . . . . . . . . . . . . . . . .1 Systeemvereisten . . . . . . . . . . . . . . . . . . . . . . . . . . . . . . . . . . . . .2 De stationhouder monteren . . . . . . . . . . . . . . . . . . . . . . . . . . . .3 Het stuurprogramma installeren . . . . . . . . . . . . . . . . . . . . . . . . .8 Het USB-station veilig verwijderen . . . . . . . . . . . . . . . . . . . . . . .
P74080-em-F5U209-man_9-02.
P74080-em-F5U209-man_9-02.qxd 9/19/02 3:06 PM Page 1 INLEIDING De houder voor externe High-Speed USB 2.0-stations (het Externe station) is een draagbaar compact opslagstation waarin een HighSpeed interface van het type USB 2.0 (Universal Serial Bus 2.0) is ingebouwd. Het Externe station biedt een snelle en makkelijke manier om uw computer van meer opslagruimte te voorzien. De plug-andplay-functie biedt u veel gemak als u wel eens met de computer onderweg bent.
P74080-em-F5U209-man_9-02.qxd 9/19/02 3:06 PM SYSTEEMVEREISTEN Hardware Notebook- en desktop-computers met USB 1.0- of USB 2.
P74080-em-F5U209-man_9-02.qxd 9/19/02 3:06 PM Page 3 DE STATIONHOUDER MONTEREN 1. Verwijder de top van het Externe station. 2. Als u een vaste schijf van 3,5-inch installeert, dient u ervoor te zorgen dat deze schijf als 'Master' is ingesteld (zie de informatie over jumperinstellingen die boven op de vaste schijf wordt vermeld). Sluit vervolgens de 34-punts lintkabel en de 4-punts stroomkabels aan. Ne 3.
P74080-em-F5U209-man_9-02.qxd 9/19/02 3:06 PM Page 4 DE STATIONHOUDER MONTEREN Opmerking: bij uw externe High-Speed stationhouderkit worden vier schroeven met een fijne schroefdraad en vier schroeven met een grove schroefdraad meegeleverd. Zorg ervoor dat u de schroeven gebruikt die bij de montagegaatjes van uw station passen. Probeer in geen geval een schroef met een grove schroefdraad in een montagegaatje met een fijne schroefdraad te wringen. 5.
P74080-em-F5U209-man_9-02.qxd 9/19/02 3:06 PM Page 5 DE STATIONHOUDER MONTEREN 6. Haak de eerste zijrail vast rond de voorrand van het Externe station en druk de rail vast in de zes rechthoekige montagegaten aan de zijkant. 7. Als u een vaste schijf monteert, is het essentieel dat u ook het voorpaneel installeert. Plaats de uitsteeksels aan de ene kant van het voorpaneel in de montagegaatjes in de geïnstalleerde zijrail.
P74080-em-F5U209-man_9-02.qxd 9/19/02 3:06 PM Page 6 DE STATIONHOUDER MONTEREN 8. Plaats de montage-uitsteeksels aan de vrije kant van het voorpaneel in de tweede zijrail en haak de zijrail vast aan de voorkant van het Externe station. 9. Voltooi de montage door de rail vast te drukken in de zes rechthoekige montagegaatjes aan de zijkant van het Externe station.
P74080-em-F5U209-man_9-02.qxd 9/19/02 3:06 PM Page 7 DE STATIONHOUDER MONTEREN 10. Steek het vierkante verbindingsstuk van de USB-kabel in de USB-poort aan de achterkant van het Externe station. 11. Sluit het rechthoekige verbindingstuk van de USB-kabel aan op een High-Speed USB 2.0-poort op de computer of op een High-Speed USB 2.0-hub. U kunt de kabel desgewenst ook aansluiten op een full-speed USB 1.1-poort op de computer of een full-speed USB 1.1-hub.
P74080-em-F5U209-man_9-02.qxd 9/19/02 3:06 PM Page 8 HET STUURPROGRAMMA INSTALLEREN Windows 98 SE 1. Plaats de installatie-cd in het cd-rom-station. 2. Open de installatie-cd. 3. Voer het programma TPPINST.EXE uit om de stuurprogramma's voor het externe USB 2.0-station te installeren. 4. Er wordt een installatievenster weergegeven. Klik op Volgende. 5. Kies Voltooien en klik op Volgende. 6. U kunt het Externe station nu op de computer aansluiten. 7. Windows detecteert nu een USB-opslagadapter.
P74080-em-F5U209-man_9-02.qxd 9/19/02 3:06 PM Page 9 HET STUURPROGRAMMA INSTALLEREN Opmerking: als het nieuwe station niet in Deze computer wordt weergegeven, moet u het station waarschijnlijk eerst van partities voorzien en formatteren. Zie de sectie 'Een extern USB 2.0-station formatteren' voor meer informatie over het voorbereiden van een vaste schijf met USB 2.0-aansluiting. In de taakbalk wordt een groen pictogram 'Hardware ontkoppelen of uitwerpen' weergegeven. Windows Me/2000/XP 1.
P74080-em-F5U209-man_9-02.qxd 9/19/02 3:06 PM Page 10 HET USB-STATION VEILIG UIT WINDOWS VERWIJDEREN Windows 98 1. Klik in de taakbalk op het groene pictogram Hardware ontkoppelen of uitwerpen en selecteer het apparaat dat u wilt verwijderen. 2. Wanneer het systeem de melding 'U kunt dit apparaat nu veilig verwijderen' weergeeft, kunt u de USB-kabel uit de USB-poort van de computer verwijderen. Windows Me/2000/XP 1. Dubbelklik op het pictogram 'Hardware ontkoppelen of uitwerpen' in de taakbalk. 2.
P74080-em-F5U209-man_9-02.qxd 9/19/02 3:06 PM Page 11 EEN EXTERN USB 2.0-STATION FORMATTEREN Formatteren onder Windows 98/Me 1. Start de computer op en start het Windowsbesturingssysteem. 2. Sluit het Externe station aan. Er zijn twee manieren waarop u een vaste schijf met USB 2.0-aansluiting kunt partitioneren en formatteren. Ne Via het Configuratiescherm 1. Kies achtereenvolgens Start en Instellingen. 2. Kies Configuratiescherm. 3. Dubbelklik op Systeem en klik vervolgens op Apparaatbeheer. 4.
P74080-em-F5U209-man_9-02.qxd 9/19/02 3:06 PM Page 12 EEN EXTERN USB 2.0-STATION FORMATTEREN 5. Selecteer Schijfstations. De nieuwe vast schijf wordt in de lijst met vaste schijven weergegeven (in dit geval als Toshiba 1924FVC). 6. Dubbelklik op het item dat uw vaste schijf aanduidt. Kies Instellingen. Het volgende scherm wordt weergegeven. 7. Zorg ervoor dat de selectievakjes Verbinding verbreken, Synchronisatie van gegevensoverdracht, Verwisselbaar en Interrupt 13-eenheid zijn ingeschakeld.
P74080-em-F5U209-man_9-02.qxd 9/19/02 3:06 PM Page 13 EEN EXTERN USB 2.0-STATION FORMATTEREN DOS-methode (alleen aanbevolen voor geavanceerde gebruikers) 1. Kies achtereenvolgens Start en Programma's. Selecteer MSDOS. 2. Typ FDISK bij de DOS-prompt en druk op Enter. Opmerking: als het hulpprogramma FDISK wordt beëindigd zonder dat er een foutmelding wordt weergegeven, dient u MS-DOS af te sluiten. Ontkoppel het Externe station vanuit Windows en start de computer opnieuw op.
P74080-em-F5U209-man_9-02.qxd 9/19/02 3:06 PM Page 14 EEN EXTERN USB 2.0-STATION FORMATTEREN BELANGRIJK Zorg ervoor dat u optie 5 selecteert en wijzig de huidige vaste schijf van 'station 1' in het schijfnummer dat aan het Externe station is toegewezen. Als de computer maar één intern schijfstation heeft, wordt het nieuwe Externe station als Station 2 geïdentificeerd. Als de computer twee interne schijfstations bevat, wordt het nieuwe Externe station als Station 3 geïdentificeerd (enzovoorts).
P74080-em-F5U209-man_9-02.qxd 9/19/02 3:06 PM Page 15 EEN EXTERN USB 2.0-STATION FORMATTEREN Opmerking: als u het configuratiescherm in de klassieke modus weergeeft, kunt u onmiddellijk doorgaan naar Systeembeheer. Ne 2. Klik op Schijfbeheer. Alle aangesloten schijfstations worden in de rechteronderhoek van het venster Computerbeheer weergegeven. In dit venster vindt u ook informatie over de status van elk schijfstation.
P74080-em-F5U209-man_9-02.qxd 9/19/02 3:06 PM Page 16 INFORMATIE FCC-verklaring VERKLARING VAN CONFORMITEIT MET DE REGELS VAN DE FCC VOOR ELEKTROMAGNETISCHE COMPATIBILITEIT Wij, Belkin Corporation, 501 West Walnut Street, Compton, CA 90220, verklaren de exclusieve verantwoordelijkheid te dragen dat het product F5U209 waarop deze verklaring betrekking heeft: F5U209 voldoet aan deel 15 van de FCC-regels.
P74080-em-F5U209-man_9-02.qxd 9/19/02 3:06 PM Page 17 Belkin Corporation 501 West Walnut Street Compton • CA • 90220 • Verenigde Staten Tel: 310.898.1100 Fax: 310.898.1111 Belkin Components, Ltd. Express Business Park Shipton Way • Rushden • NN10 6GL Verenigd Koninkrijk Tel: +44 (0) 1933 35 2000 Fax: +44 (0) 1933 31 2000 Belkin Components B.V. Starparc Building • Boeing Avenue 333 1119 PH Schiphol-Rijk • Nederland Tel: +31 (0) 20 654 7300 Fax: +31 (0) 20 654 7349 Belkin Components Ltd.
P74080-em-F5U209-man_9-02.
P74080-em-F5U209-man_9-02.qxd 9/19/02 3:06 PM Page 19 ÍNDICE Introducción . . . . . . . . . . . . . . . . . . . . . . . . . . . . . . . . . . . . . . . .1 Requisitos del sistema . . . . . . . . . . . . . . . . . . . . . . . . . . . . . . . . .2 Montaje del alojamiento de la unidad . . . . . . . . . . . . . . . . . . . . .3 Instalación del controlador . . . . . . . . . . . . . . . . . . . . . . . . . . . . .8 Extracción segura del disco USB . . . . . . . . . . . . . . . . . . . . . . . .
P74080-em-F5U209-man_9-02.
P74080-em-F5U209-man_9-02.qxd 9/19/02 3:06 PM Page 1 INTRODUCCIÓN El Alojamiento de unidad externa USB 2.0 de alta velocidad (la Unidad externa) es una unidad de almacenamiento, compacta y portátil que incorpora la interfaz de alta velocidad USB 2.0 (Bus Serie Universal 2.0). La Unidad externa proporciona una forma fácil y rápida de añadir más capacidad de almacenaje en su PC.
P74080-em-F5U209-man_9-02.qxd 9/19/02 3:06 PM REQUISITOS DEL SISTEMA Hardware Ordenadores portátiles y de sobremesa con puerto USB 1.0 o USB 2.
P74080-em-F5U209-man_9-02.qxd 9/19/02 3:06 PM Page 3 MONTAJE DEL ALOJAMIENTO DE LA UNIDAD 1. Desmonte la cubierta de la Unidad externa. 2. Si instala un disco duro de 31/2 pulgadas, compruebe que la unidad está configurada como "Master" (consulte la información sobre la colocación de los jumper, impresa en la parte superior de la propia unidad de disco), posteriormente conecte el cable de datos de 34 posiciones y el cable de alimentación de 4 posiciones. Es 3.
P74080-em-F5U209-man_9-02.qxd 9/19/02 3:06 PM Page 4 MONTAJE DEL ALOJAMIENTO DE LA UNIDAD Nota: En el kit del Alojamiento de la unidad externa de alta velocidad se incluyen 4 tornillos de rosca fina y cuatro tornillos de rosca gruesa. Asegúrese de elegir los tornillos que coincidan con los orificios de montaje de su unidad. No intente forzar los tornillos de rosca grueso en los orificios de montaje de los tornillos de rosca fina. 5.
P74080-em-F5U209-man_9-02.qxd 9/19/02 3:06 PM Page 5 MONTAJE DEL ALOJAMIENTO DE LA UNIDAD 6. Enganche la primera guía lateral en el borde delantero de la Unidad externa y presione la guía sobre los 6 orificios de montaje rectangulares del lateral. 7. Si se instala un disco duro, será necesario colocar el panel frontal. Introduzca las lengüetas de una lateral del panel frontal en los orificios de montaje de la guía lateral instalada.
P74080-em-F5U209-man_9-02.qxd 9/19/02 3:06 PM Page 6 MONTAJE DEL ALOJAMIENTO DE LA UNIDAD 8. Introduzca las lengüetas de montaje del extremo libre del panel frontal en la segunda guía lateral y enganche ésta en la parte delantera de la Unidad externa. 9. Finalice el montaje presionando la guía sobre los seis orificios rectangulares de montaje situados en el lateral de la Unidad externa.
P74080-em-F5U209-man_9-02.qxd 9/19/02 3:06 PM Page 7 MONTAJE DEL ALOJAMIENTO DE LA UNIDAD 10. Conecte el conector cuadrado del cable USB en el Puerto USB situado en la parte posterior de la Unidad externa. 11. Conecte el conector rectangular del cable USB en un puerto USB 2.0 de alta velocidad del PC o en un concentrador USB 2.0 de alta velocidad. También puede conectar el cable a un puerto USB 1.1 del PC o a un concentrador USB 1.1. Nota: Cuando se conecta a un puerto USB 1.
P74080-em-F5U209-man_9-02.qxd 9/19/02 3:06 PM Page 8 INSTALACIÓN DEL CONTROLADOR Windows 98 SE 1. Inserte el CD de instalación en la unidad de CD ROM. 2. Abra el CD de instalación. 3. Ejecute la aplicación “TPPINST.EXE” para instalar los controladores de la Unidad externa USB 2.0. 4. Aparece un cuadro de diálogo de la aplicación de instalación. Haga clic en "Siguiente". 5. Seleccione "Finalizar" y haga clic en "Siguiente". 6. Ahora puede conectar la Unidad externa al PC. 7.
P74080-em-F5U209-man_9-02.qxd 9/19/02 3:06 PM Page 9 INSTALACIÓN DEL CONTROLADOR Nota: Si la nueva unidad no aparece en Mi PC, quizás sea necesario realizar una partición y dar formato a la unidad. Consulte la sección "Formato del disco externo USB 2.0" para preparar la unidad de disco duro USB 2.0. En la bandeja del sistema aparecerá un icono de color verde, "Desconectar o expulsar hardware". Windows Me/2000/XP 1.
P74080-em-F5U209-man_9-02.qxd 9/19/02 3:06 PM Page 10 EXTRACCIÓN SEGURA DEL DISCO USB DESDE WINDOWS Windows 98 1. Haga clic en el icono verde "Desconectar o expulsar hardware" situado en la bandeja del sistema y seleccione el dispositivo que quiere extraer. 2. Cuando el sistema le indique "Ya puede extraer con seguridad este dispositivo", desconecte el cable USB del puerto USB del PC. Windows Me/2000/XP 1.
P74080-em-F5U209-man_9-02.qxd 9/19/02 3:06 PM Page 11 FORMATO DEL DISCO EXTERNO USB 2.0 Dar formato en Windows 98/Me 1. Arranque el PC en el sistema operativo Windows. 2. Conecte la Unidad externa. Existen dos métodos para realizar la partición y formato de la unidad de disco duro USB 2.0. Método del Panel de control 1. Haga clic en "Inicio" y haga clic en "Configuración". 2. Elija “Panel de control”. 3. Haga doble clic en "Sistema", luego en "Administrador de dispositivos". 4.
P74080-em-F5U209-man_9-02.qxd 9/19/02 3:06 PM Page 12 FORMATO DEL DISCO EXTERNO USB 2.0 5. Seleccione "Unidades de disco". El Nuevo disco duro aparecerá en la lista de discos duros (en este caso como “Toshiba 1924FCV”). 6. Haga doble clic en la entrada de la unidad de disco duro. Seleccione “Configuración”. Aparecerá la siguiente pantalla. 7. Asegúrese de que existen marcas de selección en las casillas de "Desconectar", "Transferencia de datos sincrónica", "Extraíble" y "Unidad int 13".
P74080-em-F5U209-man_9-02.qxd 9/19/02 3:06 PM Page 13 FORMATO DEL DISCO EXTERNO USB 2.0 Método DOS (Recomendado sólo para usuarios avanzados) 1. Haga clic en "Inicio" y haga clic en "Programas". Seleccione “MSDOS”. 2. En el símbolo del sistema del DOS, escriba "FDISK" y pulse Enter. Nota: Si la utilidad FDISK finaliza sin mostrar un mensaje de error, vuelva a Windows y desconecte la Unidad externa. Apague y vuelva a encender el ordenador.
P74080-em-F5U209-man_9-02.qxd 9/19/02 3:06 PM Page 14 FORMATO DEL DISCO EXTERNO USB 2.0 IMPORTANTE Asegúrese de que se selecciona la opción 5 y cambie el "Disco fijo actual" de "Disco 1" al número de disco asignado a la Unidad externa. Si el PC está equipado únicamente con un disco interno, el nuevo Disco externo se identificará como "Disco 2". Si el PC está equipado con dos discos internos, el nuevo Disco externo se identificará como "Disco 3".
P74080-em-F5U209-man_9-02.qxd 9/19/02 3:06 PM Page 15 FORMATO DEL DISCO EXTERNO USB 2.0 control", haga clic en el icono "Rendimiento y mantenimiento", haga clic en el icono "Herramientas administrativas" y luego haga clic en el icono "Administración de equipos". Nota: Si visualiza el Panel de control en modo clásico, vaya directamente a "Herramientas administrativas". 2. Haga clic en "Administración de disco".
P74080-em-F5U209-man_9-02.qxd 9/19/02 3:06 PM Page 16 INFORMACIÓN Declaración de la FCC DECLARACIÓN DE CONFORMIDAD CON LAS REGLAS DE LA FCC PARA COMPATIBILIDAD ELECTROMAGNÉTICA Belkin Corporation, de 501 West Walnut Street, Compton, CA 90220, declaramos bajo nuestra exclusiva responsabilidad que el producto: F5U209 , al que se refiere esta declaración: F5U209 Cumple el Apartado 15 de las reglas de la FCC.
P74080-em-F5U209-man_9-02.qxd 9/19/02 3:06 PM Page 17 Belkin Corporation 501 West Walnut Street Compton • CA • 90220 • USA Tel: 310.898.1100 Fax: 310.898.1111 Belkin Components, Ltd. Express Business Park Shipton Way • Rushden • NN10 6GL Reino Unido Tel: +44 (0) 1933 35 2000 Fax: +44 (0) 1933 31 2000 Belkin Components B.V. Starparc Building • Boeing Avenue 333 1119 PH Schiphol-Rijk • Países Bajos Tel: +31 (0) 20 654 7300 Fax: +31 (0) 20 654 7349 Belkin Components Ltd.
P74080-em-F5U209-man_9-02.
P74080-em-F5U209-man_9-02.qxd 9/19/02 3:06 PM Page 19 INDICE Introduzione . . . . . . . . . . . . . . . . . . . . . . . . . . . . . . . . . . . . . . . .1 Requisiti di sistema . . . . . . . . . . . . . . . . . . . . . . . . . . . . . . . . . . .2 Assemblaggio del telaio dell'unità . . . . . . . . . . . . . . . . . . . . . . . .3 Installazione del driver . . . . . . . . . . . . . . . . . . . . . . . . . . . . . . . . .8 Rimozione sicura del disco USB . . . . . . . . . . . . . . . . . . . . . . . . .
P74080-em-F5U209-man_9-02.
P74080-em-F5U209-man_9-02.qxd 9/19/02 3:06 PM Page 1 INTRODUZIONE Il telaio dell'unità esterna Hi-Speed USB 2.0 (l'unità esterna) è un'unità di memoria di massa compatta portatile che incorpora l'interfaccia ad alta velocità USB 2.0 (Universal Serial Bus 2.0). L'unità esterna garantisce un modo facile e veloce per aggiungere ulteriore capacità di memoria al computer.
P74080-em-F5U209-man_9-02.qxd 9/19/02 3:06 PM Page 2 REQUISITI DI SISTEMA Hardware Computer portatili e da tavolo con porta USB 1.0 o USB 2.
P74080-em-F5U209-man_9-02.qxd 9/19/02 3:06 PM Page 3 ASSEMBLAGGIO DEL TELAIO DELL'UNITÀ 1. Togliere il pannello superiore dell'unità esterna. 2. Se si installa un'unità rigida da 31/2 pollici, verificare che l'unità sia impostata su "Master" (fare riferimento alle informazioni di impostazione del ponticello stampate sull'unità del disco), quindi connettere il cavo dati a 34 posizioni ed il cavo di alimentazione a 4 posizioni. It 3.
P74080-em-F5U209-man_9-02.qxd 9/19/02 3:06 PM Page 4 ASSEMBLAGGIO DEL TELAIO DELL'UNITÀ Nota: Vi sono quattro viti a filettatura sottile e quattro a filettatura grossa incluse nel kit del telaio dell'unità esterna ad alta velocità. Fare attenzione a scegliere le viti che siano adatte ai fori di montaggio dell'unità. Non cercare di forzare le viti a filettatura grossa nei fori per viti a filettatura sottile. 5.
P74080-em-F5U209-man_9-02.qxd 9/19/02 3:06 PM Page 5 ASSEMBLAGGIO DEL TELAIO DELL'UNITÀ 6. Agganciare la prima guida laterale attorno al bordo anteriore dell'unità esterna e premere la guida dentro ai sei fori di montaggio rettangolari sul lato. 7. Se si sta installando un disco rigido, è necessario installare il pannello anteriore. Inserire le linguette che si trovano su un lato del pannello anteriore nei fori di montaggio della guida laterale installata.
P74080-em-F5U209-man_9-02.qxd 9/19/02 3:06 PM Page 6 ASSEMBLAGGIO DEL TELAIO DELL'UNITÀ 8. Inserire le linguette di montaggio sull'estremità libera del pannello anteriore nella seconda guida laterale e agganciare la guida laterale sulla parte anteriore dell'unità esterna. 9. Completare l'assemblaggio premendo la guida dentro i sei fori di montaggio rettangolari sul lato dell'unità esterna.
P74080-em-F5U209-man_9-02.qxd 9/19/02 3:06 PM Page 7 ASSEMBLAGGIO DEL TELAIO DELL'UNITÀ 10. Inserire il connettore a forma quadrata del cavo USB nella porta USB sul pannello posteriore dell'unità esterna. 11. Inserire il connettore a forma rettangolare del cavo USB in una porta USB 2.0 High-Speed del computer o dell'hub HiSpeed USB 2.0. È possibile inoltre connettere il cavo ad una porta USB 1.1 full-speed del computer o ad un hub USB 1.1 full-speed.
P74080-em-F5U209-man_9-02.qxd 9/19/02 3:06 PM Page 8 INSTALLAZIONE DEL DRIVER Windows 98 SE 1. Inserire il CD di installazione nell'unità CD-ROM 2. Aprire il CD di installazione. 3. Eseguire “TPPINST.EXE” per installare i driver per l'unità esterna USB 2.0. 4. Appare una casella di dialogo dell'installer. Fare clic su "Avanti", 5. Scegliere "Termina" e fare clic su "Avanti". 6. Ora si potrà collegare l'unità esterna al computer. 7.
P74080-em-F5U209-man_9-02.qxd 9/19/02 3:06 PM Page 9 INSTALLAZIONE DEL DRIVER Nota: Se la nuova unità non appare in Risorse del computer, potrebbe essere necessario eseguire la partizione e la formattazione dell'unità. Fare riferimento al capitolo "Formattazione dell'unità esterna USB 2.0" per preparare l'unità del disco rigido USB 2.0. Sulla barra delle applicazioni di Windows apparirà l'icona verde "Stacca o espelli hardware". Windows Me/2000/XP 1.
P74080-em-F5U209-man_9-02.qxd 9/19/02 3:06 PM Page 10 RIMOZIONE SICURA DEL DISCO USB DA WINDOWS formattazione dell'unità. Fare riferimento al capitolo "Partizione del disco rigido esterno USB 2.0" per preparare l'unità del disco rigido USB 2.0. Windows 98 1. Fare clic sull'icona verde “Stacca o espelli hardware” nella barra delle applicazioni di Windows e selezionare il dispositivo da rimuovere. 2.
P74080-em-F5U209-man_9-02.qxd 9/19/02 3:06 PM Page 11 FORMATTAZIONE DELL'UNITÀ ESTERNA USB 2.0 Formattazione in Windows 98/Me 1. Avviare il computer nel sistema operativo Windows. 2. Attaccare l'unità esterna. Ci sono a disposizione due metodi di partizione e formattazione dell'unità del disco rigido USB 2.0. Metodo del pannello di controllo 1. Fare clic su "Start" e scegliere "Impostazioni". 2. Selezionare "Pannello di controllo". 3. Fare doppio clic su "Sistema", quindi su "Gestione periferiche". 4.
P74080-em-F5U209-man_9-02.qxd 9/19/02 3:06 PM Page 12 FORMATTAZIONE DELL'UNITÀ ESTERNA USB 2.0 5. Selezionare "Unità disco". Il nuovo disco rigido apparirà nell'elenco dei dischi rigidi (in questo caso come “Toshiba 1924FCV”). 6. Fare doppio clic sulla voce del disco rigido. Selezionare "Impostazioni". Apparirà la seguente finestra. 7. Assicurarsi che vi siano i segni di spunta sulle caselle "Disconnetti", "Sincronizza trasferimento dati", "Rimovibile" e "Interrupt 13".
P74080-em-F5U209-man_9-02.qxd 9/19/02 3:06 PM Page 13 FORMATTAZIONE DELL'UNITÀ ESTERNA USB 2.0 Metodo DOS (raccomandato solo per utenti avanzati) 1. Fare clic su "Start" e scegliere "Programmi". Selezionare "MSDOS". 2. Al messaggio DOS, digitare "FDISK" e premere "Invio". Nota: Se l'utility FDISK termina senza visualizzare un messaggio di errore, entrare in Windows a disconnettere l'utilità esterna. Riavviare il computer. Quando Windows si riavvia, riconnettersi all'unità esterna e riandare al punto 1.
P74080-em-F5U209-man_9-02.qxd 9/19/02 3:06 PM Page 14 FORMATTAZIONE DELL'UNITÀ ESTERNA USB 2.0 IMPORTANTE Selezionare l'opzione 5 e cambiare il "Disco fisso corrente" da "Disco 1" al numero di disco assegnato all'unità esterna. Se il computer è dotato solo di un'unità disco interna, la nuova unità esterna sarà identificata come "Disco 2". Se il computer è dotato di due unità disco interne, la nuova unità esterna sarà identificata come "Disco 3".
P74080-em-F5U209-man_9-02.qxd 9/19/02 3:06 PM Page 15 FORMATTAZIONE DELL'UNITÀ ESTERNA USB 2.0 Nota: Se si sta visualizzando il pannello di controllo nella modalità classica, passare direttamente su "Strumenti amministrativi". 2. Fare clic su "Gestione disco". Tutte le unità disco connesse verranno visualizzate nell'angolo inferiore destro della finestra "Gestione computer". Le informazioni riguardanti lo stato di ognuna delle unità disco verranno visualizzate in questa finestra.
P74080-em-F5U209-man_9-02.qxd 9/19/02 3:06 PM Page 16 INFORMAZIONI Dichiarazione FCC DICHIARAZIONE DI CONFORMITÀ CON LE REGOLAMENTAZIONI FCC PER LA COMPATIBILITÀ ELETTROMAGNETICA La Belkin Corporation, con sede in 501 West Walnut Street, Compton, CA 90220, dichiara sotto la sua responsabilità che il prodotto: F5U209 è conforme alla Parte 15 della regolamentazione FCC.
P74080-em-F5U209-man_9-02.qxd 9/19/02 3:06 PM Page 17 Belkin Corporation 501 West Walnut Street Compton • CA • 90220 • USA Tel: 310.898.1100 Fax: 310.898.1111 Belkin Components, Ltd. Express Business Park Shipton Way • Rushden • NN10 6GL Regno Unito Tel: +44 (0) 1933 35 2000 Fax: +44 (0) 1933 31 2000 Belkin Components B.V. Starparc Building • Boeing Avenue 333 1119 PH Schiphol-Rijk • Paesi Bassi Tel: +31 (0) 20 654 7300 Fax: +31 (0) 20 654 7349 Belkin Components Ltd.
P74080-em-F5U209-man_9-02.
P74080-em-F5U209-man_9-02.qxd 9/19/02 3:06 PM Page 19 ÍNDICE Introdução . . . . . . . . . . . . . . . . . . . . . . . . . . . . . . . . . . . . . . . . . .1 Requisitos do sistema . . . . . . . . . . . . . . . . . . . . . . . . . . . . . . . . .2 Montagem da caixa da unidade . . . . . . . . . . . . . . . . . . . . . . . . .3 Instalação de controladores . . . . . . . . . . . . . . . . . . . . . . . . . . . . .8 Remoção segura do disco USB . . . . . . . . . . . . . . . . . . . . . . . . .
P74080-em-F5U209-man_9-02.
P74080-em-F5U209-man_9-02.qxd 9/19/02 3:06 PM Page 1 INTRODUÇÃO A caixa da unidade externa USB 2.0 de alta velocidade (a unidade externa) é uma unidade de armazenamento compacta portátil que integra o interface de alta velocidade USB 2.0 (Universal Serial Bus 2.0). A unidade externa fornece uma forma simples e rápida para adicionar mais espaço de armazenamento ao computador.
P74080-em-F5U209-man_9-02.qxd 9/19/02 3:06 PM Page 2 REQUISITOS DO SISTEMA Hardware Computador de secretária ou computador portátil com porta USB 1.0 ou USB 2.
P74080-em-F5U209-man_9-02.qxd 9/19/02 3:06 PM Page 3 MONTAGEM DA CAIXA DA UNIDADE 1. Remova a parte superior da unidade externa. 2. Se instalar um disco rígido de 3,5 polegadas, certifique-se de que a unidade está definida para “Master” (consulte as informações de definição dos jumpers impressas na parte superior do disco rígido) e, em seguida, ligue o cabo de dados de 34 posições e o cabo de alimentação de 4 posições. 3.
P74080-em-F5U209-man_9-02.qxd 9/19/02 3:06 PM Page 4 MONTAGEM DA CAIXA DA UNIDADE Nota: Existem quatro parafusos de rosca fina e quatro parafusos de rosca normal no kit da caixa da unidade externa de alta velocidade. Certifique-se de que os parafusos correspondem aos orifícios de montagem da unidade. Não tente aparafusar à força um parafuso de rosca normal num orifício de montagem de rosca fina. 5. Reinstale a tampa superior e verifique se está alinhada com a tampa inferior.
P74080-em-F5U209-man_9-02.qxd 9/19/02 3:06 PM Page 5 MONTAGEM DA CAIXA DA UNIDADE 6. Encaixe a primeira calha lateral à volta da margem frontal da unidade externa e pressione a caixa contra os seis orifícios de montagem rectangulares existentes na parte lateral. 7. Se instalar um disco rígido, é necessário instalar o painel frontal. Insira as patilhas de um lado do painel frontal nos orifícios de montagem na calha lateral instalada.
P74080-em-F5U209-man_9-02.qxd 9/19/02 3:06 PM Page 6 MONTAGEM DA CAIXA DA UNIDADE 8. Insira as patilhas de montagem na extremidade livre do painel frontal na segunda calha lateral e encaixe a calha lateral na parte frontal da unidade externa. 9. Pressione a calha contra os seis orifícios de montagem rectangulares existente na parte lateral da unidade externa para terminar a instalação.
P74080-em-F5U209-man_9-02.qxd 9/19/02 3:06 PM Page 7 MONTAGEM DA CAIXA DA UNIDADE 10. Ligue o conector quadrado do cabo USB à porta USB existente no painel posterior da unidade externa. 11. Ligue o conector rectangular do cabo USB a uma porta USB 2.0 de alta velocidade no computador ou no hub 2.0 de alta velocidade. Pode também ligar o cabo a uma porta USB 1.1 de velocidade total no computador ou no hub USB 1.1 de velocidade total. Nota: Quando ligado a uma porta USB 1.
P74080-em-F5U209-man_9-02.qxd 9/19/02 3:06 PM Page 8 INSTALAÇÃO DE CONTROLADORES Windows 98 SE 1. Insira o CD de instalação na unidade de CD-ROM. 2. Abra o CD de instalação. 3. Execute o “TPPINST.EXE” para instalar os controladores da unidade externa USB 2.0. 4. Aparece a caixa de diálogo do programa de instalação. Faça clique em “Seguinte”. 5. Seleccione “Completa” e faça clique em “Seguinte”. 6. Pode ligar a unidade externa ao computador. 7.
P74080-em-F5U209-man_9-02.qxd 9/19/02 3:06 PM Page 9 INSTALAÇÃO DE CONTROLADORES Nota: Se a nova unidade não aparecer em O Meu Computador, pode necessitar de dividir e formatar a unidade. Consulte a secção “Formatar a unidade externa USB 2.0” para preparar o disco rígido USB 2.0. Um ícone verde “Desligar ou ejectar hardware” aparece no tabuleiro do sistema. Windows Me/2000/XP 1.
P74080-em-F5U209-man_9-02.qxd 9/19/02 3:06 PM Page 10 REMOÇÃO SEGURA DO DISCO USB NO WINDOWS Windows 98 1. Faça clique no ícone verde em “Desligar ou ejectar hardware” no tabuleiro do sistema e seleccione o dispositivo que pretende remover. 2. Quando o sistema pedir “Pode remover este dispositivo com segurança”, desligue o cabo USB da porta USB do computador. Windows Me/2000/XP 1. Faça clique duas vezes no ícone “Desligar ou ejectar hardware” no tabuleiro do sistema. 2.
P74080-em-F5U209-man_9-02.qxd 9/19/02 3:06 PM Page 11 FORMATAÇÃO DA UNIDADE EXTERNA USB 2.0 Formatar no Windows 98/Me 1. Arranque o computador no sistema operativo Windows. 2. Ligue a unidade externa. Existem dois métodos para dividir e formatar o disco rígido USB 2.0. Método do Painel de controlo 1. Faça clique em “Iniciar” e seleccione “Definições”. 2. Seleccione “Painel de controlo”. 3. Faça clique duas vezes em “Sistema” e, em seguida, em “Gestor de dispositivos”. 4. Aparece o ecrã seguinte.
P74080-em-F5U209-man_9-02.qxd 9/19/02 3:06 PM Page 12 FORMATAÇÃO DA UNIDADE EXTERNA USB 2.0 5. Seleccione “Unidades de disco”. O novo disco rígido aparece na lista de discos rígidos (neste caso, “Toshiba 1924FCV”). 6. Faça clique duas vezes na entrada do disco rígido. Seleccione “Definições”. Aparece o ecrã seguinte. 7. Certifique-se de que seleccionou as caixas “Desligar”, “Sincronizar transferência de dados”, “Amovível” e “Unidade 13 int”.
P74080-em-F5U209-man_9-02.qxd 9/19/02 3:06 PM Page 13 FORMATAÇÃO DA UNIDADE EXTERNA USB 2.0 Método DOS (Recomendado apenas para os utilizadores avançados) 1. Faça clique em “Iniciar” e seleccione “Programas”. Seleccione “MSDOS”. 2. Na linha de comandos DOS, digite “FDISK” e prima “Enter”. Nota: Se o utilitário FDISK terminar sem exibir uma mensagem de erro, saia do Windows e desligue a unidade externa. Reinicie o computador. Quando reiniciar o Windows, volte a ligar a unidade externa e volte ao passo 1.
P74080-em-F5U209-man_9-02.qxd 9/19/02 3:06 PM Page 14 FORMATAÇÃO DA UNIDADE EXTERNA USB 2.0 IMPORTANTE Certifique-se de que seleccionou a opção 5 e altere o “Current Fixed Disk (Disco fixo actual)” de “Disk 1 (Disco 1)” para o número do disco atribuído à unidade externa. Se o computador estiver equipado apenas com uma unidade interna, a nova unidade externa será identificada como “Disk 2 (Disco 2)”.
P74080-em-F5U209-man_9-02.qxd 9/19/02 3:06 PM Page 15 FORMATAÇÃO DA UNIDADE EXTERNA USB 2.0 Nota: Se estiver a ver o Painel de controlo no modo clássico, avance directamente para as “Ferramentas administrativas”. 2. Faça clique em “Gestão de discos”. Todas as unidades de disco ligadas aparece no canto inferior direito da janela “Gestão do computador”. As informações relacionadas com o estado de cada uma das unidades de disco aparecerá nesta janela.
P74080-em-F5U209-man_9-02.qxd 9/19/02 3:06 PM Page 16 INFORMAÇÕES Declaração FCC DECLARAÇÃO DE CONFORMIDADE COM AS REGRAS DA FCC RELACIONADAS COM A COMPATIBILIDADE ELECTROMAGNÉTICA Nós, Belkin Corporation, sediada em 501 West Walnut Street, Compton CA 90220, EUA, declaramos sob nossa responsabilidade que o produto: F5U209 o produto a que se refere a presente declaração: Está em conformidade com a Parte 15 das Regras da FCC.
P74080-em-F5U209-man_9-02.qxd 9/19/02 3:06 PM Page 17 Belkin Corporation 501 West Walnut Street Compton • CA • 90220 • USA Tel: 310.898.1100 Fax: 310.898.1111 Belkin Components, Ltd. Express Business Park Shipton Way • Rushden • NN10 6GL Reino Unido Tel: +44 (0) 1933 35 2000 Fax: +44 (0) 1933 31 2000 Belkin Components B.V. Starparc Building • Boeing Avenue 333 1119 PH Schiphol-Rijk • Holanda Tel: +31 (0) 20 654 7300 Fax: +31 (0) 20 654 7349 Belkin Components Ltd.