Optical Ergo Mouse Belkin Ltd. Express Business Park • Shipton Way Rushden • NN10 6GL • United Kingdom Tel: +44 (0) 1933 35 2000 Fax: +44 (0) 1933 31 2000 Belkin GmbH Hanebergstrasse 2 80637 Munich • Germany Tel: +49 (0) 89 143405 0 Fax: +49 (0) 89 143405 100 Belkin B.V.
Optical Ergo Mouse Navigate and input data, with comfort and control EN ___ FR ___ DE ___ NL ___ ES ___ IT User Manual P74816ea_F8E857ea.
EN ___ FR ___ DE ___ NL ___ ES ___ IT 1 15 29 43 57 71 P74816ea_F8E857ea.
P74816ea_F8E857ea.
Optical Ergo Mouse Navigate and input data, with comfort and control EN ___ FR ___ DE ___ NL ___ ES ___ IT User Manual P74816ea_F8E857ea.
Table of Contents 1 Introduction . . . . . . . . . . . . . . . . . . . . . . . . . . . . . . . . .3 1 System Requirements . . . . . . . . . . . . . . . . . . . . . . .4 Packaging Includes . . . . . . . . . . . . . . . . . . . . . . . . .4 2 3 4 Overview . . . . . . . . . . . . . . . . . . . . . . . . . . . . . . . . . .4 2 Hardware Installation . . . . . . . . . . . . . . . . . . . . . . . . .5 Connecting the USB Mouse . . . . . . . . . . . . . . . . . . .6 Connecting the PS/2 Mouse . . . . . . . . . .
Introduction Congratulations and thank you for purchasing the Optical Ergo Mouse from Belkin. You are about to experience a whole new world of computing convenience with superior input features and navigating accuracy. The Mouse provides five customizable buttons, including the convenient scroll wheel, to make repetitive tasks simpler than ever. 1 2 3 Please review this User Manual thoroughly to ensure your safe, long-term use of the Mouse, and for help in getting the most from its advanced features.
Introduction System Requirements 1 • Windows® 98 SE, Me, 2000, or XP Mac OS 10.x and higher 2 • CD-ROM drive • 5MB of available disk space • USB or PS/2 port 3 4 5 Packaging Includes • Optical Ergo Mouse • Software CD • User Manual • PS/2 Adapter Overview Before starting the installation of the hardware and software for the Mouse, please remove any drivers or software from any mice that were previously installed on your computer.
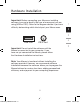
Hardware Installation Important: Before connecting your Mouse or installing software, be sure to identify the type of mouse port you are using (USB or PS/2). Refer to the diagrams below if you have difficulty determining which kind of port your Mouse uses. 1 2 3 USB Port PS/2 Port Important: Do not install the software until the 4 5 Mouse is connected to your computer. If you have not yet connected the Mouse, please follow the Hardware Installation instructions.
Hardware Installation Connecting the USB Mouse 1 USB in Windows 98 SE, Me, 2000, and XP 2 1. 3 Make sure your computer is turned on before installing the Mouse. 2. 4 Connect the mouse to an available USB port on your computer. 3. A New Hardware Wizard will start automatically. Note: Windows 98 SE may require you to insert 5 your Windows 98 SE Installation CD into your computer’s CD-ROM drive to complete the install. 4. P74816ea_F8E857ea.
Hardware Installation Connecting the PS/2 Mouse PS/2 in Windows 98 SE, Me, 2000, and XP 1 1. Turn off your computer. 2 2. Insert the cable with the connector to the PS/2 (6-pin) mouse port on your computer. 3 3. Turn the computer on. 4. When the computer finishes starting up, it will automatically detect the Mouse and make it function. 5. When your Mouse is properly connected, you can start the software installation. P74816ea_F8E857ea.
Software Installation 1 2 Important: Do not install the software until the Mouse is connected and properly functioning to your computer. If you have not yet connected the Mouse, please follow the Hardware Installation instructions. 1. 4 Insert the included installation CD into your CD-ROM drive. After a few moments, the main menu will start automatically. 2. 5 Select “Install Driver” and the computer will begin installation. 3. Follow the on-screen instructions to complete the installation.
Software Installation Software Features Your Mouse’s software enables a variety of exciting features and functions that will help you to increase your productivity with your new Mouse. In order to control the Mouse’s high-end features, you will need to access your Mouse’s Properties dialog box, either through the Control Panel or through your Mouse’s software.
Troubleshooting If you are having any problems with the installation or operation of your Mouse, please review the following section. If the problem is not referred to below, or the suggested solutions do not solve the problem, please contact our technical support staff at 00 800 223 55 460. 1 2 3 4 Why isn’t my pointer moving smoothly? The Mouse works well on a wide variety of surfaces, especially those with textured and/or patterned features.
Troubleshooting My USB Mouse was not detected by the system and won’t work. Why? 1 Please do the following: 1. Make sure your USB Mouse is completely 2 plugged into the USB port. 2. Check the functioning of your system’s USB port in the Device Manager page of System Properties. If there is a circled exclamation point through the USB port’s icon, the USB controller has some problem.
Information Belkin Corporation Limited Lifetime Product Warranty* 1 2 3 4 5 Belkin Corporation warrants this product against defects in materials and workmanship for its lifetime. If a defect is discovered, Belkin will, at its option, repair or replace the product at no charge provided it is returned during the warranty period, with transportation charges prepaid, to the authorized Belkin dealer from whom you purchased the product. Proof of purchase may be required.
P74816ea_F8E857ea.
Optical Ergo Mouse Belkin Ltd. Express Business Park • Shipton Way Rushden • NN10 6GL • United Kingdom Tel: +44 (0) 1933 35 2000 Fax: +44 (0) 1933 31 2000 Belkin GmbH Hanebergstrasse 2 80637 Munich • Germany Tel: +49 (0) 89 143405 0 Fax: +49 (0) 89 143405 100 Belkin B.V.
Souris optique ergo Navigation et saisie de données en tout confort Manuel de l’utilisateur P74816ea_F8E857ea.
Table des Matières 1 Introduction . . . . . . . . . . . . . . . . . . . . . . . . . . . . . . . . 19 1 Configuration Requise . . . . . . . . . . . . . . . . . . . . . .20 Contenu de l’emballage . . . . . . . . . . . . . . . . . . . . .20 2 3 4 Présentation . . . . . . . . . . . . . . . . . . . . . . . . . . . . . .20 2 Installation du matériel . . . . . . . . . . . . . . . . . . . . . . . 21 Branchement de la souris USB . . . . . . . . . . . . . . .22 Branchement de la souris PS/2 . . . . . . . . . . .
Introduction Félicitations et merci d’avoir choisi la Souris optique ergo de Belkin. Vous êtes sur le point de découvrir les fonctions extraordinaires de saisie et de navigation offertes par cette souris. Elle possède 5 boutons programmables ainsi qu’une molette de défilement pratique, pour exécuter vos tâches courantes en un tournemain. 1 2 3 Veuillez prendre le temps lire ce manuel afin de vous assurer une utilisation sécuritaire de cette Souris, et de tirer le maximum de votre nouvel achat.
Introduction Configuration Requise 1 Windows® 98 SE, Me, 2000 ou XP Lecteur de CD-ROM 2 5 Mo d’espace libre sur le disque dur Port USB ou PS/2 3 4 Contenu de l’emballage Souris optique ergo 5 Logiciel sur CD-ROM Manuel de l’utilisateur Adaptateur PS/2 Présentation Avant de débuter l’installation du matériel et du logiciel de la Souris, veuillez supprimer tous les pilotes et logiciels de toutes les souris précédemment installées sur votre ordinateur.
Installation du matériel Important : Avant de brancher votre Souris ou installer le logiciel, identifiez le type de port Souris que vous utilisez (USB ou PS/2). Jetez un œil sur les schémas ci-dessous si vous ne connaissez pas votre type de port Souris. Important : N’installez pas le logiciel avant de brancher la Souris à votre ordinateur.
Installation du matériel Branchement de la souris USB 1 USB sous Windows 98 SE, Me, 2000 et XP 2 1. 3 Veillez à ce que votre ordinateur soit allumé avant d’installer la Souris. 2. 4 Branchez le souris sur n’importe quel port USB libre sur votre ordinateur. 3. L’Assistant Ajout de nouveau matériel démarre. Remarque : Si vous utilisez Windows 98 5 SE, il se peut que vous deviez insérer le CD d’installation de Windows 98 SE dans votre lecteur de CD-ROM pour terminer l’installation. 4.
Installation du matériel Branchement de la souris PS/2 PS/2 sous Windows 98 SE, Me, 2000 et XP 1 1. Éteignez l’ordinateur. 2 2. Insérez le câble avec l’adaptateur dans le port souris PS/2 (6 broches) de votre ordinateur. 3 3. Allumez l’ordinateur. 4. Lorsque le démarrage de l’ordinateur est terminé, celui-ci détecte automatiquement la souris et lui permet de fonctionner. 5. Lorsque votre souris est correctement branchée, vous pouvez lancer l’installation du logiciel. P74816ea_F8E857ea.
Installation du logiciel Important : N’installez pas le logiciel avant de 1 brancher la Souris à votre ordinateur et avant de vous assurer que la Souris fonctionne. 2 Si vous n’avez pas déjà branché la Souris, veuillez suivre les instructions d’installation du matériel 3 1. Insérez le CD d’installation fourni dans le lecteur de CD-ROM. Le menu principal apparaît automatiquement, quelques instants plus tard. 2. Sélectionnez « Install Driver [Installer le Pilote] » pour commencer l’installation. 3.
Installation du logiciel Fonctionnalités du logiciel Le logiciel de votre nouvelle Souris comprend des fonctions très pratiques, qui vous permettront d’être plus productif et plus efficace. Pour configurer ces fonctions, vous devez accéder aux Propriétés de votre Souris, soit en passant par le Panneau de Configuration ou en passant par le logiciel de la Souris.
Dépannage Si vous éprouvez des problèmes avec l’installation ou le fonctionnement de votre Souris, veuillez lire la section suivante. Si votre problème n’est pas abordé ci-dessous, ou si les conseils n’ont pas réglé le problème, veuillez contacter le service d’assistance technique au 00 800 223 55 460. 1 2 3 4 Pourquoi est-ce que mon pointeur se déplace par à-coups ? La Souris fonctionne sur la plupart des surfaces, même les surfaces texturées ou à motifs.
Dépannage My USB Mouse was not detected by the system and won’t work. Why? Ma Souris USB n’est pas détectée par le système et elle ne fonctionne pas. Pourquoi ? Veuillez suivre la procédure suivante : 1. Assurez-vous que votre Souris USB est bien branchée dans le port USB. 2. Vérifiez le fonctionnement de votre port USB à l’aide du Gestionnaire de Périphérique, dans les Propriétés Système. S’il y a un point d’exclamation encerclé à l’icône du port USB, le contrôleur USB a rencontré un problème.
Information Garantie à vie limitée du produit de Belkin Corporation* 1 2 3 Belkin Corporation garantit ce produit contre tout défaut matériel ou de fabrication pendant toute sa durée de vie. Si l’appareil s’avère défectueux, Belkin le réparera ou le remplacera gratuitement, à sa convenance, à condition que le produit soit retourné, port payé, pendant la durée de la garantie, au dépositaire Belkin agréé auprès duquel le produit a été acheté. Une preuve d’achat peut être exigée.
P74816ea_F8E857ea.
Souris optique ergo Belkin Ltd. Express Business Park, Shipton Way Rushden, NN10 6GL, Royaume-Uni Tel: +44 (0) 1933 35 2000 Fax: +44 (0) 1933 31 2000 Belkin GmbH Hanebergstrasse 2 80637 Munich, Allemagne Tel: +49 (0) 89 143405 0 Fax: +49 (0) 89 143405 100 Belkin B.V.
Ergonomische Optische Maus Bequeme Steuerung, Dateneingabe und Navigation EN ___ FR ___ DE ___ NL ___ ES ___ IT Benutzerhandbuch P74816ea_F8E857ea.
Inhaltsverzeichnis 1 Einführung . . . . . . . . . . . . . . . . . . . . . . . . . . . . . . . . .35 1 Systemanforderungen . . . . . . . . . . . . . . . . . . . . . .36 Verpackungsinhalt . . . . . . . . . . . . . . . . . . . . . . . . .36 2 3 4 Übersicht . . . . . . . . . . . . . . . . . . . . . . . . . . . . . . . .36 2 Hardware-Installation . . . . . . . . . . . . . . . . . . . . . . . . 37 Anschließen der USB-Maus . . . . . . . . . . . . . . . . . .38 Anschließen der PS/2-Maus . . . . . . . . . . . .
Einführung Wir freuen uns, dass Sie sich für die Ergonomische Optische Maus von Belkin entschieden haben. Genießen Sie die komfortable Bedienung der Maus mit leistungsfähigen Eingabefunktionen und präziser Navigation. Zur Vereinfachung wiederkehrender Arbeitsabläufe ist sie mit fünf programmierbaren Tasten (inklusive Scrollrad) ausgestattet.
Einführung Systemanforderungen 1 • Windows ® 98 SE, ME, 2000 oder XP • CD-ROM-Laufwerk • 5 MB freier Festplattenspeicher 3 • USB- oder PS/2-Anschluss 4 Verpackungsinhalt 2 5 • Ergonomische Optische Maus • CD mit Software • Benutzerhandbuch • PS/2-Adapter Übersicht Bevor Sie die Hardware- oder Software-Installation der Maus beginnen, deinstallieren Sie bitte sämtliche Treiber oder Software von vorher auf dem Computer installierten Mäusen.
Hardware-Installation Wichtig: Bestimmen Sie vor dem Anschließen der Maus und vor der Installation der Software den verwendeten Mausanschluss (USB oder PS/2). Für den Fall, dass Sie nicht sicher sind, welcher Mausanschluss verwendet wird, sind die beiden Anschlusstypen in der folgenden Abbildung dargestellt. 1 2 3 USB Port PS/2 Port Wichtig: Installieren Sie die Software erst, wenn die Maus 4 5 an den Computer angeschlossen ist.
Hardware-Installation Anschließen der USB-Maus 1 USB bei Windows 98 SE, ME, 2000, XP 2 1. 3 Achten Sie darauf, dass der Computer eingeschaltet ist, bevor Sie die Maus installieren. 2. 4 Schließen Sie die Maus an einen verfügbaren USB-Anschluss des Computers an. 3. Ein Hardware-Assistent wird automatisch geöffnet. Hinweis: Bei Windows 98 SE kann es erforderlich sein, dass Sie die Windows 98 SE InstallationsCD in das CD-ROM-Laufwerk des Computers einlegen, um die Installation abzuschließen. 5 4.
Hardware-Installation Anschließen der PS/2-Maus PS/2 bei Windows 98 SE, ME, 2000, XP 1 1. Schalten Sie den Computer aus. 2 2. Schließen Sie das Kabel mit dem Adapter an den 6-poligen PS/2-Mausanschluss des Computers an. 3 3. Schalten Sie den Computer ein. 4. Nach dem Hochfahren erkennt der Computer die Maus automatisch und macht sie betriebsbereit. Hinweis: Wenn die Maus nicht funktioniert, lesen Sie die Anleitungen im Abschnitt „Synchronisierung der Maus mit dem Empfänger“. 5.
Software-Installation Wichtig: Installieren Sie die Software erst, wenn die Maus 2 an den Computer angeschlossen ist und einwandfrei funktioniert. Wenn Sie die Maus noch nicht angeschlossen haben, befolgen Sie bitte die Anweisungen im Abschnitt „Hardware-Installation“. 3 1. Legen Sie die mitgelieferte Installations-CD in das CD-ROM-Laufwerk ein. Nach kurzer Zeit wird automatisch das Hauptmenü gestartet. 2.
Software-Installation Merkmale der Software Die Software der Maus beinhaltet eine Reihe von interessanten Funktionen, mit denen Sie Ihre Effizienz im Umgang mit der Maus steigern können. Um die Highend-Funktionen der Maus zu steuern, müssen Sie das Dialogfeld „Eigenschaften von Maus“ über die Systemsteuerung oder über die Maus-Software aufrufen.
Fehlersuche Wenn irgendwelche Probleme bei der Installation oder Verwendung der Maus auftreten, lesen Sie bitte den folgenden Abschnitt. Wenn das Problem dort nicht aufgeführt ist oder durch die Lösungsvorschläge nicht behoben werden kann, setzen Sie sich bitte mit unserem technischen Kundendienst unter der Nummer 00 800 223 55 460 in Verbindung.
Fehlersuche Meine USB-Maus wird vom System nicht erkannt und funktioniert nicht. Warum? 1 Bitte führen Sie die folgenden Schritte aus: 1. Stellen Sie sicher, dass der Stecker der USBMaus vollständig in den USB-Anschluss eingesteckt ist. 2. Überprüfen Sie die Funktion des USBAnschlusses im Fenster „Geräte-Manager“ unter „Systemeigenschaften“. Wenn ein Ausrufungszeichen in einem Kreis auf dem Symbol für den USB-Anschluss angezeigt wird, besteht ein Problem mit dem USB-Controller.
Informationen Eingeschränkte lebenslange Produktgarantie* von Belkin 1 2 3 4 5 Belkin Corporation garantiert die Schadensfreiheit des Produktes in Material und Herstellung für die Lebensdauer des Produktes. Bei Feststellung eines Fehlers wird Belkin das Produkt nach eigenem Ermessen entweder kostenlos reparieren oder austauschen, sofern es während des Garantiezeitraums ausreichend frankiert an den autorisierten Belkin-Händler zurückgesendet wurde, bei dem es erworben wurde.
P74816ea_F8E857ea.
Ergonomische Optische Maus Belkin Ltd. Express Business Park • Shipton Way Rushden • NN10 6GL • Großbritannien Tel: +44 (0) 1933 35 2000 Fax: +44 (0) 1933 31 2000 Belkin GmbH Hanebergstrasse 2 80637 Munich • Deutschland Tel: +49 (0) 89 143405 0 Fax: +49 (0) 89 143405 100 Belkin B.V.
Ergonomische optische muis Op comfortabele wijze navigeren en gegevens invoeren EN ___ FR ___ DE ___ NL ___ ES ___ IT Handleiding P74816ea_F8E857ea.
Inhoud 1 Inleiding . . . . . . . . . . . . . . . . . . . . . . . . . . . . . . . . . . . 51 1 Systeemvereisten . . . . . . . . . . . . . . . . . . . . . . . . . .52 Inhoud verpakking: . . . . . . . . . . . . . . . . . . . . . . . . .52 2 3 4 Overzicht . . . . . . . . . . . . . . . . . . . . . . . . . . . . . . . .52 2 Hardware installeren . . . . . . . . . . . . . . . . . . . . . . . . .53 De USB-muis aansluiten . . . . . . . . . . . . . . . . . . . . .54 De PS/2-muis aansluiten . . . . . . . . . . . .
Inleiding Wij danken u hartelijk voor de aankoop van de ergonomische optische muis van Belkin waarvan u veel plezier zult hebben. U gaat een totaal nieuwe dimensie van computergemak beleven met onovertroffen invoerfuncties en cursorprecisie. De muis heeft vijf knoppen die u zelf kunt configureren, inclusief een gemakkelijk bereikbaar scrollwieltje dat repeterende werkzaamheden makkelijker maakt dan ooit.
Inleiding Systeemvereisten 1 • Windows ® 98 SE, Me, 2000 of XP • Cd-romstation • 5 MB vrije ruimte op de harde schijf 3 • USB- of PS/2-poort 4 Inhoud verpakking: 2 5 • Ergonomische optische muis • Cd-rom met software • Handleiding • PS/2-adapter Overzicht Verwijder voordat u de hardware en software voor de muis installeert alle stuurprogramma’s en software van alle muizen die tevoren op uw computer zijn geïnstalleerd.
Hardware installeren Belangrijk: Let goed op welk type muispoort u gebruikt (USB of PS/2) voordat u de muis aansluit of de bijbehorende software installeert. Kijk goed naar de onderstaande tekeningen als u twijfelt welk type poort uw muis gebruikt 1 2 3 USB Port PS/2 Port Belangrijk: U mag de software pas installeren nadat u 4 5 de muis op uw computer hebt aangesloten. Als u de muis nog niet hebt aangesloten, volg dan de aanwijzingen onder ‘Hardware installeren’.
Hardware installeren De USB-muis aansluiten 1 USB onder Windows 98 SE, Me, 2000 en XP 2 1. 3 Zorg ervoor dat uw computer ingeschakeld is voordat u de muis installeert. 2. 4 Sluit de muis aan op een vrije USB-poort van uw computer. 3. Een wizard voor de nieuwe hardware start automatisch. 5 Let op: Windows 98 SE kan u vragen de installatiecd van Windows 98 SE in het cd-romstation van uw computer te plaatsen om de installatie te voltooien. 4. P74816ea_F8E857ea.
Hardware installeren De PS/2-muis aansluiten PS/2 onder Windows 98 SE, Me, 2000 en XP 1 1. Zet uw computer uit. 2 2. Sluit de kabel met de connector aan op de (zespolige) PS/2-muispoort van de computer. 3 3. Schakel de computer in. 4. Zodra de computer is opgestart, herkent hij automatisch de muis en zorgt hij dat de muis werkt. 5. Wanneer de muis correct is aangesloten, kunt u de installatie van de software starten. P74816ea_F8E857ea.
Software installeren Belangrijk: U mag de software pas installeren nadat de 1 muis op uw computer is aangesloten en daarmee goed samenwerkt. 2 Als u de muis nog niet hebt aangesloten, volg dan de aanwijzingen onder ‘Hardware installeren’. 3 1. Plaats de bijgeleverde installatie-cd in uw cdromstation. Na enige ogenblikken start het hoofdmenu automatisch. 2. Selecteer ‘Install Driver’ (Stuurprogramma installeren) waarna de computer begint met installeren. 3.
Software installeren Eigenschappen software De software van uw muis activeert allerlei interessante eigenschappen en functies die u helpen uw productiviteit met de nieuwe muis te verhogen. Om de geavanceerde functies van de muis te kunnen gebruiken, moet u via het configuratiescherm of de software van uw muis het dialoogvenster ‘Properties’ (Eigenschappen) van uw muis openen.
Problemen oplossen Lees het volgende hoofdstuk goed door als u bij de installatie of bediening van de muis op een probleem stuit. Als u het probleem hieronder niet vindt of wanneer de voorgestelde oplossingen het probleem niet kunnen verhelpen, neem dan contact op het onze technische helpdesk op 00 800 223 55 460. 1 2 3 4 Waarom beweegt mijn cursor niet gelijkmatig? De muis werkt perfect op allerlei oppervlakken, vooral op oppervlakken met een weefselstructuur en/of patronen.
Problemen oplossen Mijn USB-muis wordt door de computer niet herkend en werkt niet. Waarom? 1 Ga als volgt te werk: 1. Zorg ervoor dat uw USB-muis volledig in de 2 USB-poort is bevestigd. 2. Controleer de werking van de USB-poort van uw computer op de pagina ‘Device Manager’ (Apparaatbeheer) van ‘System Properties’ (Systeemeigenschappen). Als er een omcirkeld uitroepteken op het pictogram van de USBpoort staat, heeft de USB-controller wellicht een probleem.
Informatie Beperkte levenslange productgarantie van Belkin Corporation* 1 2 3 4 5 Belkin Corporation geeft garantie voor de levensduur van het product op materiaal- en fabricagefouten. Wanneer een defect wordt geconstateerd, zal Belkin naar eigen keuze het product repareren of kosteloos vervangen, op voorwaarde dat het product tijdens de garantieperiode met vooruitbetaalde vervoerskosten wordt geretourneerd aan de officiële Belkin dealer bij wie het product is gekocht.
P74816ea_F8E857ea.
Ergonomische optische muis Belkin Ltd. Express Business Park • Shipton Way Rushden • NN10 6GL • Verenigd Koninkrijk Tel: +44 (0) 1933 35 2000 Fax: +44 (0) 1933 31 2000 Belkin GmbH Hanebergstrasse 2 80637 München • Duitsland Tel: +49 (0) 89 143405 0 Fax: +49 (0) 89 143405 100 Belkin B.V.
Ratón óptico ergonómico Navegue e introduzca datos cómodamente y con todo el control EN ___ FR ___ DE ___ NL ___ ES ___ IT Manual del usuario P74816ea_F8E857ea.
Índice de contenido 1 Introducción . . . . . . . . . . . . . . . . . . . . . . . . . . . . . . . .67 1 Requisitos del sistema . . . . . . . . . . . . . . . . . . . . . .68 El paquete incluye . . . . . . . . . . . . . . . . . . . . . . . . .68 2 3 4 Descripción general . . . . . . . . . . . . . . . . . . . . . . . .68 2 Instalación del hardware . . . . . . . . . . . . . . . . . . . . .69 Conexión del ratón USB . . . . . . . . . . . . . . . . . . . . . 70 Conexión del ratón PS/2 . . . . . . . . . . . . .
Introducción Felicidades y gracias por comprar el Ratón óptico ergonómico de Belkin. Está a punto de entrar a un nuevo mundo de conveniencia informática con propiedades superiores de entrada y precisión de navegación. Proporciona cinco botones programables, incluyendo una rueda de desplazamiento cómoda, para que las tareas repetitivas resulten más fáciles que nunca.
Introducción Requisitos del sistema 1 • Sistema operativo Windows ® 98 SE, Me, 2000 o XP • Unidad de CD-ROM • 5MB de espacio disponible en el disco 3 • Puerto USB o PS/2 4 El paquete incluye 2 5 • Ratón óptico ergonómico • Software en CD • Manual del usuario • Adaptador PS/2 Descripción general Antes de iniciar la instalación del hardware y software del ratón, desinstale los controladores o software de cualquier ratón previamente instalado en su ordenador.
Instalación del hardware Importante: Antes de conectar su ratón o instalar el software, asegúrese de identificar el tipo de puerto de ratón que está utilizando (USB o PS/2). Consulte los siguientes gráficos si no está seguro del tipo de puerto que utiliza su ratón. 1 2 3 USB Port PS/2 Port Importante: No instale el software hasta que el ratón esté 4 5 conectado a su ordenador. Si todavía no ha conectado el ratón, siga las instrucciones de instalación del hardware.
Instalación del hardware Conexión del ratón USB 1 USB en Windows 98 SE, Me, 2000 y XP 2 1. 3 Asegúrese de encender su ordenador antes de instalar el ratón. 2. 4 Conecte el ratón a un puerto USB disponible de su ordenador. 3. El asistente para nuevo hardware se iniciará automáticamente. 5 Atención: Puede que Windows 98 SE le solicite insertar su CD de instalación de Windows 98 SE en la unidad de CD-ROM de su ordenador para completar la instalación. 4. P74816ea_F8E857ea.
Instalación del hardware Conexión del ratón PS/2 PS/2 en Windows 98 SE, Me, 2000 y XP 1 1. Apague su ordenador. 2 2. Introduzca el cable con el conector en el puerto del ratón PS/2 (6 espigas) de su ordenador. 3 3. Encienda su ordenador. 4. Cuando el ordenador termine de arrancar, éste detectará automáticamente el ratón y hará que funcione. 5. Cuando el ratón esté conectado correctamente, puede iniciar la instalación del software. P74816ea_F8E857ea.
Instalación del software 1 2 3 4 5 Importante: No instale el software hasta que el ratón esté conectado a su ordenador y funcionando correctamente. Si todavía no ha conectado el ratón, siga las instrucciones de instalación del hardware. 1. Inserte el CD de instalación incluido en su unidad de CD-ROM. Tras unos segundos, el menú principal se iniciará automáticamente. 2. Seleccione “Install Driver” (Instalar controlador) y el ordenador iniciará la instalación. 3.
Instalación del software Propiedades del software El software de su ratón habilita una gama de propiedades y funciones interesantes que le ayudarán a aumentar su productividad con su nuevo ratón. A fin de controlar las propiedades de alto rendimiento del ratón, será necesario que acceda al cuadro de diálogo de propiedades de su ratón, ya sea a través del panel de control o a través del software de su ratón.
Resolución de problemas Si tiene algún problema con respecto a la instalación o funcionamiento de su ratón, revise la siguiente sección. Si el problema no aparece en esta lista o las soluciones sugeridas no resuelven el problema, póngase en contacto con nuestro departamento de asistencia técnica al 00 800 223 55 460. 1 2 3 4 ¿Por qué mi cursor no se desplaza con fluidez? El ratón funciona bien sobre una amplia gama de superficies, en particular aquellas con textura y/o con diseño.
Resolución de problemas El sistema no detectó mi ratón USB y, por lo tanto, no funciona. ¿Por qué? 1 Siga los siguientes pasos: 1. Asegúrese de que su ratón USB esté 2 totalmente conectado al puerto USB. 2. Revise el funcionamiento del puerto USB de su sistema en el Administrador de dispositivos de las Propiedades del sistema. Si aparece un signo de admiración en un círculo en el ícono del puerto USB, el problema está en el controlador USB.
Información Garantía limitada de por vida para los productos de Belkin Corporation* 1 2 3 4 5 Belkin Corporation garantiza este producto de por vida contra defectos con respecto a mano de obra y materiales.
P74816ea_F8E857ea.
Ratón óptico ergonómico Belkin Ltd. Express Business Park • Shipton Way Rushden • NN10 6GL • Reino Unido Tel: +44 (0) 1933 35 2000 Fax: +44 (0) 1933 31 2000 Belkin GmbH Hanebergstrasse 2 80637 München • Alemania Tel: +49 (0) 89 143405 0 Fax: +49 (0) 89 143405 100 Belkin B.V.
Mouse Ottico Ergonomico Per navigare ed immettere dati con comodità e controllo EN ___ FR ___ DE ___ NL ___ ES ___ IT Manuale utente P74816ea_F8E857ea.
Indice 1 Introduzione . . . . . . . . . . . . . . . . . . . . . . . . . . . . . . . .83 1 Requisiti del sistema . . . . . . . . . . . . . . . . . . . . . . .84 La confezione include . . . . . . . . . . . . . . . . . . . . . . .84 2 3 4 Descrizione generale . . . . . . . . . . . . . . . . . . . . . . .84 2 Installazione dell’hardware . . . . . . . . . . . . . . . . . . . .85 Collegamento del mouse USB . . . . . . . . . . . . . . . .86 Collegamento del mouse PS/2 . . . . . . . . . . . . . . . .
Introduzione Congratulazioni e grazie per aver acquistato il Mouse Ottico Ergonomico Belkin. Potrete così sperimentare le eccellenti opzioni di immissione dati ed accuratezza della navigazione. È provvisto di cinque tasti che possono essere personalizzati, inclusa la rotella di scorrimento, per facilitare i compiti ripetitivi. Si prega di leggere attentamente questo manuale per ottenere le migliori prestazioni dal mouse, garantirne una lunga durata ed ottenere il massimo dalle sue funzioni avanzate.
Introduzione Requisiti del sistema 1 • Windows ® 98 SE, Me, 2000 o XP • Drive per CD-ROM • 5 MB di spazio libero su disco fisso 3 • Porta USB o PS/2 4 La confezione include 2 5 • Mouse Ottico Ergonomico • CD con il software di installazione • Manuale utente • Adattatore PS/2 Descrizione generale Prima di iniziare ad installare l’hardware ed il software del mouse, rimuovere qualsiasi driver o software di altri mouse precedentemente installati sul computer.
Installazione dell’hardware Importante: prima di collegare il mouse o di installare il software, assicurarsi di identificare il tipo di porta del mouse usata (USB o PS/2). Se non si sapesse quale tipo di porta usi il mouse, vedere il diagramma sotto riportato. 1 2 3 USB Port PS/2 Port Importante: non installare il software prima di aver 4 5 collegato il mouse al computer. Se il mouse ancora non fosse stato collegato, seguire le istruzioni per l’installazione dell’hardware.
Installazione dell’hardware Collegamento del mouse USB 1 USB in Windows 98 SE, Me, 2000 e XP 2 1. 3 Assicurarsi che il computer sia acceso prima di installare il mouse. 2. 4 Collegare il mouse ad una porta USB libera del computer. 3. Automaticamente si avvia il programma per l’installazione dell’hardware. 5 Nota: se si sta usando Windows 98 SE, è possibile che il sistema richieda l’inserimento del CD di installazione di Windows 98 SE nel drive del CD ROM, per completare l’installazione. 4.
Installazione dell’hardware Collegamento del mouse PS/2 PS/2 in Windows 98 SE, Me, 2000 e XP 1 1. Spegnere il computer. 2 2. Inserire il cavo con il connettore alla porta del mouse PS/2 (a 6 pin) sul computer 3 3. Accendere il computer. 4. Dopo aver effettuato il riavvio, il computer rileverà il mouse e questo sarà funzionante. 5. Una volta che il mouse è ben collegato, si può procedere con l’installazione del software. P74816ea_F8E857ea.
Installazione del software 1 2 Importante: non installare il software prima che il mouse sia stato collegato al computer e sia perfettamente funzionante. Se il mouse ancora non fosse stato collegato, seguire le istruzioni per l’installazione dell’hardware. 1. 4 Inserire il CD di installazione a corredo nell’apposito drive del CD ROM. Dopo alcuni istanti il menu principale si apre automaticamente. 2. 5 Selezionare “Install Driver”(Installa driver), dopodiché il computer inizierà l’installazione. 3.
Installazione del software Caratteristiche del software Il software del mouse permette di usufruire di una serie di funzioni e caratteristiche che aumentano la produttività del mouse. Per poter controllare le funzioni di alto livello del mouse, bisognerà accedere alla finestra di dialogo “Properties”(Proprietà) del mouse, mediante il “Control Panel” (pannello di controllo) o usando il software del mouse.
Rilevazione e risoluzione delle anomalie Se si dovessero avere dei problemi con l’installazione o il funzionamento del mouse, leggere il capitolo seguente. Se il problema non dovesse essere tra quelli di seguito riportati, o se le soluzioni riportate non dovessero risolvere il problema, contattare l’assistenza tecnica al numero 00 800 223 55 460. 1 2 3 4 Perché il puntatore non si muove in modo scorrevole? Il mouse funziona bene su una vasta gamma di superfici, specialmente su quelle ruvide e/o decorate.
Rilevazione e risoluzione delle anomalie Il sistema non rileva il mio mouse USB e questo non funziona. Perché? 1 Seguire il seguente procedimento: 1. Accertarsi che il mouse USB sia 2 ben collegato alla porta USB. 2. Assicurarsi che la porta USB del sistema funzioni correttamente, controllando nella pagina “Device Manager”(Gestione delle unità) delle “System Properties” (Proprietà di sistema).
Informazioni Garanzia a vita sul prodotto Belkin Corporation* 1 2 3 Belkin Corporation garantisce a vita questo prodotto da eventuali difetti di materiale e lavorazione. Qualora venisse rilevata un’anomalia, Belkin provvederà, a propria discrezione, a riparare o sostituire il prodotto gratuitamente, a condizione che esso sia restituito entro il periodo di garanzia, con le spese di trasporto prepagate, al rivenditore Belkin autorizzato dal quale è stato acquistato.
P74816ea_F8E857ea.
Mouse Ottico Ergonomico Belkin Ltd. Express Business Park • Shipton Way Rushden • NN10 6GL • Regno Unito Tel: +44 (0) 1933 35 2000 Fax: +44 (0) 1933 31 2000 Belkin GmbH Hanebergstrasse 2 80637 Monaco di Baviera • Germania Tel: +49 (0) 89 143405 0 Fax: +49 (0) 89 143405 100 Belkin B.V.