OmniView® SOHO KVM Switch with Audio PS/2 and USB Console and Host Support User Manual F1DS102J F1DS104J
Table of Contents 1. Introduction................................................................................ 1 Package Contents.. ............................................................ 1 2. Overview....................................................................................... 2 Feature Overview............................................................... 2 Equipment Requirements................................................... 3 Unit Display Diagrams.. .............................
Introduction This User Manual will provide details about your new Switch, from installation and operation, to troubleshooting—in the unlikely event of a problem. For easy installation, please refer to the Quick Installation Guide included with your KVM Switch. Thank you for purchasing the Belkin OmniView SOHO KVM Switch with Audio. We appreciate your business and have confidence that you will soon see for yourself why over 1 million Belkin OmniView KVM Switches are being used worldwide.
Overview Feature Overview Video Resolution The SOHO KVM Switch is able to support video resolutions of up to 2048x1536 so you can use the latest in video display technology for all your computers. Flash Upgrade With the firmware-upgrade feature, your investment in the KVM Switch is further ensured and its lifetime value is maximized. You don’t have to change your KVM Switch to solve compatibility problems since you can solve them with easy firmware upgrades.
Overview Equipment Requirements Platforms Windows® 2000, XP, 2000, Vista®, 2003 DOS Linux® Novell® NetWare® 4.x/5.x Mac OS®* X v10.x *with USB support Keyboards 1 2 3 4 5 Supports 101-/102-/104-/107-key keyboards 6 Mice 7 Mice with 2, 3, 4, or 5 buttons, compatible with Microsoft® Note: Mouse software is not supported 8 Monitor VGA SVGA MultiSync® Microphone Multimedia microphone/stereo with 3.5mm connectors Audio Multimedia speaker/stereo with 3.5mm connectors Power Supply 9V, 1.
Overview back panel front panel M Soho DVI 4 Port Enclosure t Graphics v.2.1 F1DD102L, F1DD104L Unit Display Diagrams back panel Front View KVM Switch M Soho VGA T-type 4 Port Enclosure front panel Graphics v.2.1 F1DS102J, F1DS104J front backpanel panel Audio/Mic Switch M Soho VGA T-type 4 Port Enclosure nt Graphics v.2.
Overview Specifications F1DS102J, F1DS104J Power: 9V, 1.1A DC adapter with center pin-positive polarity PCs Supported: 2 (F1DS102J), 4 (F1DS104J) Console Keyboard: PS/2 & USB Console Mouse: PS/2 & USB Monitor Supported: VGA and SVGA MultiSync, LCD Max Resolution: 2048x1536@85Hz Audio Input/Output: 3.5mm jack Microphone Input/Output: 3.5mm jack VGA Port: 15-pin HDDB type LED Indicators: 4 (F1DS102J), 8 (F1DS104J) Enclosure: High-impact plastic Dimensions: F1DS102J 12.5 (L) x 5.
Installing the KVM Switch Pre-Configuration Where to Place the KVM Switch The compact size of the KVM Switch makes it perfect for desktop placement. Consider the following when deciding where to place the KVM Switch: whether or not you intend to use the direct-access port selectors; the length of the cables attached to your keyboard, mouse, and monitor; the location of your CPUs from your console; and the length of the cables you use to connect your computers to the KVM Switch.
Installing the KVM Switch Connecting the KVM Switch 1 2 3 Step 1 Connect the shared keyboard, mouse, and monitor to the console port on the rear of the KVM Switch. Step 2 Connect your PS/2 computer to a computer port on the rear of the KVM Switch. Step 3 For USB computers, use the special USB PS/2 KVM cable (with the USB-to-PS/2 adapter) for connection to a USB computer (PS/2 computer).
Installing the KVM Switch Audio and Microphone Connections Note: Speakers and microphones are not required for use of your KVM Switch. Connect the Audio 1. Using the audio cable attached to your speakers, connect the male 3.5mm plug to the lime audio jack in the “Console” section of the KVM Switch. 2. Using the mic cable attached to your microphone, connect the male 3.5mm plug to the pink mic jack in the “Console” section of the KVM Switch. 3.
Installing the KVM Switch Powering Up the Systems You can select which computer to operate by either the direct-access port selectors located on the front panel of the KVM Switch or through keyboard hot-key commands. Note that it will take 1–2 seconds for the video to display after switching. This is due to the refresh of the video signal. There is also re-synchronization of the mouse and keyboard signal that takes place. This is normal operation and ensures that proper synchronization is established.
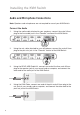
Using the KVM Switch Selecting a Computer Using Direct-Access Port Selectors You can directly select which computer you wish to control by pressing the corresponding direct-access port selector next to the appropriate port. The LED will be lit to indicate that the port is currently selected. KVM LED Center Function Audio LED • Pushing the button in the center switches both the KVM Switch and audio for that specific computer at the same time.
Using the KVM Switch Hot-Key Preceding Sequence Configuration For users who want to use a preceding sequence other than two consecutive Scroll Locks, there is also one convenient way to configure it. 2. S elect and press the key you would like to use as your preceding sequence (SCROLL LOCK, CAPS, F12, NUM LOCK, LEFT_CTRL, RIGHT_CTRL keys are available for selection), and you will hear a beep for selection confirmation. Now you can use the new preceding sequence to execute your hot-key commands.
Using the KVM Switch To modify the hot-key preceding sequence from the default Scroll Lock, you can either hit the hot-key sequence: scrlk – scrlk – H – (y), y = y = SCROLL LOCK, CAPS, ESC, F12 or NUM LOCK (as detailed in the QIG). or You can use another method: Press and hold the last button to enter the hot-key setting mode. Step 1. P ress and hold the last button (i.e., the second button on the 2-port model and the fourth button on the 4-port model) till you hear two beeps. Then release the button.
Using the KVM Switch Switching the Audio/Mic The audio/mic is independent to the KVM Switch and can be switched independently. This means that if you are working on port 1 of the KVM Switch, you can be listening to your music on port 3. 1. Using the direct-port selectors: The port selector has an Audio LED that indicates which port your audio/mic is on. Push the speaker icon on any of the four buttons and the audio/mic will switch to the corresponding port. 2 3 4 5 6 2.
Firmware-Upgrade Guide This firmware-upgradeable KVM Switch allows you to upgrade firmware contents whenever it is needed to enhance its compatibility to other devices or its functionality and performance. We offer both Windows and Mac® versions of the upgrade utility. You can choose either one depending on the computer platform on which you are going to perform the KVM Switch firmware uploading. The correct firmware-upgrade procedures using the Windows and Mac upgrade utilities are described below.
Firmware-Upgrade Guide Activate the Firmware-Upgrade Utility Program Note: You should close any unnecessary running programs such as antivirus, system-monitoring, or automatic updates; otherwise, the stability of the system during the firmware-upgrade process might be undermined. Step 3. Double-click the icon of “Uniloader.exe”, the firmware-upgrade utility program. A warning message box may appear if you have antivirus software running on the PC.
Firmware-Upgrade Guide Connect your KVM Switch to the Host PC Step 4. Now press the first front-panel button on the KVM Switch until you hear two beeps. The KVM Switch has now entered into the upgrade mode. Step 5. Check to make sure the KVM cables from port 1 are connected to the host PC. Note: A special upgrade cable is not needed to perform the upgrade since you can use the same KVM cable that you use for connecting to the computers.
Firmware-Upgrade Guide Begin the File Upload Note: Before hitting the “Upgrade” button on the utility program, you should make sure that you are focused on port 1 of the KVM Switch where you have the computer connected. If not, switch to that computer before hitting the “Upgrade” button. Step 7. 2 3 4 5 6 Note: Meanwhile, be careful not to power off the computer or disconnect the USB-cable connection. Otherwise, the file upload will be interrupted and the upgrade process will be aborted.
Firmware-Upgrade Guide Step 8. Finally, unplug the power cable from the back of the KVM Switch and all other cables from the KVM Switch, and perform a cold reset. Reconnect all the cables again to the KVM Switch. Now you can enjoy the newly added functionality and compatibility of the new firmware version. Note: After you have finished the firmware-upgrade process, try the port switching and other functionalities of the KVM Switch to see whether it works fine with the new firmware.
Firmware-Upgrade Guide Install and Activate the Firmware-Upgrade Utility Program Note: You should close any unnecessary running programs such as antivirus, system-monitoring, or automatic updates; otherwise, the stability of the system during the firmware-upgrade process might be undermined. Step 3. Double-click the icon of “Uniloader Installer.pkg”, the firmware-upgrade utility program, and a message box appears that will guide you through the installation process.
Firmware-Upgrade Guide After you have installed the program, you can find the upgrade-utility icon in the “Application” folder. Step 4. Now, double-click the “Uniloader” icon to activate the upgrade utility. Now the upgrade utility program is ready.
Firmware-Upgrade Guide Connect your KVM Switch to the Mac Host Step 5. 1 Press the first front-panel button on the KVM Switch until you hear two beeps. Now the KVM Switch has entered into the upgrade mode. 2 Step 6. 3 Check to make sure the KVM cables from port 1 are connected to the Mac host. 5 6 7 8 21 section Note: A special upgrade cable is not needed to perform the upgrade since you can use the same KVM cable that you use for connecting to the computers.
Firmware-Upgrade Guide Step 7. Click the “Browse” button and locate the firmware-upgrade file, which is indicated with a file extension such as “*.uni”. Select the upgrade file (for example: “UCF-30-11-07.uni”) and click “Choose” to load the file. Then click “Upgrade” for upload. Begin the File Upload Note: Before clicking on the “Upgrade” button on the utility program, you should make sure that you are focused on port 1 of the KVM Switch where you have the Mac host connected.
Firmware-Upgrade Guide 1 2 The file upload is finished when the progress bar runs through 100 percent and a prompt tells you that the upgrade is OK. 3 4 Click “OK”. The firmware-upgrade process is complete. Step 9. Finally, unplug the power cable from the back of the KVM Switch and all other cables from the KVM Switch, and perform a cold reset. Reconnect all the cables again to the KVM Switch. 6 7 8 Now you can enjoy the newly added functionality and compatibility of the new firmware version.
FAQs What operating systems does the KVM Switch support? The KVM Switch will support any operating system that runs on a PS/2 and USB platform. It will also work with non-USB-enabled SunTM and Mac operating systems using the appropriate adapter. Compatible operating systems include, but are not limited to, Windows 2000, XP, and Vista; Linux; and Mac OS. What does flash-upgrade capability mean? You can update your KVM Switch firmware with flash upgrades, when needed, by going to belkin.com.
FAQs Do I have to install any software to use the KVM Switch? No, the KVM Switch does not require any drivers or software to be installed in your computers. Simply connect all your computers to the PC ports on the KVM Switch, then attach one keyboard, monitor, and mouse to the “Console” port and it is ready for use. Does the KVM Switch require an AC adapter? Yes, the KVM Switch requires a 9V, 1.1A DC power adapter with center pin-positive polarity.
Troubleshooting VIDEO Problem: I am getting ghosting, shadowing, or fuzzy images on my monitor. Solution: • Check that all video cables are inserted properly. • Check that the monitor you are using supports the resolution and refresh-rate setting on your computer. • Check that the graphics card you are using supports the resolution and refresh-rate setting on your computer. • Connect the monitor directly into the computer with which you are having trouble to see if the problem still appears.
Troubleshooting KEYBOARD Problem: 1 The computer does not detect a keyboard and I get a keyboard error reported at boot up. 2 Solution: • Check that the keyboard cable between the KVM Switch and the computer is connected properly. Tighten any loose connections. • Try swapping your keyboard with a different one. • Try connecting the computer to a different port.
Troubleshooting Problem: The mouse is not detected at boot up. Solution: • Check the cables and make sure that they are inserted properly. Problem: The computer boots up fine, but the mouse does not work. Solution: • Make sure it is plugged in properly. • Make sure the mouse works when directly plugged into the computer. Rebooting may be necessary when trying this. • Try a different mouse.
Troubleshooting Problem: Some of the keys on my keyboard are not functioning properly when I use a Mac computer. Solution: • Because you are using a PC keyboard on a Mac computer, a few of the option keys on your PC keyboard may be reversed. All major keys will function as labeled. 1 2 3 4 AUDIO AND MICROPHONE Problem: 5 I have connected the speakers to the KVM Switch and I am not getting any sound from my computer.
Troubleshooting Firmware-Upgrade Troubleshooting Problem: The progress bar stops for a long time without any advancement. Solution: Press and hold down the first front-panel button until two beeps are heard, and click the upgrade button on the upgrade utility program. The firmware-upload process will begin immediately, and you will see the progress bar advance gradually to full length.
Information FCC Statement Declaration of Conformity with FCC Rules for Electromagnetic Compatibility We, Belkin International, Inc., of 501 West Walnut Street, Compton, CA 90220, declare under our sole responsibility that the products: F1DS102J, F1DS104J, to which this declaration relates: Comply with Part 15 of the FCC Rules.
Information Belkin International, Inc., Limited 3-Year Product Warranty What this warranty covers. Belkin International, Inc. (“Belkin”) warrants to the original purchaser of this Belkin product that the product shall be free of defects in design, assembly, material, or workmanship. What the period of coverage is. Belkin warrants the Belkin product for three years. What will we do to correct problems? Product Warranty.
Information Belkin reserves the right to review the damaged Belkin product. All costs of shipping the Belkin product to Belkin for inspection shall be borne solely by the purchaser. If Belkin determines, in its sole discretion, that it is impractical to ship the damaged equipment to Belkin, Belkin may designate, in its sole discretion, an equipment repair facility to inspect and estimate the cost to repair such equipment.
OmniView® SOHO KVM Switch with Audio PS/2 and USB Console and Host Support Belkin Tech Support US: 800-223-5546 ext. 2263 310-898-1100 ext. 2263 UK: 0845 607 77 87 Australia: 1800 235 546 New Zealand: 0800 235 546 Singapore: 65 64857620 Europe: www.belkin.com/support Belkin International, Inc. 501 West Walnut Street Los Angeles, CA 90220, USA 310-898-1100 310-898-1111 fax Belkin Ltd.