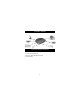
USB Multi-port Hub User Manual P73277 F5U116
Introduction Please read this manual thoroughly in its entirety. Failure to follow installation and other recommended procedures may result in irreversible damage to the product, your computer and/or connected devices. Thank you for purchasing the Belkin Components F5U116 Multi-port Hub.
Product Detail System Requirements • PC with one free USB port • Windows® 98/98 Second Edition (SE) • CD-ROM drive 2
Hardware Installation Because USB is hot swappable, you need not power down your PC.
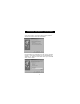
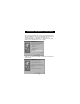
Software Installation Software Installation – Windows® 98 and Windows® 98 Second Edition (SE) First, Windows® will automatically detect and install the built-in "General Purpose USB Hub" for the four downstream USB ports. You do not need to do anything. Next, Windows® will detect the two serial ports named "USB-232 Adapter". You see the following dialog box: Click on Next.
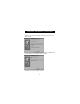
Software Installation (continued) At the next prompt, click on Next again so that Windows® searches for the best driver (recommended): You must then tell Windows® where to get the drivers. Insert the CD-ROM in your CD-ROM drive, and click on “Specify a location”. In the space provided, type “d:\serial\win98” (or substitute “d:” with the correct drive letter of your CD-ROM drive). Click on Next.
Software Installation (continued) Windows® will read the CD-ROM and find the correct drivers. Click on Next. Once Windows® has finished copying the drivers, installation for the first serial port is complete. Click on Finish: Windows® may prompt you to restart your computer. Because installation is not yet complete, click No.
Software Installation (continued) Windows® will continue, and will detect and install the drivers for the second serial port. Then, Windows® 98 will find an “Unknown Device”. Windows® 98 SE will find this device as a “USB Device”. Click on Next.
Software Installation (continued) You must then tell Windows® where to get the drivers. Make sure the Installation CD is in your CD-ROM drive, and click on “Specify a location”. In the space provided, type in “d:\parallel\win98” (or substitute “d:” with the correct drive letter of your CD-ROM drive). Click on Next. Windows® will read the CD-ROM and find the correct drivers. Click on Next.
Software Installation (continued) Once Windows® has completed copying the files, you will see the following confirmation. Click Finish. Windows® may prompt you to restart your computer. Installation is complete, and restarting is necessary to properly configure the system registry. Click Yes.
Software Installation (continued) Windows® should copy all the files it needs and install the Multi-port Hub completely. Windows® will begin installing the USB COM ports as COM_A and COM_B on your computer, where A and B are unused COM ports (A and B can be any number from 2 to 10). It will also finish installing the Parallel Port. You can verify whether all the ports on the Multi-port Hub are installed by looking in your “Device Manager”.
Software Installation (continued) You’re done! You can now use the two serial ports on the Multiport Hub as COM_A and COM_B (A and B can be any number from 2 to 10), and the parallel printer port as LPTUSB1. Take note of these port names when installing or attaching hardware to these ports. Go to page 17 for more information on installing a parallel printer.
Software Installation (continued) Software Installation – Windows® 95 Prior to installing the Multi-port Hub drivers, you must ensure that the USB ports on your system are working properly. If you plug in the Multi-port Hub and nothing happens (with the power adapter), chances are your USB is not set up yet.
Software Installation (continued) You must then tell Windows® where to get the drivers.
Software Installation (continued) In the space provided, type in “d:\serial\win95” (or substitute “d:” with the correct drive letter of your CD-ROM drive). Click on OK: Windows will read the CD-ROM and find the correct drivers.
Software Installation (continued) Windows® will display the following prompt. Click OK: In the space provided, type in “d:\serial\win95” (or substitute “d:” with the correct drive letter of your CD-ROM drive). Click on OK: Next, Windows® will detect another “Unknown Device”. This second “Unknown Device” is the parallel printer port of the Multi-port Hub.
Software Installation (continued) You must then tell Windows where to find the drivers. Make sure the CD is in your CD-ROM drive, and click on “Other Locations…”: In the space provided, type “d:\parallel\win95” (or substitute “d:” with the correct drive letter of your CD-ROM drive).
Installing a Parallel Printer Windows® will read the CD-ROM and find the correct drivers. Click on Finish: Windows® will display the following prompt.
Software Installation (continued) In the space provided, type “d:\parallel\win95” (or substitute “d:” with the correct drive letter of your CD-ROM drive). Click on OK: Once Windows® has completed copying the files, it may prompt you again for the serial port drivers. Click OK: In the space provided, type “d:\serial\win95” (or substitute “d:” with the correct drive letter of your CD-ROM drive).
Software Installation (continued) Windows® should copy all the files it needs and install the Multi-port Hub completely. Windows will start installing the USB COM ports as COM_A and COM_B on your computer, where A and B are unused COM ports (A and B can be any number from 2 to 10). It will also finish installing the Parallel Port. You can verify whether all the ports on the Multi-port Hub are installed by looking in your “Device Manager”.
Software Installation (continued) You’re done! You can now use the two serial ports on the Multiport Hub as COM_A and COM_B (A and B can be any number from 2 to 10), and the parallel printer port as LPTUSB1. Take note of these port names when installing or attaching hardware to these ports. Skip to page 21 for more information on installing a parallel printer.
Installing a Parallel Printer • First, connect your parallel printer to the Multi-port Hub using IEEE 1284-compliant cables (Belkin F2A046-XX where “XX” is the length in feet). • Install your printer’s drivers using the software that came with it. Better yet, download the latest software from the printer manufacturer’s web site. When the software prompts you for the port name, select “LPTUSB1”. • If not, open the printers folder by clicking on START, then click on SETTINGS.
Adding Optional DOS Box Support Adding Optional DOS Box Support for Serial Ports DOS Box support for the USB Serial Adapter is useful if you intend to use DOS applications, but not necessary for Windows® applications. If you are using only Windows® applications, it is recommended that you do not install this feature as it uses resources. For more information about using DOS Box applications, see section 4.4.
Adding Optional DOS Box Support 10. You will be asked for the “USB to Serial installation” CD. Insert the installation CD into your CD drive and click “OK”. If a dialog appears stating that a file could not be found, make sure that the “Copy files from:” edit box contains the name of your CD drive along with “:\Win98” and click “OK”. Once DOS Box support is enabled for a specific USB Serial Adapter device, an additional Port entry in the “Device Manager” will be created, labeled “16550 COM Port Emulator”.
Serial Plug-and-Play Device Detection (continued) 1. 2. 3. 4. Attach the serial device to the USB Serial Adapter. Right-click the “My Computer” icon on your desktop. Click “Properties” from the menu that appears. Click the “Device Manager” tab on the System Properties page. 5. Click “Refresh”. Your Plug-and-Play device should be detected and you may be asked for a device driver if it has not been previously installed. Follow the instructions that came with your serial device to complete the installation.
Using USB with DOS Applications Using the USB Serial Adapter With DOS Applications To enable the USB Serial Adapter to work with DOS applications, follow the instructions in Adding DOS Box Support. You can choose a different name for DOS than what is used for Windows®. You may need to do this if the USB Serial Adapter has been installed as COM5 or higher, since many DOS applications will only use COM1-COM4.
Troubleshooting Port unavailable If the installation of the USB Serial Adapter has been completed but the port is unavailable to applications, follow the instructions below to diagnose the problem: 1. Check the LEDs on the USB Serial Adapter. • If the red light is on steady, skip to the next section. • If there are no lights on, check to make sure the device has been properly plugged in. • If the center, green LED is blinking steadily, the device has not been configured properly.
Troubleshooting (continued) no parity, one stop bit and hardware handshaking, errors can occur if the settings on the other device do not match. Modem not detected/illegal operation in MODEM.CPL It is possible that a modem attached to the USB Serial Adapter will not be detected or a problem will occur in MODEM.CPL if more than one USB hub is between the USB Serial Adapter and the root hub. This is a known problem in MODEM.CPL, a component of Windows® 98.
Information FCC Statement DECLARATION OF CONFORMITY WITH FCC RULES FOR ELECTROMAGNETIC COMPATIBILITY We, Belkin Components, of 501 West Walnut Street, Compton CA 90220, declare under our sole responsibility that the product: F5U116 to which this declaration relates: Complies with Part 15 of the FCC Rules.
Belkin Components 501 West Walnut Street Compton • CA • 90220 • USA Tel: 310.898.1100 Fax: 310.898.1111 Belkin Components, Ltd. Unit 13 • Gatelodge Close • Round Spinney Northampton • NN3 8RX • UK Tel: +44 (0) 1604678300 Fax: +44 (0) 1604678330 Belkin Components B.V. Diamantlaan 8 • 2132 WV Hoofddorp • The Netherlands Tel: +31 (0) 235698765 Fax: +31 (0) 235612694 © 2000 Belkin Components. All rights reserved. All trade names are registered trademarks of respective manufacturers listed.