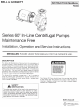
BELL & ROSSETTI INSTRUCTION MANUAL P82893 Series 60° In-Line Centrifugal Pumps Maintenance Free Installation, Operation and Service Instructions INSTALLER: PLEASE LEAVE THIS MANUAL FOR THE OWNER’S USE. DESCRIPTION The Seders 50 Maintenance Free pump is the culmination of compact design, quiet operation and, of course, Bell & Rossetti quality. The compact design of the Series BO centrifugal pump facilitates direct In-line mounting.
OPERATIONAL LIMITS Unless special provisions have been made for your pump by Bell & Rossetti, the operational limits for Series BO Pumps are as follows: PUMP APPLICATION Bell & Rossetti Centrifugal Pumps may be used for hydroponic heating and cooling systems, domestic wale industrial apple cations and general service operations.
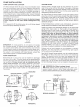
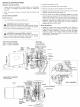
PUMP INSTALLATION PUMP SUPPORT AND LOCATION The Bell & Rossetti Moseley 80 pump should be installed where there will be sufficient room for future Inspection and service, it is highly recommended that service legislation) valves be installed on sate side of the pump to facilitate servicing or replacing the pump without draining the system. the pump is 10 be located near a noise sensitive ares, consult a sound specialist, Special precautions should be taken to avoid sound and vibration transmission.
WIRING INSTRUCTIONS WARNING: Electrical Shock Hazard Disconnect and lookout the power before making electrical connections.
SERVICE INSTRUCTIONS GENERAL INSTRUCTIONS 1. inspect the pump mournfully for leaking seals, worn gaskets, and loose or damaged components. Repair or replace as reacquired, . Drain the pump if there is a chance that the system will frag, MOTOR REPLACEMENT Motor Removal 1. Turn off and lock out power to the motor WARNING: Electrical Shock Hazard Connection and lockout the power before making election connections.
SPRING TYPE COUPLET REPLACEMENT Couplet Removal 1. Remove the motor as outlined in the section tutted “Motor Removal” 2. Remove old couplet from the pump shaft by almost com platelet backing-out the setscrew located in the pump side couplet lal Couplet Installation 1. install the new couplet on the pump shaft, Ensure the coupe sel gore Is seated in the shaft dimple, 2. Lit the motor into position and attach the motor side couplet half, Ensure the couplet sel screw is seated in the shaft dimple, 3.
£. Behoove the sigh cap screws that hold the bearing assembly or adapter ring to the volt, 4h WARNING: High Pressure Hazard Pressure may be present in the pump body. This pressure can be relieved by loosening the sight volute corkscrews and shifting the bearing assembly slightly to allow the pressurized water to escapes. Failure to follow these st ructions could result in serous personal injury or death, &. Remove the bearing assembly, 7.
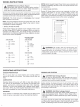
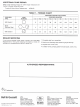
ADDITIONAL PUMP REPAIR Safer to the following manual for further repair Instructions for the Bell & Rossetti Series 80 pump: Couplet & Motor Mount Replacement |. #POB4S2 TABLE 1 TORQUE CHART CAP SCREW TORQUE (FOOT-POUND) CAP SCREW HEAD CAP SCREW DIAMETER TYPE MARKING Thy 4 SAE Grade 120 1490 210 300 Brass Stainless Sled 130 200 200 SAE Grade 18D az BPE 800 DEALER SERVICING your pump requires further repair, contact your local BAG Representative.