
Manual


3É
Preparation for Installation:É
Assemble the parts and tools required:É
1. Open and inspect Autocirc pump package.É
2. AutocircÉpump package includes the pump with a built-in ti¿, a 6ft. cord, ÉÉÉÉÉÉÉÉÉÉÉÉÉÉÉÉÉÉÉÉÉÉÉÉÉÉÉÉÉÉÉÉÉÉÉÉÉÉÉÉÉ
ÉÉÉÉÉand wall mounting bracket.É
3. Two stainless steel flexible hoses (1/2” x 3/8”) - length as required. É
ÉÉÉÉ(sold separately)É
4. Adjustable wrench and screwdriver.É
5. Select the sink under which the AutocircɪÔp is to be locatÉÉed (the sink ÉÉÉÉÉÉÉÉÉÉÉÉÉÉÉÉÉÉÉÉÉÉÉÉÉÉÉÉ
ÉÉÉÉÉwhere hot water takes longest to arrive).É
InstallationÉ
ÉÉ
Step 1É
ÉÉ
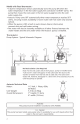
If not already available, install a 115 Volt/ 60Hz
outlet within six (6) feet of the installation site (the
faucet/tap farthest from the water heater), as the
Autocirc is supplied with a 6 ft. long, grounded
cord. The Autocirc pump requires only 14 watts
and 0.3 amps of power (see Fig. 1).É
ÉÉ
Step 2É
ÉÉ
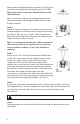
Autocirc pump and mounting bracket come
preassembled. Remove mounting bracket from
Autocirc by carefully sliding the mounting bracket
off the (4) supporting pins on the Autocirc pump
body. Fasten the mounting to the wall under the
sink using the wall bracket provided in the Autocirc
kit. Mount AutocircÉpump into position by aligning
and securing mounting bracket to the (4) support
pins. Be sure the pump timer is turned toward the
front and is accessible for setting and changing the
time (see Fig. 2). The pump must be installed only in
a vertical position as shown.É
ÉÉ
Step 3É
ÉÉ
Close the under sink hot and cold water riser
shut-off valves and open the hot and cold water
faucets/taps to relieve the water pressure. Close the
water faucets/taps after pressure has bled from the
lines.É
ÉÉ
Note: in some older homes, the riser shut-off valves
may be difficult to shut off completely. If this is the
case turn the water off at the main water inlet valve
to the house.É
ÉÉ
CAUTION: Do Not fasten pump to a thin wood panel
wall as this might create a vibration noise when the
pump is operating.É
ÉÉ
Figure 1É
ÉÉ
Figure 2É
ÉÉ
Figure 3É