FLAT PANEL TV WALL MOUNT INSTRUCTION MANUAL SUPPORT MURAL D'ÉCRAN PLAT MANUEL D'INSTRUCTIONS SOPORTE DE PARED PARA TV DE PANTALLA PLANA MANUAL DE INSTRUCCIONES SUPPORTO A PARETE PER TELEVISORE A SCHERMO PIATTO MANUALE DI ISTRUZIONI FLACHBILDSCHIRM TV WANDBEFESTIGUNG ANLEITUNGSHANDBUCH НАСТЕННЫЙ КРОНШТЕЙН ДЛЯ ПЛОСКОПАНЕЛЬНОГО ТЕЛЕВИЗОРА ИНСТРУКЦИЯ 7411B
PRECAUTIONS If at any time you are unclear about the directions and believe you need further assistance, contact Bell’O® at: 1-888-235-7646 (US/Canada) or +1-732-972-1333 (International) from 9am – 5pm EST, Monday through Friday. • NEVER ExCEED THE MAxIMUM LOAD CAPACITy OF 40 LBS (18.1 kG). • THIS PRODUCT SHOULD NEVER BE MOUNTED TO METAL FRAMING STUDS OR BRICkS. • The maximum weight of your television cannot exceed the maximum weight rating of your mount. • Wood studs should be 2" x 4", at minimum: 1.
AVERTISSEMENTS Pour toutes questions concernant les instructions ou pour tout besoin d'assistance, veuillez communiquer avec Bell’O® au : 1-888-235-7646 (USA/Canada) ou +1-732-972-1333 (International) de 9h00 à 17h00 (heure de l'Est), du lundi au vendredi. • NE JAMAIS DÉPASSER LA CAPACITÉ DE CHARGE MAxIMALE DE 18,1 kG (40 LBS) • LE PAS INSTALLE CE PRODUIT DANS DES BROCHES D'INSERTION EN MÉTAL OU DES BRIqUES. • Le poids maximum du téléviseur ne doit pas dépasser la capacité de charge maximale du support.
ADVERTENCIAS Si en algún momento tiene dudas sobre las instrucciones y necesita asesoramiento adicional, comuníquese con Bell’O®: 1-888-235-7646 (EE. UU. y Canadá) o +1-732-972-1333 (desde otros lugares del mundo) de 9 a 17 hora del este, lunes a viernes. • NUNCA ExCEDA LA CAPACIDAD DE CARGA MáxIMA DE 40 LBS (18.1) • ESTE PRODUCTO NUNCA DEBE SER MONTADO SOBRE MONTANTES METáLICOS O LADRILLOS. • El peso máximo de su televisor no puede exceder la clasificación de peso máximo de su soporte.
PRECAUZIONI Nel caso che, in qualsiasi momento, le istruzioni non dovessero risultare chiare o si necessitasse di ulteriore assistenza, contattare Bell’O® al numero verde: 1-888-235-7646 (da USA/Canada) oppure al +1-732-972-1333 (da altri Paesi) dalle 9.00 - 17.00 (ora costa orientale USA), Lunedi a Venerdì. • NON SUPERARE MAI LA MASSIMA CAPACITà DI CARICO, PARI A 18.1 kG (40 LBS) • qUESTO PRODOTTO NON ESSERE MONTATO MAI A MONTANTI D’INqUADRAMENTO DEL METALLO O I MATTONI.
VORSICHTSMASSNAHMEN Sollten Sie sich nicht ganz klar über die Anleitungen und der Ansicht sein, dass Sie Unterstützung brauchen, setzen Sie sich bitte mit Bell’O® unter Telefonnummer 1-888-235-7646 (US/kanada) oder + 1-732-972-1333 (International) zwischen 9 Uhr und 17 Uhr (Ostzeit) in Verbindung, Montag bis Freitag. • NIE MEHR ALS DIE MAxIMALE GEWICHT kAPAZITäTEN : 18,1 kG (40 PFD). • NICHT INSTALLIEREN SIE DIESES PRODUkT IN METALLE RAHMEN WANDPFOSTEN ODER ZIEGELSTEINE.
ПРЕДУПРЕЖДЕНИЕ Если вам понадобится помощь или что–то непонятно в инструкции, обратитесь в фирму Bell’O® по телефону 1-888-235-7646 (США/Канада) или +1-732-972-1333 (для международных звонков) с 9 утра до 5 вечера (время — восточное стандартное), от понедельника до пятницы. • НИ ПРИ КАКИХ ОБСТОЯТЕЛЬСТВАХ НЕ ПРЕВЫШАТЬ мАКСИмАЛЬНУю НАГРУЗКУ: В 40 фУНТОВ (18,1 КГ) • НЕ УСТАНАВЛИВАЙТЕ эТОТ ПРОДУКТ В METAL ОБРАмЛЕНИЯ ШПИЛЬКИ ИЛИ КИРПИчА.
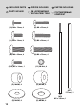
INCLUDED PARTS PARTI INCLUSE PIÈCES INCLUSES IM LIEFERUMFANG ENTHALTENE TEILE (WM) Wall Mount, 1 Support mural, 1 Soporte de pared, 1 Supporto a parete, 1 Wandbefestigung, 1 Настенный кронштейн, 1 PARTES INCLUIDAS ПОСТАВЛЯЕмЫЙ КОмПЛЕКТ (MP) Monitor Plate, 1 Plaque de moniteur, 1 Placa del monitor, 1 Piastra per lo schermo, 1 Monitor-Platte, 1 Плата для монитора, 1 (AP) Adapter Plates, 4 Plaques d'adaptation, 4 Placas adaptadoras, 4 Piastre-adattatore, 4 Adapter-Platten, 4 Адаптерные платы, 4 (WR5
INCLUDED PARTS PARTI INCLUSE PIÈCES INCLUSES IM LIEFERUMFANG ENTHALTENE TEILE (A) M4 x 12mm, 4 (B) M4 x 22mm, 4 (J) M6 x 14mm, 8 (k) M6 x 24mm, 4 (M) M8 x 20mm, 4 (N) M8 x 30mm, 4 (GG) M5 x 14mm, 1 (Jy) M6 Nut, 4 (D) M4/M5, 4 (q) M6/M8, 4 PARTES INCLUIDAS ПОСТАВЛЯЕмЫЙ КОмПЛЕКТ (WT) 137mm, 1 10 (R) M4/M5, 6 (S) M6/M8, 4 (WS) M5 x 150mm, 1
NECESSARy TOOLS ATTREZZI NECESSARI OUTILLAGE NÉCESSAIRE ERFORDERLICHE WERkZEUGE Phillips-head Screwdriver Tournevis à tête Phillips Destornillador philips (cruz) Cacciavite Phillips kreuzschlitzschraubenzieher Крестообразная отвертка Masking Tape Ruban de masquage Cinta de enmascarar Nastro adesivo Abdeckband маскировочная лента HERRAMIENTAS NECESARIAS НЕОБХОДИмЫЕ ИНСТРУмЕНТЫ Ratchet Set Clé à cliquet à douilles Equipo de trinquete Strumento Del Cricco Schaltklinke Hilfsmittel Набор инструментов с х
ATTACHING THE MONITOR PLATE (MP) FIxER LA PLAqUE DE MONITEUR (MP) CÓMO FIJAR LA PLACA DEL MONITOR (MP) FISSAGGIO DELLA PIASTRA PER LO SCHERMO (MP) BEFESTIGUNG DER MONITOR-PLATTE (MP) КРЕПЛЕНИЕ ПЛАТЫ ДЛЯ мОНИТОРА (MP) SELECT THE CORRECT SCREW Before beginning, test several of the screws in your hardware kit to find the correct size and length for your television.
DECIDE IF ADAPTER PLATES (AP) ARE NECESSARy Compare to the mounting holes on the back of your television. DÉCIDER SI DES PLAqUES D'ADAPTATION (AP) SON NÉCESSAIRES Comparer aux trous de fixation au dos du téléviseur. DETERMINE SI NECESITA LAS PLACAS ADAPTADORAS (AP) Compare los orificios de montaje en la parte trasera de su televisor. DECIDERE SE LE PIASTRE-ADATTORE (AP) SONO NECESSARIE Verificare la corrispondenza tra la posizione dei fori sul retro del televisore e il supporto stesso.
J AP MP Jy WR5 IF USING THE ADAPTER PLATES (AP): Attach the Adapter Plates (AP) to the Monitor Plate (MP) using four M6 x 14mm Screws (J) and four M6 Nuts (JY). SI LES PLAqUES D'ADAPTATION (AP) SONT UTILISÉES : Fixer les plaques d'adaptation (AP) à la plaque de moniteur (MP) à l'aide de quatre rondelles M6 x 14mm (J) et de quatre vis M6 (JY).
ATTACH MONITOR PLATE (MP) TO TELEVISION Attach the Monitor Plate (MP) using the correct TV Mounting Screws (A, J, or M) and Washers (R or S) as shown. Do not place the Washers between the monitor plate and the TV. FIxER LA PLAqUE DE MONITEUR (MP) AU TÉLÉVISEUR Fixer la plaque de moniteur (MP) avec les vis (A, J, ou M) de fixation de TV et les rondelles (R ou S) correctes comme sur l'illustration. Ne pas place pas de rondelle entre la plaque de moniteur et le téléviseur.
use spacers (D or q) if the Monitor Plate (MP) does not fit firmly against the back of the television, such as when the back of the television is curved, contains larger recessed mounting holes, or some other obstruction is in the way. The Monitor Plate must rest securely on the spacers, and should not be loose. use longer screws (B, K or N).
INSTALLING THE WALL MOUNT IN WOOD POSER LE SUPPORT MURAL SUR DU BOIS CÓMO INSTALAR EL SOPORTE DE PARED EN MADERA INSTALLAZIONE DEL SUPPORTO A PARETE SU LEGNO INSTALLATION DER WANDBEFESTIGUNG IN HOLZ КРЕПЛЕНИЕ НАСТЕННОГО КРОНШТЕЙНА К ДЕРЕВУ FIND THE WOOD STUD using a stud finder, find the exact location of the stud to which you want to attach the wall mount. Mark the right and left side to determine the center of the stud. Wood studs should be 2" x 4", at minimum: 1.5" X 3.5" (38 mm X 89 mm).
DETERMINE HEIGHT LOCATION OF TELEVISION Measure the distance from the bracket holes to the top and bottom of the TV to determine the center mounting position. Measure from the floor up, and make small marks on the wall to help you determine the desired TV height. using a level, line up the Installation Template (IT) with your pencil markings and tape it into place.
IT 16 Inches (406mm) TV • Height to bottom of TV • Hauteur jusqu'au bas du téléviseur • Altura hasta la parte inferior del TV • Altezza alla parte inferiore del televisore • Höhe zum unteren Teil des TVs • Высота до низа телевизора 19
FOR MASONRY INSTALLATIONS, SEE PAGE 24. POUR UNE POSE SUR DE LA MAÇONNERIE, VOIR PAGE 24. PARA INSTALACIONES EN MAMPOSTERÍA CONSULTE LA PÁGINA 24. PER INSTALLAZIONI A MURO, VEDERE A PAGINA 24. FÜR INSTALLATIONEN IN MAUERWERK, SIEHE SEITE 24. КРЕПЛЕНИЕ К КАМЕННОЙ КЛАДКЕ, СМ. СТР. 24. DRILL PILOT HOLES Follow directions on the Installation Template (IT) carefully. Drill two holes 2.5" (64mm) deep using a 5/32" (or 4mm) size drill bit in the “A” and “B” locations noted on the Installation Template.
A B 21
INSTALL THE WALL MOUNT (WM) Install the Wall Mount (WM) using two Lag Bolts (TS) and Washers (R) in the "A" and "B" holes. Do not tighten Lag Bolts completely. POSER LE SUPPORT MURAL (WM) Poser le support mural (WM) en vissant deux tire-fond (TS) et rondelles (R) dans les trous « A » et « B ». Ne pas complètement serrer les tire-fond. INSTALE EL SOPORTE DE PARED (WM) Instale el soporte de pared (WM) usando dos tirafondos (TS) y arandellas (R) en los orificios “A” y “B”.
WM R A B TS DO NOT OVER TIGHTEN LAG BOLTS (TS)! NE PAS FORCER SUR LES TIRE-FOND (TS) ! NO AJUSTE DEMASIADO LOS TIRAFONDOS (TS)! NON SERRARE ECCESSIVAMENTE I BULLONI (TS)! ZIEHEN SIE DIE ANKERBOLZEN (TS) NICHT ZU FEST! НЕ ЗАТЯГИВАЙТЕ ШУРУПЫ (TS) СЛИШКОМ СИЛЬНО! 23
MOUNTING TO SOLID CONCRETE OR CINDER BLOCk POSE SUR DU BÉTON PLEIN OU DES PARPAINGS MONTAJE EN CONCRETO SÓLIDO LADRILLOS DE ESCORIAS MONTAGGIO SU CALCESTRUZZO O BLOCCHI IN CEMENTO MONTAGE AN FESTBETON ODER SCHLACkENBETONBLOCk КРЕПЛЕНИЕ К НЕАРмИРОВАННОмУ БЕТОНУ ИЛИ ШЛАКОБЕТОННОмУ БЛОКУ After you have determined your desired TV location, Line up the Installation Template (IT) to ensure you will not drill into any mortar joints.
DRILL PILOT HOLES Carefully drill two holes using a 5/16" (or 8mm) masonry drill bit in the “A” and “B” locations noted on the Installation Template. Each hole should be at least 3" (76mm) deep. PERCER LES TROUS GUIDES Percer soigneusement deux trous avec une mèche à maçonnerie de 5/16 po (ou 8 mm) aux emplacements notés « A » et « B » sur le gabarit de pose. Chaque trou doit être d'au moins 76 mm (3 po) de profond.
DO NOT DRILL INTO MORTAR JOINTS! DRILL TOP HOLES AT LEAST 1" (25.4 MM) FROM THE JOINTS. USE A NEW DRILL BIT TO ENSURE OPTIMUM HOLDING ABILITY. DO NOT USE A HAMMER DRILL! NE PAS PERCER DANS LES JOINTS DE MORTIER ! PERCER LES TROUS SUPéRIEURS à AU MOINS 25 MM (1 PO) DES JOINTS. UTILISER UNE MèCHE NEUVE POUR ASSURER UNE CAPACITé DE MAINTIEN OPTIMALE. NE PAS UTILISER DE PERCEUSE à PERCUSSION ! NO PERFORE LAS JUNTAS DE ARGAMASA.
U10 INSERT ANCHORS Remove Template (IT) and insert Anchors (u10). ENFONCER LES CHEVILLES Enlever le gabarit (IT) et enfoncer des chevilles d'ancrage (u10). COLOqUE LOS ANCLAJES quite la plantilla (IT) y coloque los anclajes (u10). INSERIRE I TASSELLI Togliere lo schema (IT) e inserire i tasselli (u10). DÜBEL EINFÜGEN Entfernen Sie die Schablone (IT) und führen Sie Dübel (u10). ВСТАВИТЬ АНКЕРЫ Снять шаблон для установки (IT) и вставить анкеры (u10).
INSTALL THE WALL MOUNT (WM) Install the Wall Mount (WM) using two Lag Bolts (TS) and Washers (R) in the "A" and "B" holes. Do not tighten Lag Bolts completely. Leave enough room to slip the Wall Mount over the Bolts. After the Wall Mount is on the wall, use a level to make sure the Wall Mount is vertically level. POSER LE SUPPORT MURAL (WM) Poser le support mural (WM) en vissant deux tire-fond (TS) et rondelles (R) dans les trous « A » et « B ». Ne pas complètement serrer les tire-fond.
WM R U10 A B TS DO NOT OVER TIGHTEN LAG BOLTS (TS)! NE PAS FORCER SUR LES TIRE-FOND (TS) ! NO AJUSTE DEMASIADO LOS TIRAFONDOS (TS)! NON SERRARE ECCESSIVAMENTE I BULLONI (TS)! ZIEHEN SIE DIE ANKERBOLZEN (TS) NICHT ZU FEST! НЕ ЗАТЯГИВАЙТЕ ШУРУПЫ (TS) СЛИШКОМ СИЛЬНО! 29
MOUNTING THE TELEVISION POSE DU TÉLÉVISEUR CÓMO INSTALAR EL TELEVISOR MONTAGGIO DEL TELEVISORE MONTAGE DES FERNSEHERS УСТАНОВКА ТЕЛЕВИЗОРА PREPARE THE SECURITy SCREWS For TVs under 20" (508mm), use the shorter 14mm Security Screws (GG). For TVs larger than 20" (508mm), use the longer 150mm Security Screws (WS) with the Plastic Sleeves (WT). The longer screws makes it easier to find and turn the screw with a screwdriver after you have installed the TV. Place the screws in the Wall Mount (WM) as shown.
WM MAKE SURE THE SCREW IS SECURE BUT DOES NOT COME PAST THE METAL. S'ASSURER qUE LES VIS TIENNENT EN PLACE MAIS NE TRAVERSENT PAS LE MéTAL. GG ASEGúRESE DE qUE EL TORNILLO ESTÁ FIRME PERO SIN SOBRESALIR DEL METAL. VERIFICARE CHE LA VITE SIA SERRATA MA CHE NON OLTREPASSI IL METALLO. ACHTEN SIE DABEI DARAUF, DASS DIE SCHRAUBE FEST SITZT, DAS METALL JEDOCH NICHT ÜBERRAGT. УбЕДИТЕСЬ, чТО ВИНТ хОРОШО ДЕРжИТ И НЕ ВЫхОДИТ ЗА МЕТАЛЛ.
MOUNT THE TELEVISION With the help of an assistant, lift the television and guide the Monitor Plate (MP) onto the Wall Mount (WM) as shown. Once safely on the mount, secure the television with the Security Screws (GG or WS) using a Phillips-head screwdriver. FIxER LE TÉLÉVISEUR Avec l'aide d'une autre personne, soulever le téléviseur et guider la plaque de moniteur (MP) dans le support mural (WM) comme sur l'illustration.
MP WM GG/WS EXERCISE CAUTION WHEN REMOVING THE TELEVISION FROM THE MOUNT TO AVOID EqUIPMENT DAMAGE OR PERSONAL INJURY. LORS DU DéCROCHAGE DU TéLéVISEUR, FAIRE PREUVE DE PRéCAUTION POUR éVITER LES DOMMAGES MATéRIELS ET CORPORELS. TENGA MUCHO CUIDADO AL RETIRAR EL TELEVISOR DEL SOPORTE PARA EVITAR DAñOS EN EL EqUIPO O LESIONES CORPORALES. FARE ATTENZIONE qUANDO VIENE RIMOSSO IL TELEVISORE DAL SUPPORTO, PER EVITARE DANNI ALL'APPARECCHIO O ALLA PERSONA.
LIMITED LIFETIME WARRANTy This Bell’O International, Corp. (“Bell’O” or “we”) mounting product SKu # 7411 (“Product”) is warranted for the life of the Product only to the original purchaser and limited to the original installation (“Warranty”). Re-installation of the Product in a different location or with a different monitor or peripheral voids this Warranty. This Warranty is only valid in the united States of America and Canada.
GARANTIE à VIE LIMITÉE Ce produit de fixation Bell’O International, Corp. (« Bell’O » ou « nous ») de n° SKu 7411 (le « Produit ») est garanti pendant la durée de vie du Produit uniquement à l'acheteur initial et dans les limites de la pose initiale (« Garantie »). La réinstallation du Produit à un emplacement différent ou avec un téléviseur ou périphérique différent annule cette Garantie. Cette garantie est valable uniquement aux États-unis d’Amérique et au Canada.
GARANTÍA LIMITADA DE POR VIDA Este producto de montaje SKu # 7411 (“Producto”) Bell’O International, Corp. (“Bell’O” o “nosotros”) está cubierto por la garantía durante la vida del Producto solo para el comprador original y está limitada a la instalación original (“Garantía”). La Garantía solo es válida en los Estados unidos de Norteamérica y Canadá.
GARANZIA LIMITATA A VITA questo prodotto di supporto SKu # 7411 (“Prodotto”) di Bell’O International, Corp. (“Bell’O” o “noi”) è coperto da garanzia per la durata della vita del Prodotto unicamente per l'acquirente originale e solo per l'installazione originale (“Garanzia”). La reinstallazione del Prodotto in posizione diversa, o con schermo o periferica diversi, rende questa Garanzia nulla. questa Garanzia vale unicamente negli Stati uniti d'America e in Canada.
BESCHRäNkTE GARANTIE AUF LEBENSZEIT Eine Gewährleistung für dieses Montageprodukt SKu Nr. 7411 (das "Produkt") von Bell’O International Corporation (“Bell’O” oder “wir”) wird für die Lebenszeit des Produkts nur dem ursprünglichen Käufer gegenüber zugesichert und beschränkt sich auf die ursprüngliche Installation ("Gewährleistung"). Eine erneute Installation des Produkts an einer anderen Stelle oder mit einem anderen Monitor oder an einer anderen Außenfläche macht diese Garantie ungültig.
ОГРАНИчЕННАЯ ПОЖИЗНЕННАЯ ГАРАНТИЯ Фирма Bell’O International, Corp. (“Bell’O” или “мы”) дает гарантию на кронштейн SKu # 7411 (“Продукт”) на время жизни Продукта только первоначальному покупателю и только на первую установку (“Гарантия”). Повторная установка Продукта в другом месте, либо с другим монитором или с другой периферийной аппаратурой аннулирует эту Гарантию. Эта Гарантия имеет силу только в Соединенных Штатах Америки и Канаде.
BELL'O INTERNATIONAL CORPORATION 711 Ginesi Drive, Morganville, NJ 07751 (888) 235-7646 • (732) 972-1333 bello-digital.