7845 FLAT PANEL TV WALL MOUNT INSTRUCTION MANUAL SUPPORT MURAL D'ÉCRAN PLAT MANUEL D'INSTRUCTIONS SOPORTE DE PARED PARA TV DE PANTALLA PLANA MANUAL DE INSTRUCCIONES SUPPORTO A PARETE PER TELEVISORE A SCHERMO PIATTO MANUALE DI ISTRUZIONI WANDBEFESTIGUNG FÜR FLACHBDILDSCHIRM/TV ANLEITUNGSHANDBUCH НАСТЕННЫЙ КРОНШТЕЙН ДЛЯ ПЛОСКОПАНЕЛЬНОГО ТЕЛЕВИЗОРА ИНСТРУКЦИЯ
PRECAUTIONS If at any time you are unclear about the directions and believe you need further assistance, contact Bell’O® at: 1-888-235-7646 (US/Canada) or +1-732-972-1333 (International) from 9am – 5pm EST, Monday through Friday. • NEVER EXCEED THE MAXIMUM LOAD CAPACITIES OF 80 LBS (36 KG) • This mounting bracket was designed to be installed and utilized ONLY as specified in this manual.
AVERTISSEMENTS Pour toutes questions concernant les instructions ou pour tout besoin d'assistance, veuillez communiquer avec Bell’O® au : 1-888-235-7646 (USA/Canada) ou +1-732-972-1333 (International) de 9h00 à 17h00 (heure de l'Est), du lundi au vendredi. • NE JAMAIS DÉPASSER LA CAPACITÉ DE CHARGE MAXIMALE DE 36 KG (80 LBS) • Ce support de fixation est conçu pour être posé et utilisé UNIQUEMENT comme indiqué dans ce manuel.
ADVERTENCIAS Si en algún momento tiene dudas sobre las instrucciones y necesita asesoramiento adicional, comuníquese con Bell’O®: 1-888-235-7646 (EE. UU. y Canadá) o +1-732-972-1333 (desde otros lugares del mundo) de 9 a 17 hora del este, lunes a viernes. • NUNCA EXCEDA LA CAPACIDAD MÁXIMA DE CARGA DE 36 KG (80 LBS) • Este soporte fue diseñado para ser instalado y utilizado ÚNICAMENTE como se indica en el presente manual.
PRECAUZIONI Nel caso che, in qualsiasi momento, le istruzioni non dovessero risultare chiare o si necessitasse di ulteriore assistenza, contattare Bell’O® al numero verde: 1-888-235-7646 (da USA/Canada) oppure al +1-732-972-1333 (da altri Paesi) dalle 9.00 - 17.00 (ora costa orientale USA), Lunedi a Venerdì. • NON SUPERARE MAI LA MASSIMA CAPACITÀ DI CARICO, PARI A 36 KG (80 LBS) • Questo supporto è stato progettato UNICAMENTE per essere installato e utilizzato come specificato in questo manuale.
VORSICHTSMASSNAHMEN Sollten Sie sich nicht ganz klar über die Anleitungen und der Ansicht sein, dass Sie Unterstützung brauchen, setzen Sie sich bitte mit Bell’O® unter Telefonnummer 1-888-235-7646 (US/Kanada) oder + 1-732-972-1333 (International) zwischen 9 Uhr und 17 Uhr (Ostzeit) in Verbindung, Montag bis Freitag. • NIE MEHR ALS DIE MAXIMALE GEWICHT KAPAZITÄTEN 36 KG (80 LBS) • Diese Konsole darf NUR so wie in diesen Anleitungen beschrieben installiert und verwendet werden.
ПРЕДУПРЕЖДЕНИЕ Если вам понадобится помощь или что–то непонятно в инструкции, обратитесь в фирму Bell’O® по телефону 1-888-235-7646 (США/Канада) или +1-732-972-1333 (для международных звонков) с 9 утра до 5 вечера (время — восточное стандартное), от понедельника до пятницы. • НИ ПРИ КАКИХ ОБСТОЯТЕЛЬСТВАХ НЕ ПРЕВЫШАТЬ МАКСИМАЛЬНУЮ НАГРУЗКУ 36 KG (80 LBS) • Этот настенный кронштейн был сконструирован для установки и использования ТОЛЬКО в соответствии со спецификациями, приведенными в этом документе.
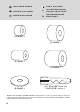
INCLUDED PARTS PARTI INCLUSE IM LIEFERUMFANG ENTHALTENE TEILE ПОСТАВЛЯЕМЫЙ КОМПЛЕКТ PIÈCES INCLUSES PARTES INCLUIDAS (EA) Extension Assembly, 1 Assemblage du bras d’extension, 1 Conjunto de Brazo de Extensión, 1 Montaggio braccio di estensione, 1 Montage des Auslegearms, 1 Узел удлинителя, 1 8 (WPC-T) (MA) Wall Plate Cover Top, 1 Protection de plaque murale – Haut, 1 Cubierta de Placa de Pared – Parte Superior, 1 Copertura piastra a muro - superiore, 1 Abdeckung Wandplatte - oben, 1 Крышка стенной пл
INCLUDED PARTS PARTI INCLUSE IM LIEFERUMFANG ENTHALTENE TEILE ПОСТАВЛЯЕМЫЙ КОМПЛЕКТ PIÈCES INCLUSES PARTES INCLUIDAS (A) M4 x 12mm, 4 (B) M4 x 22mm, 4 (C) M4 x 30mm, 4 (G) M5 x 12mm, 4 (H) M5 x 22mm, 4 (I) M5 x 30mm, 4 (J) M6 x 14mm, 4 (K) M6 x 25mm, 4 (L) M6 x 35mm, 4 (M) M8 x 20mm, 4 (N) M8 x 30mm, 4 (O) M8 x 40mm, 4 (BW) M8, 4 (BT) M8 X 63mm, 4 9
INCLUDED PARTS PIÈCES INCLUSES PARTES INCLUIDAS PARTI INCLUSE IM LIEFERUMFANG ENTHALTENE TEILE ПОСТАВЛЯЕМЫЙ КОМПЛЕКТ (D) M4/M5, 4 (Q) M6/M8, 4 (E) M4/M5, 4 (P) M6/M8, 4 (R) M4/M5, 4 (AU) TOGGLER® brand A10 ALLIGATOR® Anchor, 4 TOGGLER® brand ALLIGATOR® SOLID-WALL ANCHORS are patented under one or more of US Patent numbers 5,161,296 and 5,938,385; and foreign counterparts thereof and of 4,752,170. Other patents pending.
NECESSARY TOOLS OUTILLAGE NÉCESSAIRE HERRAMIENTAS NECESARIAS ATTREZZI NECESSARI ERFORDERLICHE WERKZEUGE НЕОБХОДИМЫЕ ИНСТРУМЕНТЫ Phillips-head Screwdriver Tournevis à tête Phillips Destornillador philips (cruz) Cacciavite Phillips Kreuzschlitzschraubenzieher Крестообразная отвертка Masking Tape Ruban de masquage Cinta de enmascarar Nastro adesivo Abdeckband Маскировочная лента Stud Finder Détecteur de montant Localizador de montantes Rilevatore di montanti Bolzenfinder Искатель стойки Drill Perceuse
INSTALLING THE WALL MOUNT IN WOOD POSER LE SUPPORT MURAL SUR DU BOIS CÓMO INSTALAR EL SOPORTE DE PARED EN MADERA INSTALLAZIONE DEL SUPPORTO A PARETE SU LEGNO INSTALLATION DER WANDBEFESTIGUNG IN HOLZ КРЕПЛЕНИЕ НАСТЕННОГО КРОНШТЕЙНА К ДЕРЕВУ FIND THE WOOD STUD Using a stud finder, find the exact location of the stud to which you want to attach the wall mount. Mark the right and left side to determine the center of the stud.
IT • Height to center of TV • Hauteur jusqu'au centre du téléviseur • Altura para centrar el TV • Altezza al centro del televisore • Höhe zur TV-Mitte • Высота до центра телевизора DETERMINE HEIGHT LOCATION OF TELEVISION Measure the distance from the bracket holes to the top and bottom of the TV to determine the center mounting position. Line up the center position with the Centerline on the Installation Template (IT).
DETERMINARE LA POSIZIONE IN ALTEZZA DEL TELEVISORE Misurare la distanza dai fori dei sostegni al punto superiore e a quello inferiore del televisore, per determinare la posizione centrale di montaggio. Allineare la posizione centrale con il punto centrale dello schema di installazione (IT). Prendere le misure partendo dal suolo, segnando leggermente sul muro l'altezza desiderata del televisore.
IT A B DRILL PILOT HOLES Follow directions on the Installation Template (IT) carefully. Drill two holes 3" (77mm) deep using a 1/4" (or 6.5mm) size drill bit in the “A” and “B” locations noted on the Installation Template. PERCER LES TROUS GUIDES Suivre avec attention les instructions figurant sur le gabarit de pose (IT). Percer deux trous de 77 mm (3 po) de profond avec un foret de 1/4 po (ou 6.5 mm) de diamètre aux emplacements notés « A » et « B » sur le gabarit de pose.
TRAPANARE I FORI/PILOTA Seguire con attenzione le istruzioni contenute sullo schema di installazione (IT). Trapanare due fori profondi 77 mm, con una punta da 6.5 mm, nei punti “A” e “B” indicati sullo schema di installazione. FÜHREN SIE EINE VORBOHRUNG DURCH Bitte achten Sie darauf, dass der Installationsschablone (IT) sorgfältig gefolgt wird. Bohren Sie zwei 77 mm tiefe Löcher mit einer 6.5 mm großen Bohrerspitze in die "A" und "B" Stellen auf der Installationsschablone.
MOUNTING TO SOLID CONCRETE OR CINDER BLOCK POSE SUR DU BÉTON PLEIN OU DES PARPAINGS MONTAJE EN CONCRETO SÓLIDO O LADRILLOS DE ESCORIAS MONTAGGIO SU CALCESTRUZZO O BLOCCHI IN CEMENTO MONTAGE AN FESTBETON ODER SCHLACKENBETONBLOCK КРЕПЛЕНИЕ К НЕАРМИРОВАННОМУ БЕТОНУ ИЛИ ШЛАКОБЕТОННОМУ БЛОКУ DRILL PILOT HOLES Carefully drill two holes using a 3/8" (or 9.5mm) masonry drill bit in the “A” and “B” locations noted on the Installation Template. Each hole should be at least 3-3/4" (95mm) deep.
DO NOT DRILL INTO MORTAR JOINTS! DRILL HOLES AT LEAST 1" (25.4 MM) FROM THE JOINTS. USE A NEW DRILL BIT TO ENSURE OPTIMUM HOLDING ABILITY. DO NOT USE A HAMMER DRILL! NE PAS PERCER DANS LES JOINTS DE MORTIER ! PERCER LES TROUS À AU MOINS 25 MM (1 PO) DES JOINTS. UTILISER UNE MÈCHE NEUVE POUR ASSURER UNE CAPACITÉ DE MAINTIEN OPTIMALE. NE PAS UTILISER DE PERCEUSE À PERCUSSION ! NO PERFORE LAS JUNTAS DE ARGAMASA. TALADRE ORIFICIOS A UNA DISTANCIA DE, POR LO MENOS, 1” (25,4 MM) DE LAS JUNTAS.
INSTALL THE EXTENSION ARM ASSEMBLY (EA) ON THE WALL Install Wall Plate using the four Lag Bolts (BT) in the drilled holes. Use a level to make sure the Horizontal Mounting Rails are level, then tighten the bolts completely. FIXATION DE L’ASSEMBLAGE DU BRAS D’E TENSION (EA) SUR LE MUR Fixez la plaque murale en utilisant les quatre tire-fond (BT) dans les trous percés. Utilisez un niveau pour vous assurer que les glissières de montage horizontales soient au niveau, puis serrez à fond les boulons.
INSTALLAZIONE DEL GRUPPO BRACCIO DI ESTENSIONE (EA) AL MURO Installare la piastra a muro usando i quattro perni (BT) nei fori creati. Usare una livella per assicurarsi che i binari di montaggio orizzontali siano a livello, quindi stringere i perni completamente. MONTIEREN SIE DEN AUSLEGEARM (EA) AN DER WAND Montieren Sie die Wandplatte, indem Sie die vier Ankerschrauben (BT) in die Bohrlöcher schrauben.
ATTACHING THE MONITOR ARMS (MA) FIXER LES BRAS DE MONITEUR (MA) CÓMO FIJAR LOS BRAZOS DE LA PANTALLA (MA) FISSAGGIO DEGLI SNODI DELLO SCHERMO (MA) BEFESTIGUNG DER MONITORARME (MA) ПРИКРЕПЛЕНИЕ КРЕПЕЖНЫХ УЗЛОВ МОНИТОРА (МА) SELECT THE CORRECT SCREW Before beginning, test several of the screws in your hardware kit to find the correct size and length for your television.
ATTACHING THE MONITOR ARMS (MA) Attach each Monitor Arm (MA) to the back of your television as shown. Make sure that each Washer (R for M4 or M5 screws) is placed between the Screw and the Monitor Arm. Don’t place the Washers between the Arms and the television. FIXER LES BRAS DE MONITEUR (MA) Fixer les deux bras de moniteur (MA) au dos du téléviseur comme sur l'illustration. Veiller à bien placer une rondelle (R pour les vis M4 ou M5) entre chaque vis et le bras de moniteur.
USING SPACERS Use spacers if the Monitor Arms (MA) do not fit firmly against the back of the television, such as when the back of the television is curved, contains larger recessed mounting holes, or some other obstruction is in the way. Spacers also provide additional room for cables. The Monitor Arms must rest securely on the spacers, and should not be loose.
USO DE LOS ESPACIADORES Use los espaciadores si los brazos de la pantalla (MA) no encajan con firmeza contra la parte trasera del televisor, como sucede cuando esta parte es curva, contiene orificios de montaje embutidos más grandes o presenta alguna otra obstrucción. Los espaciadores también ofrecen espacio adicional para cables. Los brazos deben apoyarse con firmeza sobre los espaciadores y no deben quedar flojos.
HORIZONTAL MOUNTING RAILS GLISSIÈRES DE MONTAGE HORIZONTALES RIELES HORIZONTALES DE MONTAJE BINARI DI MONTAGGIO ORIZZONTALI HORIZONTALE TRAGSCHIENEN ГОРИЗОНТАЛЬНЫЕ МОНТАЖНЫЕ НАПРАВЛЯЮЩИЕ PREPARE THE MOUNT FOR INSTALLING THE TV Before you place the television on the wall, first move the arm into the straight extended position and make sure the Horizontal Mounting Rails for the Monitor Arms are parallel with the wall. Check the Tilt Adjustment. It needs to be tight so it will not tilt during installation.
PREPARAZIONE DEL SUPPORTO PER L’INSTALLAZIONE DELLA TV Prima di fissare la televisione al muro, spostare il braccio in posizione estesa e assicurarsi che i binari di montaggio orizzontali per i bracci monitor siano paralleli al muro. Verificare laregolazione della pendenza. Se necessario stringere affinché non si inclini durante l’installazione. Vedere le istruzioni relative alla pendenza di seguito.
Push In to Turn Lever Enfoncer pour tourner le levier Presione para girar la palanca Spingere per girare la leva Hineinschieben, um den Hebel zu drehen Втолкнуть, чтобы повернуть рычаг Turn Counter-Clockwise to Loosen Sens inverse des aiguilles d'une montre pour desserrer Gire en sentido antihorario para aflojar Girare in senso anti-orario per allentare Zur Lockerung entgegen den Uhrzeigersinn drehen.
MOUNT THE TELEVISION With the help of at least one assistant, lift the television and guide the Monitor Arms (MA) onto the Extension Arm as shown. POSER LE TÉLÉVISEUR Avec l'aide d'au moins une autre personne, soulever le téléviseur et guider les bras de moniteur (MA) dans le bras articulé comme sur l'illustration. CÓMO MONTAR EL TELEVISOR Con la ayuda de, por lo menos, un asistente, levante el televisor y guíe los brazos de la pantalla (MA) sobre el brazo de extensión, tal como se muestra.
SECURE THE TELEVISION Once safely on the mount, secure the television by tightening the Security Screws using a Phillips-head screwdriver as shown. Repeat on both sides. Loosen this Screw to remove television. Exercise caution when removing the television from the mount to avoid equipment damage or personal injury. FIXER LE TÉLÉVISEUR Une fois le téléviseur bien accroché au support, le fixer en serrant les vis de sécurité à l'aide d'un tournevis à tête Phillips. Répéter de l'autre côté.
ATTACHING THE DECORATIVE COVERS FIXER LES CAPUCHONS DÉCORATIFS CÓMO COLOCAR LAS CUBIERTAS DECORATIVAS FISSAGGIO DEI RIVESTIMENTI DECORATIVI BEFESTIGUNG DER ZIERABDECKUNGEN УСТАНОВИТЕ ДЕКОРАТИВНЫЕ КОЛПАЧКИ Loosen the Tilt Control Bar (1) and tilt forward. This will provide optimum access for installing the Right Arm Cover (RAC). Desserrez la barre de commande d'inclinaison (1) et inclinez en avant. Ceci fournira l'accès optimum pour installer la protection du bras droit (RAC).
ATTACHING THE DECORATIVE COVERS FIXER LES CAPUCHONS DÉCORATIFS CÓMO COLOCAR LAS CUBIERTAS DECORATIVAS FISSAGGIO DEI RIVESTIMENTI DECORATIVI BEFESTIGUNG DER ZIERABDECKUNGEN УСТАНОВИТЕ ДЕКОРАТИВНЫЕ КОЛПАЧКИ Position the Left Arm Cover (LAC) over the Left Monitor Arm and push into place. Carefully slide the Right Arm Cover (RAC) under the Tilt Control Bar and push into place over the Right Monitor Arm. Slide both covers down to lock into place.
ATTACH THE WALL PLATE COVERS Slide the Top Wall Plate Cover (WPC-T) down as shown over the wall plate. Slide the Bottom Wall Plate Cover (WPC-B) cover up over the bottom of the wall plate and snap the two plates together as shown. ATTACHE DES PROTECTIONS DE PLAQUE MURALE Glissez vers le bas la protection supérieure de plaque murale (WPC-T) sur la plaque murale comme sur l’illustration.
TO APPLY COVERS: POUR POSER LES COUVERCLES : PARA COLOCAR LAS CUBIERTAS: MESSA IN POSIZIONE DEI RIVESTIMENTI: ANBRINGUNG DER ABDECKUNGEN: ЧТОБЫ УСТАНОВИТЬ КРЫШКИ: WPC-T WPC-B TO REMOVE COVERS: POURDÉPOSERLESCOUVERCLES: PARA RETIRAR LAS CUBIERTAS: RIMOZIONE DEI RIVESTIMENTI: ABNAHME DER ABDECKUNGEN: ЧТОБЫ СНЯТЬ КРЫШКИ: WPC-T WPC-B 33
LIMITED LIFETIME WARRANTY This Bell’O International, Corp. (“Bell’O” or “we”) mounting product SKU # 7845 (“Product”) is warranted for the life of the Product only to the original purchaser and limited to the original installation (“Warranty”). Re-installation of the Product in a different location or with a different monitor or peripheral voids this Warranty. This Warranty is only valid in the United States of America and Canada.
GARANTIE À VIE LIMITÉE Ce produit de fixation Bell’O International, Corp. (« Bell’O » ou « nous ») de n° SKU 7845 (le « Produit ») est garanti pendant la durée de vie du Produit uniquement à l'acheteur initial et dans les limites de la pose initiale (« Garantie »). La réinstallation du Produit à un emplacement différent ou avec un téléviseur ou périphérique différent annule cette Garantie. Cette garantie est valable uniquement aux États-Unis d’Amérique et au Canada.
GARANTÍA LIMITADA DE POR VIDA Este producto de montaje SKU # 7845 (“Producto”) Bell’O International, Corp. (“Bell’O” o “nosotros”) está cubierto por la garantía durante la vida del Producto solo para el comprador original y está limitada a la instalación original (“Garantía”). La Garantía solo es válida en los Estados Unidos de Norteamérica y Canadá.
GARANZIA LIMITATA A VITA Questo prodotto di supporto SKU # 7845 (“Prodotto”) di Bell’O International, Corp. (“Bell’O” o “noi”) è coperto da garanzia per la durata della vita del Prodotto unicamente per l'acquirente originale e solo per l'installazione originale (“Garanzia”). La reinstallazione del Prodotto in posizione diversa, o con schermo o periferica diversi, rende questa Garanzia nulla. Questa Garanzia vale unicamente negli Stati Uniti d'America e in Canada.
BESCHRÄNKTE GARANTIE AUF LEBENSZEIT Eine Gewährleistung für dieses Montageprodukt SKU Nr. 7845 (das "Produkt") von Bell’O International Corporation (“Bell’O” oder “wir”) wird für die Lebenszeit des Produkts nur dem ursprünglichen Käufer gegenüber zugesichert und beschränkt sich auf die ursprüngliche Installation ("Gewährleistung"). Eine erneute Installation des Produkts an einer anderen Stelle oder mit einem anderen Monitor oder an einer anderen Außenfläche macht diese Garantie ungültig.
ОГРАНИЧЕННАЯ ПОЖИЗНЕННАЯ ГАРАНТИЯ Фирма Bell’O International, Corp. (“Bell’O” или “мы”) дает гарантию на кронштейн SKU # 7845 (“Продукт”) на время жизни Продукта только первоначальному покупателю и только на первую установку (“Гарантия”). Повторная установка Продукта в другом месте, либо с другим монитором или с другой периферийной аппаратурой аннулирует эту Гарантию. Эта Гарантия имеет силу только в Соединенных Штатах Америки и Канаде.
BELL'O INTERNATIONAL CORPORATION 711 Ginesi Drive, Morganville, NJ 07751 (888) 235-7646 • (732) 972-1333 www.bello.