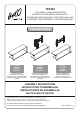
TP4452 FLAT PANEL TV MOUNTING SYSTEM SUPPORT DE TÉLÉVISEUR À ÉCRAN PLAT SISTEMA DE INSTALACIÓN DE TV DE PANTALLA PLANA КОМПЛЕКТ ПОД ТЕЛЕВИЗОР С ПЛОСКИМ ЭКРАНОМ OPTION 1 OPTION 1 OPCIÓN 1 ВАРИАНТ 1 Flat Panel TV Stand Meuble pour TV à écran plat Base para panel de TV de pantalla plana Подставка под телевизор с плоским экраном OPTION 2 OPTION 2 OPCIÓN 2 ВАРИАНТ 2 Stand with TV Mounting System Meuble avec support de TV Base con sistema de soporte para TV Подставка со стойкой для крепления телевизора OPTI
for your safety, please follow these preCautioNs: ! DO NOT PlACe ITeMS ON The ShelVeS (Or TV MOuNT) WhICh exCeeD The MAxIMuM WeIGhT lIMITS OF 125 lBS. FOr The TV, AND 75 lBS. FOr BOTTOM ShelF. ! ONly WAll MOuNT INTO WOOD STuDS Or CONCreTe WAllS. DO NOT ATTeMPT TO WAll MOuNT The TeleVISION INTO DryWAll ONly. ! The MAxIMuM WeIGhT OF yOur TeleVISION CANNOT exCeeD The MAxIMuM WeIGhT rATING OF The WAll MOuNT. ! AlWAyS reMOVe The TV AND OTher eQuIPMeNT FrOM The FurNITure PrIOr TO MOVING The ASSeMBleD uNIT.
Veiller À respeCter Ces Mesures De prÉCautioN ! ! Ne PAS POSer Sur le MeuBle (Ou FIxATION De TV) DeS OBJeTS DÉPASSANT lA lIMITe De POIDS De 56,7 kG POur le TÉlÉVISeur, eT De 34 kG POur le PlATeAu Du BAS. ! POSe MurAle uNIQueMeNT DANS DeS MONTANTS eN BOIS Ou Sur DeS MurS De BÉTON. Ne PAS TeNTer De POSer le TÉlÉVISeur Au Mur Sur De lA ClOISON SÈChe SeuleMeNT. ! le POIDS MAxIMuM Du TÉlÉVISeur Ne DOIT PAS DÉPASSer lA CAPACITÉ De ChArGe MAxIMAle Du SuPPOrT De FIxATION MurAle.
por su seGuriDaD teNGa las siGuieNtes preCauCioNes: ! NO COlOQue SOBre lOS eSTANTeS (O SOPOrTe De TV) OBJeTOS Que SuPereN el lÍMITe De PeSO MÁxIMO De 125 lBS (56,7 kG) PArA TeleVISOreS y De 75 lB. (34 kG) SOBre el eSTANTe INFerIOr. ! CuANDO MONTe eN PAreD, hÁGAlO ÚNICAMeNTe SOBre MONTANTeS De MADerA O eN PAreDeS De CONCreTO. NO INSTAle el TeleVISOr ÚNICAMeNTe eN PAreD De yeSO. ! el PeSO MÁxIMO De Su TeleVISOr NO PueDe exCeDer lA ClASIFICACIÓN De PeSO MÁxIMO Del SOPOrTe De PAreD.
ДЛЯ ВАШЕЙ БЕЗОПАСНОСТИ ВЫПОЛНЯЙТЕ СЛЕДУЮЩИЕ МЕРЫ ПРЕДОСТОРОЖНОСТИ: ! НЕ ПОМЕЩАЙТЕ НА ПОЛКАХ (И НА СТОЙКЕ ДЛЯ ТЕЛЕВИЗОРА) ПРЕДМЕТЫ, ВЕС КОТОРЫХ ПРЕВЫШАЕТ МАКСИМАЛЬНЫЙ ПРЕДЕЛ 125 ФУНТОВ (56,5 КГ) ДЛЯ СТОЙКИ, И 75 ФУНТОВ (34 КГ) НА НИЖНЕЙ ПОЛКЕ. ! КРЕПЛЕНИЕ НА СТЕНЕ ДОПУСКАЕТСЯ ТОЛЬКО К ДЕРЕВЯННЫМ СТОЙКАМ ИЛИ БЕТОННЫМ СТЕНАМ. ЗАПРЕЩАЕТСЯ КРЕПЛЕНИЕ ТЕЛЕВИЗОРА К СТЕНЕ ИЗ ГИПСОКАРТОНА. ! МАКСИМАЛЬНЫЙ ВЕС ТЕЛЕВИЗОРА НЕ ДОЛЖЕН ПРЕВЫШАТЬ МАКСИМАЛЬНЫЙ ВЕС, НА КОТОРЫЙ РАССЧИТАНА СТОЙКА.
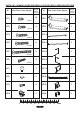
PArTS lIST / NOMeNClATure DeS PIÈCeS / lISTA De PIezAS / ПЕРЕЧЕНЬ ДЕТАЛЕЙ Quantity Quantité Cantidad Количество # 16 yF11 1 4 yF12 1 2 yF13-2 1 4 yF14-2 1 4 yF15-2 1 2 yF16-2 1 yF7 3 yF17-2 1 yF8 5 yF18 1 yF9 4 yF19 1 yF10 2 yF20 1 # yF1 yF2 yF3 yF4 yF5 yF6 Part / Pièce / Pieza / Деталь 12 mm 18 mm 28 mm 35 mm 54 mm 25 mm 6 Part / Pièce / Pieza / Деталь Quantity Quantité Cantidad Количество
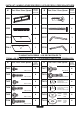
PArTS lIST / NOMeNClATure DeS PIÈCeS / lISTA De PIezAS / ПЕРЕЧЕНЬ ДЕТАЛЕЙ Quantity Quantité Cantidad Количество Quantity Quantité Cantidad Количество # yF21 1 yF25 4 yF22 2 yF26 4 yF23-2 1 yF27 1 yF24-2 1 yF28 1 # Part / Pièce / Pieza / Деталь Part / Pièce / Pieza / Деталь TV MOuNTING SCreWS / VIS De FIxATION De TV TOrNIllOS De MONTAJe PArA TV / КРЕПЕЖНЫЕ ВИНТЫ ДЛЯ ТЕЛЕВИЗОРА # TVy1 TVy2 TVy3 TVy4 TVy5 TVy6 Part / Pièce / Pieza / Деталь M4 x 12 mm M4 x 28 mm M5 x 12 mm M5 x 28
OPTION 1: FlAT PANel TV STAND OPTION 1: MeuBle POur TÉlÉVISeur à ÉCrAN PlAT OPCIÓN 1: BASe PArA PANel De TV De PANTAllA PlANA ВАРИАНТ 1: ПОДСТАВКА ПОД ТЕЛЕВИЗОР С ПЛОСКИМ ЭКРАНОМ NOTe: 2 PEOPLE ARE RECOMMENDED TO ASSEMBLE THIS FURNITURE. TO AVOID DAMAGE DURING ASSEMBLY, IT SHOULD BE ASSEMBLED ON A SOFT SURFACE. reMArQue : IL EST CONSEILLÉ D’ÊTRE À DEUX POUR ASSEMBLER CE MEUBLE. POUR ÉVITER LES DOMMAGES, EFFECTUER L'ASSEMBLAGE SUR UNE SURFACE DOUCE.
Fig. 1-2 yF13-2 yF15-2 yF14-2 yF16-2 yF1 1-4. lIFT the front frame upright, and ATTACh the Left and Right Rear Support Frames (YF15-2, YF16-2) using four 12 mm Screws (YF1) as shown above. Fully tighten all Screws. 1-4. reDreSSer le cadre avant et ATTACher les cadres supports arrière droit et gauche (YF15-2, YF16-2) à l'aide de quatre vis de 12 mm (YF1) comme sur l'illustration ci-dessus. Serrer complètement toutes les vis. 1-4.
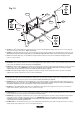
Fig. 1-3 yF7 yF17-2 yF16-2 yF11 yF13-2 yF4 yF15-2 yF12 yF14-2 yF8 1-5. ATTACh the CMS® (Cable Management System) Panel (YF17-2) to the Left and Right Rear Support Frames (YF15-2, YF16-2) using four 35 mm Screws (YF4) as shown above. Tighten Screws fully. 1-6. SCreW three Adjustable Glass Pads (YF7) into the threaded holes at the tops of the Top Crossbar (YF13-2) and Right and Left Legs (YF11, YF12).
yF16-2 Fig. 1-4 yF24-2 yF3 yF13-2 yF15-2 yF23-2 yF3 1-8. From the front, carefully PlACe the Lower Glass Shelf (YF23-2) down onto the Soft Glass Pads (YF8) along the Bottom Crossbar (YF14-2) and the Right and Left Rear Support Frames (YF15-2, YF16-2). Make sure the Glass Shelf is well supported, level, and properly in place. 1-9. Carefully PlACe the Top Glass Shelf (YF24-2) down onto the Top Crossbar (YF13-2) and Right and Left Rear Support Frames (YF15-2, YF16-2).
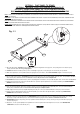
OPTION 2: FlAT PANel TV MOuNTING SySTeM OPTION 2: SuPPOrT De TÉlÉVISeur à ÉCrAN PlAT OPCIÓN 2: BASe CON SISTeMA De SOPOrTe PArA TV De PANTAllA PlANA ВАРИАНТ 2: КОМПЛЕКТ СО СТОЙКОЙ ДЛЯ КРЕПЛЕНИЯ ТЕЛЕВИЗОРА Fig. 2-1 Fig. 2-2 yF20 yF9 yF19 yF20 yF1 yF18 (View from rear) (Vue depuis l'arrière) (Vista desde la parte trasera) (Вид сзади) 2-1. ATTACh the Tilt Bracket (YF20) to the Swivel Bracket (YF19) using four 12 mm Screws (YF1) as shown. Tighten Screws fully. 2-2.
Fig. 2-3 yF21 yF19 yF2 yF20 yF10 yF18 yF18 yF17-2 yF5 2-3. ATTACh the Mounting Pole (YF18) to the back of the CMS® Panel (YF17-2) using four 54 mm Bolts (YF5) as shown. Tighten Bolts fully. 2-4. SCreW in two Tilt Adjustment Knobs (YF10) through the slots in the Tilt Bracket (YF20) and into the threaded hole in the Mounting Pole (YF18) as shown. Make sure the Tilt Bracket is in a level and upright position, then fully tighten both Tilt Adjustment Knobs by hand.
MOuNTING The TeleVISION / POSe Du TÉlÉVISeur INSTAlACIÓN Del TeleVISOr / УСТАНОВКА ТЕЛЕВИЗОРА CautioN: Carefully DeterMiNe the CorreCt MouNtiNG proCeDure to preVeNt DaMaGe to your tV aND/or Bell'o® MouNtiNG systeM. always reMoVe the teleVisioN & CoMpoNeNts Before atteMptiNG to MoVe the staND. atteNtioN : DÉterMiNer aVeC atteNtioN la proCÉDure De pose CorreCte pour ÉViter D'eNDoMMaGer le tÉlÉViseur ou le systÈMe De fiXatioN Bell'o®.
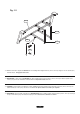
Fig. 2-5 yF22 yF22 TVy10 TVy12 TVy11 TVy6 TVy8 TVy9 TVy11 TVy2 TVy4 TVy1 TVy3 TVy5 2-7. PlACe your TV face-down on a flat, very soft, non-abrasive surface, taking extreme caution to not damage the face of your TV. 2-8. ATTACh each Monitor Arm (YF22) to the back of your television as shown with selected Screws and Washers. Make sure that each Washer (TVY11 or TVY12) is placed between the Screw and the Monitor Arm.
Fig. 2-6 yF22 Fig. 2-7 yF21 yF6 2-9. with the help of an assistant, carefully ATTACh the TV with Monitor Arms (YF22) to the Mounting Bracket (YF21) and SeCure the Monitor Arms using two 25 mm Screw (YF6) as shown in Fig. 2-7. tighten screws fully. 2-9. avec l'aide d'une autre personne, ATTACher avec précaution le téléviseur équipé des bras de moniteur (YF22) au support de fixation (YF21) et FIXER les bras de moniteur à l'aide de deux vis de 25 mm (YF6) comme sur la Fig. 2-7. serrer les vis à fond.
OPTION 3: STAND WITh WAll MOuNT OPTION 3: MeuBle AVeC SuPPOrT MurAl OPCIÓN 3: BASe CON SOPOrTe De PAreD ВАРИАНТ 3: ПОДСТАВКА С КРЕПЛЕНИЕМ НА СТЕНЕ CautioN: NeVer eXCeeD the MaXiMuM loaD CapaCity of 125 lBs (56.7 KG) atteNtioN : Ne JaMais DÉpasser la CapaCitÉ De CharGe MaXiMale De 56,7 KG (125 lBs) aDVerteNCia: NuNCa eXCeDa la CapaCiDaD MÁXiMa De CarGa De 125 lBs (56.7 KG) ПРЕДУПРЕЖДЕНИЕ: НИ ПРИ КАКИХ ОБСТОЯТЕЛЬСТВАХ НЕ ПРЕВЫШАЙТЕ МАКСИМАЛЬНУЮ НАГРУЗКУ В 125 ФУНТОВ (56,7 КГ) Fig.
Fig. 3-2 • height to bottom of TV • hauteur jusqu'au bas du téléviseur • Altura hasta la parte inferior del TV • Высота до нижней грани телевизора 3-2. MeASure the distance from the mounting holes on the back of your television to the top and bottom edges of the television to determine the true center of the television once it will be mounted. Many television manufacturers do not place the mounting holes exactly centered in the television. 3-3.
Fig. 3-3 5/32" (4 mm) 2.5" (64 mm) INSTAllING The WAll MOuNT IN WOOD: 3-4. DrIll four holes 2.5" (64 mm) deep using a 5/32" (or 4 mm) size drill bit in the “A”, “B”, “C”, and “D” locations noted on the Installation Template. POSer le SuPPOrT MurAl Sur Du BOIS: 3-4. PerCer quatre trous de 64 mm (2,5 po) de profond avec un foret de 5/32 po (ou 4 mm) de diamètre aux emplacements notés « A », « B », « C » et « D » sur le gabarit de pose. CÓMO INSTAlAr el SOPOrTe De PAreD eN MADerA: 3-4.
Fig. 3-5 3" (76 mm) MOuNTING TO SOlID CONCreTe Or CINDer BlOCk: 3-4. Carefully DrIll four holes using a 5/16" (or 8mm) masonry drill bit in the “A”, “B”, “C”, and “D” locations noted on the Installation Template. NOTe: eACh hOle ShOulD Be AT leAST 3" (76 MM) DeeP. [FIGURE 3-5] iMportaNt: Do Not Drill iNto Mortar JoiNts! Drill holes at least 1" (25.4 MM) froM the JoiNts. POSe Sur Du BÉTON PleIN, Ou DeS PArPAINGS: 3-4.
Fig. 3-7 3-5. reMOVe the Installation Template. 3-6. If mounting into concrete, INSerT four TOGGLER® brand Wall Anchors (YF25) into the drilled holes. [FIGURE 3-9] 3-7. PlACe the Wall Plate (YF21) over the holes and SCreW in the Lag Bolts (YF26) about half way. Use a leVel to make sure the Wall Plate is level and make any necessary adjustments. Once straight, TIGhTeN all of the Lag Bolts completely (DO NOT OVer TIGhTeN!) yF21 3-5. eNleVer le gabarit de pose. 3-6.
Fig. 3-10 yF22 yF21 yF6 Fig. 3-10a 3-8. with the help of an assistant, carefully lIFT and ATTACh the TV with the Monitor Arms (YF22) to the Wall Plate (YF21). MAke Sure both Monitor Arms are correctly attached, then SeCure the Monitor Arms using two 25 mm Screws (YF6) as shown in Fig. 3-10a. tighten fully. 3-8. avec l'aide d'une autre personne, SOuleVer avec précaution le téléviseur équipé des bras de moniteur (YF22) et l'ATTACher à la plaque murale (YF21).
WARRANTY One (1) Year Limited Warranty All Bell’O International furniture products are warranted, with the exception of glass, to the original purchaser at the time of purchase and for a period of one (1) year thereafter. Glass is warranted to the original purchaser at the time of purchase and for a period of thirty (30) days thereafter. This warranty is expressly limited to new products purchased in factory sealed cartons. Warranty is valid in the United States of America and Canada.
GARANTÍA Garantía limitada de un (1) año Se le garantiza al comprador original este producto de mueble de Bell'O International Corporation, con excepción del vidrio, durante un período de un (1) año a partir de la fecha de la compra. Se le garantiza al comprador original el vidrio durante un período de treinta (30) días a partir de la fecha de la compra. Esta garantía se limita expresamente a los productos nuevos comprados en cajas cerradas en fábrica.