
manual


9
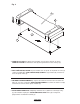
10. TURN the preassembled stand forward with the help of another person.
11. PLACE three cam locks (H) into the holes on the top of the rear of the CMS
®
panel (5).
12. ATTACH the rear CMS
®
(Cable Management System) panel (5) as shown using three 25mm screws (G),
making sure the three cam pins (I) are properly inserted into the cam locks (H) in the CMS
®
panel (5).
DO NOT FULLY TIGHTEN THE SCREWS AT THIS POINT.
10. REMETTRE le meuble préassemblé vers l'avant avec lʼaide dʼune autre personne.
11. POSER trois verrous (H) dans les trous du haut à lʼarrière du panneau CMS
®
(5).
12. FIXER le panneau passe-fil CMS
®
arrière (5) comme sur lʼillustration, avec trois vis de 25mm (G), en veillant à enfiler
correctement les trois broches de verrouillage (I) dans les verrous (H) du panneau CMS
®
(5).
NE PAS ENCORE SERRER LES VIS À FOND.
10. DE VUELTA el soporte sobre su frente con la ayuda de otra persona.
11. COLOQUE tres tuercas de fijación (H) dentro de los orificios que se encuentran en el borde superior trasero del panel
del CMS
®
(5).
12. FIJE el panel trasero del CMS
®
(Sistema de administración de cables) (5), tal como se muestra, usando tres tornillos
de 25mm (G), asegurándose de que las tres clavijas se inserten correctamente en las tuercas de fijación (H) del panel
del CMS
®
(5). NO AJUSTE LOS TORNILLOS COMPLETAMENTE TODAVÍA.
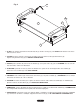
5
G
H
Fig. 7
10. собранную тумбу вперед с помощью другого человека.
11. три эксцентриковые стяжки (H) в отверстия, расположенные в верхней части задней поверхности
панели CMS
®
(5).
12. заднюю панель CMS
®
(системы укладки кабелей) (5) с помощью трех винтов длиной 25 мм (G),
как показано на рисунке, убедившись в том, что три штифта (I) правильно вставлены в эксцентриковые стяжки
(H) на панели CMS
®
(5). .