
Specifications

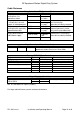
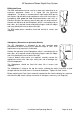
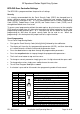
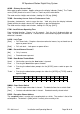
Table Of Contents
- TABLE OF CONTENTS
- Introduction
- Basic System Operation
- Panel Controls
- Number and Letter Buttons
- Call sequence
- Silent viewing
- Apartment Station Controls
- Auto Display
- Ringer Mute
- Door Status Indication
- Call Privacy
- User Activation (CCTV Mode)
- Cameras
- Extension Apartment Stations
- Lock Type
- Exit Button and Fire Switch
- Trades Facility
- DDA Functionality
- Multiple Entrances
- Gate and Block Systems
- Design Considerations
- Installation & Commissioning
- Checklist
- Wiring
- Commissioning
- BFD-DIG Door Controller Settings
- Security
- Panel Programming
- ACOD – Primary Access Code
- TCOD – Secondary Access Code or Tradesmen’s Code
- LTIM – Lock Release Operating Time
- LOCK – Lock Type
- CAM2 – Second Camera Present?
- TRAD – Door Button Trades Mode
- DMON – Door Status Switch
- RECP – Reception Phone Address
- PSEC – Panel Security Key
- PPRG – Phone Programming Security Key
- RING – Ringing Time/Call Time and Ring Effect
- TALK – Talking Time/Apartment Station Active
- TONE – Re-assurance Tone
- CANC – Cancel Key Compatibility
- BCAL – Bellcall Compatibility Mode
- 12A? – Flat 13 Numbered as 12A (From build 4)
- BFD-DIG Door Controller Jumper Settings
- BSC4 Video Controller Settings
- BF Apartment Station Switch Settings
- BS Videophone Switch Settings
- ATTENTION
- Troubleshooting
- Specifications
- Diagram A – Basic System Wiring Overview
- Diagram B – BFD_DIG PCB Detail
- Diagram C – BFD-DIG Keypad Matrix
- Diagram D – Basic System Wiring Detail
- Diagram E – BSC4 PCB Detail
- Diagram F – BSC4 Wiring Detail
- Diagram G – Large system Overview
- Diagram H – Extension Apartment Station Wiring
- Diagram I – Apartment Station Local Power Wiring
- Diagram J – Camera Sharing & Time Clock Sharing
- Diagram K – Combined Connections bellfree With Lock
- Diagram L – Combined Connections Third Party Lock
- Safety Information and Declarations

BF Apartment Station Digital Entry System
PD–166 Issue 1 Installation and Operating Manual Page 20 of 48
ACOD – Primary Access Code
Main code to open the door. Applies whenever the display indicates [Code]. The Trades
mode (TRAD) needs to be set to „Code‟ or „Trade‟ as per the table below.
The code must be 4 digits and no letters, leading 0 is OK (e.g. [0246]).
TCOD – Secondary Access Code or Tradesmen’s Code
Secondary „tradesmen‟s‟ code to open the door. Valid only when the display indicates
[Code] and the time clock selects the Trade option as per the table below.
The code must be 4 digits and no letters, leading 0 is OK (e.g. [0137]).
LTIM – Lock Release Operating Time
Door unlocked duration. Range 1 to 99 seconds. Only the last 2 displayed digits are
used. A value of 0 will default to 1 second and a value containing alpha characters will
default to 3 seconds.
LOCK – Lock Type
[Secr] = Fail secure lock: - Requires alternate mechanical means, key or thumb-turn to
open on power failure.
[Safe] = Fail safe lock: - Lock opens on power failure.
CAM2 – Second Camera Present?
[No] = Only 1 camera,
[Yes] = Second camera present.
TRAD – Door Button Trades Mode
„None‟ = No function; pressing the door button is ignored.
„Door‟ = Pressing the door button opens the door.
„Code‟ = Pressing the door button prompts for the [ACOD] access code to open the
door.
„Trade‟ = Pressing the door button prompts for either the [ACOD] or [TCOD] code to
open the door
DMON – Door Status Switch
[Owc] = Contacts open when door is closed: - The default allows for no switch fitted.
[Cwc] = Contacts closed when door is closed: - Standard normally closed switch.
RECP – Reception Phone Address
The reception button is used to call a reception desk or similar. The number is that of the
called phone. The default is [9898] which is unlikely to be used by a flat.
Setting
[0]
[1]
[2]
[3]
[4]
[5]
[6]
[7]
[8]
[9]
Time Clock Off
None
None
None
None
Code
Code
Code
Trade
Trade
Door
Time Clock On
None
Door
Code
Trade
Trade
Door
Code
Trade
Door
Door