36077 Congratulations on your selection of the 36077 from Northwestern Bell Phones. This quality 2.4GHz cordless telephone with Digital Answering System and Call Waiting Caller ID, like all Genuine BELL® products, has been designed to give you many years of continuous service and represents the best value for your money. It requires little maintenance and is easy to setup and operate.
IMPORTANT SERVICE INFORMATION Read this manual before attempting to setup or use this instrument. It contains important information regarding safe installation and use. Keep this manual for future reference. Also save the carton, packing and proof of purchase to simplify and accelerate any needed action. If you need assistance or service, call (800) 888-8990 between 8:00 a.m. and 4:30 p.m. Pacific Standard Time, Monday through Friday. You can also visit our web site at http://www.nwbphones.
SAVE THESE INSTRUCTIONS IMPORTANT SAFETY INSTRUCTIONS ! When using your telephone equipment, basic safety precautions should always be followed to reduce the risk of fire, electric shock, and injury to persons, including the following: 1. Read and understand all instructions. 2. Follow all warnings and instructions marked on the product. 3. Unplug this product from the wall outlet before cleaning. Do not use liquid cleaners or aerosol cleaners. Use a damp cloth for cleaning. 4.
1. 2. 3. 4. ! 1. 2. ! Never install telephone wiring during a lightning storm. Never install telephone jacks in wet locations unless the jack is specifically designed for wet locations. Never touch uninsulated telephone wires or terminals unless the telephone line has been disconnected at the network interface. Use caution when installing or modifying telephone lines. MAINTENANCE Use a damp cloth to clean the plastic cabinet. A mild soap will help to remove grease or oil.
4. If your telephone causes harm to the telephone network, the telephone company may discontinue your service temporarily. If possible, they will notify you in advance. But if advance notice is not practical, you will be notified as soon as possible. You will be advised of your right to file a complaint with the FCC. 5. Your telephone company may make changes to its facilities, equipment, operations or procedures that could affect the proper operation of your equipment.
DESCRIPTIONS 030506A-1 6
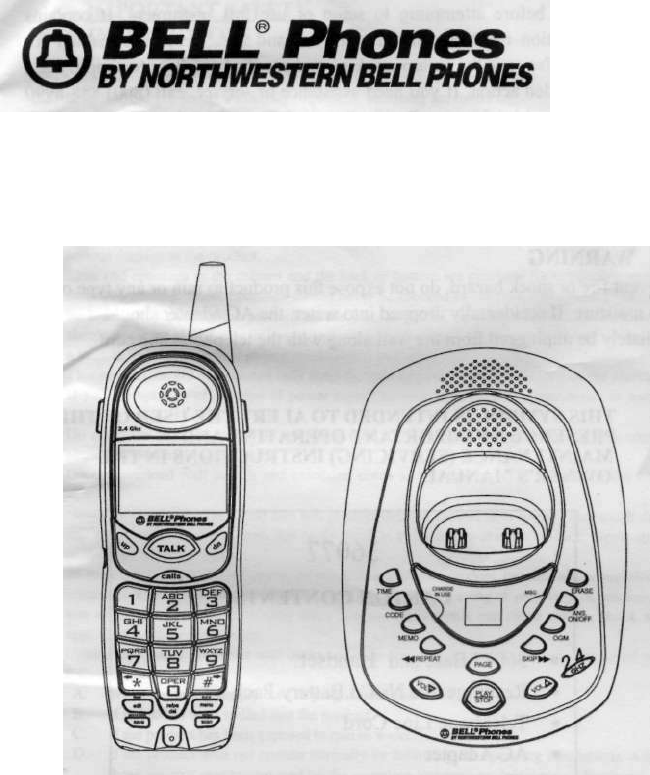
ERASE Button - Press to erase a single message or all messages in order to conserve message space in memory. Memo Button - Press to record Memo message. OGM Button - Press to record Outgoing Message(OGM). TIME SET Button - Press to set the day and time stamp. CODE Button - Press to set the password for remote operation. Ring (TS/4R/2R) Switch -Allows you to select the appropriate ringing.
3. 4. (Figure 1) Insert the Ni-Cd battery into the battery compartment. Replace the battery compartment cover by sliding it up towards the handset. NOTE: Use the type and size of Ni-Cd battery pack, 3.6V, 450mAh. It is recommended that the Ni-Cd battery pack should be fully charged overnight prior to initial use. Belt Clip Installation With the back of handset facing up, insert one side of the belt clip hook into the matching slots at the top side of handset as shown in Figure2.
(Figure3) HEADSET CONNECTION One of the special features of your phone is that your handset could utilize a headset (not included) for hands-free communication. Insert the small plug at the end of your headset cord to the headset jack at the side of the handset as shown in Figure 4. Follow the procedures discussed in "Placing a Call" when to place and receive a call. Note: The headset jack of your cordless telephone is compatible with 2.5mm headset plugs only.
RECEIVE A CALL NOTE: If you are expecting incoming calls, the handset must be programmed to RING ON mode. If the handset is on the base: 1. When the phone rings, simply pick up the handset from the base cradle if the unit is set to auto-answer ON mode. If the unit is set to auto-answer OFF mode, press the TALK button. See the "AUTO ANSWER ON/OFF SETTING" section to set auto-answer mode. The LCD Display will show "TALK". 2. Start your conversation.3 3.
You an assign PREFERRED CALL which will generate a special ringer sound at start of the second ring to any welcome caller in the Phonebook. 1. Press the SAVE/PHONE BOOK button. 2. Press the UP or DN button to find the one you need. 3. Press the MENU/ MUTE button once. The LCD Display will show "VIP". 4. Press the SAVE/PHONE BOOK button to save the preferred call and go back to STANDBY mode. B.
VIEWING THE PHONEBOOK This Phonebook lets you scroll through the list to find the person you need for one touch dialing. You can store up to 20 names and telephone numbers in the Memory. 1. 2. Press the SAVE/PHONE BOOK button. Press the UP or DN button to find the one you need , press the SHIFT RIGHT name or telephone number is more than 11 digits. button if the NOTE: To exit the Phonebook at anytime. Press the SAVE/PHONE BOOK button. EDITING NAME AND NUMBER IN THE PHONEBOOK 1. 2. 3.
3. Press the TALK button to dial out the telephone number. 4. Start your conversation. 5. To end your conversation, either press the TALK button or place the handset on the base unit. NOTE: Be sure to check that the line is not in use by another extension. DELETING A STORED NUMBER 1. Press the SAVE/PHONE BOOK button. 2. Press the UP or DN button to find the one you want to delete. 3. Press the RE/PA/DEL button.
PAGING FUNCTION • If you have misplaced the handset or need to alert person nearly the handset, press the PAGE button on the base unit. Each press of this button will activate the handset to beep for 20 seconds and LCD Display shows "PAGING" while it is being paged by the base unit. NOTE: Even if the handset is in RING OFF mode, the base unit can page the handset.
segment of LCD Display and NEW CALL LED indicator will flash if there is new call(s). When you receive a call, the system displays the caller information sent by the telephone company, called a Call Record. The Call Record consists of the following information: a. The caller's name(if available) b. The caller's telephone number c. The time and date of a call If there is no call records, the LCD display shows "NO CALLS" 2. 3. Press UP or DN button to scroll to the next call.
Display shows when a voice mail message has been received and is stored by message waiting service provided by the phone company. Display shows when the incoming call is a priority call. This is displayed when CALLS button is pressed and there is no Caller ID date stored. NOTE: If a call is received from the same number more than once since the records were last viewed, no new entry is made, but the repeat call icon "RPT" and the number of repeat calls is displayed.
Press OPTION button Press OPTION button 4. 5. Press TALK button to dial out or press CALLS button to cancel dialing. To end you conversation, either press the TALK button or place the handset on the base unit. SAVING THE NAME AND NUMBER FROM THE CALLER LIST INTO PHONE BOOK 1. Press the CALLS button. 2. Press the UP or DN button to scroll to the call record you wish to store into the phonebook. 3. Press SAVE/PHONE BOOK button. The LCD Display shows "SAVE". 4. Press CALLS button to return to standby mode.
PROGRAMS OPERATION This unit contains the following special Programs: A. B. C. D. E. F. RING ON/OFF LANGUAGE FIRST RING ON/OFF TIME SET AREA CODE CONTRAST G. PBX NUMBER H. I. J. K L. M. PBX MODE ON/OFF PAUSE TIME MSG WAITING AUTO ANSWER ON/OFF PRIVATE RING ON/OFF UNAVAILABLE RING ON/OFF A. RING ON/OFF To turn on or off the ringing sound. 1. Press and hold the MENU/ MUTE button. 2. Press the TELEPHONE KEYPAD #1 button. 3. Press the EDIT/FLASH button. 4. Press the UP or DN button to select ON or OFF.
from your local telephone company. E. AREA CODE 1. Press and hold the MENU/ MUTE button. 2. Press the TELEPHON KEYPAD #5 button. 3. Press the EDIT/FLASH button. 4. Use the TELEPHONE KEYPAD buttons to enter the three digit area code. 5. Press the SAVE/PHONE BOOK button to save the setting. 6. Press the MENU/ MUTE button to go back to standby mode. F. CONTRAST This unit enables you to select 3 brightness levels for the Large LCD Display. 1. Press and hold the MENU/ MUTE button. 2.
5. Press the SAVE/PHONE BOOK button to save the setting. 6. Press the MENU/ MUTE button to go back to STANDBY mode. J. MSG WAITING (Message Waiting) To turn off the Message Waiting LCD/LED indicator. 1. Press and hold the MENU/ MUTE button. 2. Press the TELEPHON KEYPAD #0 button. 3. Press the EDIT/FLASH button. 4. Press the SAVE/PHONE BOOK button, the Message Waiting LCD/LED indicator turn off. 5. Press the MENU/ MUTE button to go back to STANDBY mode.
NOTE: The maximum incoming Message(ICM) recording time is 1 minutes. The minimum incoming Message(lCM) recording time is 3 seconds. VOICE MENU SYSTEM A sophisticated Voice Menu System has been designed and pre-programmed into the 36077. This system will verbally guide you through key operational procedures. TIME/DAY STAMP lCMs and Memo messages are automatically voice-stamped with the current time and day. NOTE: After power failure, the time/day stamp will be lost. In this case, the time will be incorrect.
3. Press Skip •*- or Repeat « button (on the base) to select the first digit you desired. 4. Press the CODE button to confirm. 5. Press Skip •*• or Repeat •** button to select the second digit you desired. 6. Press the CODE button to confirm. 7. Press Skip •*• or Repeat •** button to select the third digit you desired. 8. Press the CODE button to confirm. You will hear the newly programmed 3-digit security code. NOTE: The factory preset password is "159".
ERASING MESSAGES A. SELECTIVE ERASING 1. Press the ERASE button on the base unit during message playback. 2. And then start the next message. B. ERASING ALL ICM AND MEMO I. In standby mode, press and hold the ERASE button for about 2 seconds. C. 1. ERASING OGM During OGM playback, press ERASE button. MEMORY FULL DETECTION The memory full condition occurs: If 15 minutes of recording time is reached, or If 59 message (i.e. Memo, OGM, ICM) have been recorded.
The following tabic lists announcements made after you have pressed 9: Message main menu Repeat message To skip message Delete message To stop function Key 3 5 6 7 Action Repeats the current message Skips forward to the next message Deletes current message Stops current function During message or memo playback Replay previous message Pause message Change OGM1 Record new MEMO Change security code Switch answerphone off Delete current message Key(s) * 1 2 # Key press 33 4 *1 *2 *3 *5 6 Function Skip OGM
charge time. When you notice the usable charge duration decreasing, fully discharge the Ni-Cd battery and recharge as described: DISCHARGING 1. Unplug the telephone line cord from the 36077. 2. Make sure that the adapter is connected. 3. Lift the handset out of the base cradle. 4. Press the TALK button of the handset and start discharging. Once the Symbol Low Battery appears on LCD Display, it means that the battery level is low. Let it fully discharge for 12 hours.
TROUBLESHOOTING A. TELEPHONE UNIT TROUBLESHOOTING TABLE SYMPTOM No dial tone • • • • SOLUTION Check the telephone line cord connectors at both ends that they are pushed in firmly until they click. If you had a power failure or had unplugged the base unit, replace the handset on the base unit for two to five seconds to reset the system. Check the RING ON/OFF mode on the handset. Set to RING ON mode to enable the handset ringer.
B. CALLER ID SYSTEM TROUBLESHOOTING TABLE SYMPTOM SOLUTION The Caller ID • Check the power connection. panel is blank • Check the telephone line cord connections. • Check the batteries for proper installation. The Caller ID does • The Caller ID unit will not function until you have Caller ID service not show the caller's provided by your local phone company. Call your local phone company name and/or phone to have Caller ID installed on your telephone line.