
Installation Guide


3
Bella Core Poly Installation Process
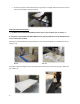
Tool Requirements-
Circular Saw or Jigsaw
Cutting Table (Centipede-www.centipedetool.com)
Miter Saw
Spacer Bars (www.harborfreight.com item # 66172)
Core Bit
Masking Tape
Measuring Tape
100% Silicone
Silicone Sealant
Level
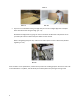
Let’s Get Started-
Once your shower specification (pan or tub size) is finalized; select the proper Bella CORE Poly Kit that
you will need for your shower walls and do the following measurements and cuts. Plus, verify what
design best fits your surround vertical or horizontal.
o Finishing height of shower/tub surround
o Height of Design Strip if using horizontal design
o Back wall width
o Side wall widths
o Tub/pan leg specs
o Internal trims cut to size and notched
o External trims cut to size and mitered
o Design Strips cut to size for back & side walls making sure pattern matches up in corners
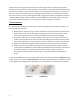
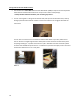
Before Getting Started
If you are going over an existant surface and there is any loose tile or water damage evident, these areas
need to be repaired prior to installing the wall system. If loose tile is removed and the sheet rock or
greenboard behind it is still in good condition, you may fill in the area with the flat tape or 100% silicone
and proceed with installation.
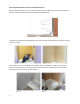
It is extremely important that the tile wall is cleaned with 100% DNA prior to applying adhesives. Any
soap scum left on the tile will prevent the TES from adhering. *Exception: If the tile is painted, it will
smear the paint. Use only denatured alcohol (50% DNA and 50% water solution) on painted tile.