Bella CORE Poly Installation Process 1
Table of Contents 2 Tool List – (page 3) Let’s Get Started – (pages 3-5) Templating & Measuring- (pages 6,7) Cutting of Panels & Components – (pages 8-9) Installation – (pages 11, 12) Horizontal Panels – (pages 12, 13) Design Strips – (pages 15-17) Vertical Panels – (pages 18,19) Seaming the Panels (Tongue & Groove) - (page 20) Trim Pieces - (pages 21, 22) Corner Shelve – (page 23) Recessed Dish – (page 24) Tub Decks – (page 25) Finishing – (page 26)
Bella Core Poly Installation Process Tool Requirements Circular Saw or Jigsaw Cutting Table (Centipede-www.centipedetool.com) Miter Saw Spacer Bars (www.harborfreight.com item # 66172) Core Bit Masking Tape Measuring Tape 100% Silicone Silicone Sealant Level Let’s Get StartedOnce your shower specification (pan or tub size) is finalized; select the proper Bella CORE Poly Kit that you will need for your shower walls and do the following measurements and cuts.
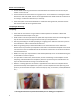
Plug the drain with a rag to prevent any debris from entering and remove any existing soap dishes. Determine the location for the new soap dish(s). It is a good idea to check with the homeowner and ask if they have a preference for the soap dish location. For a standard recessed soap dish, knock out a 14” W X 13” T hole in the tile wall where the new soap dish will be located.
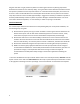
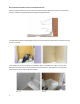
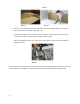
Recommended Installation Process of Tubs & Shower Pans When installing a shower pan or tub, make sure that the flange is attached to the stub and the backerboard or drywall is setting ON TOP of the flange (see diagram below). This will allow the backer-board/drywall to be flush with the bathroom wall and the ½ Bullnose trim will set flat on the wall. If the shower pan or tub is installed over the backer-board or drywall (pics 1.1 & 1.2), use the Full Bullnose trim.
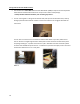
Backer board Installation Cement backer board or green board is recommended to be installed in the wet area of your shower or tub surround. Cut the backer board so that there are no gapes over ½” and In addition to screwing the backer board to the wall studs, 100% silicone can be applied behind the backer board as an extra bond or to bring it out flush and with the tile, if necessary.
You can also draw a line 3/8” in from inside corner and start the template at the line, then measure ½” from the corner and then draw a line and start your side wall templates from that line as the Internal corner channels set of the wall ½”. Measuring“Point to Point” measuring is a safe method in accounting for the walls being out of square or plumb.
Connect the points of the Crows Feet by using a level or a straight with a fine pencil or pen and then you are ready for cutting the panels. Cutting of Panels & Components****ALWAYS USE EYE PROTECTION & Double check all your measurements prior to cutting**** A “Cut Sheet” is provided for each Bella CORE Kit as the general guideline but can be modified based on your actual measurements. Place tape on the finished side of the panel (pic 2.1) and trace the templates or measurements to the tape (pic 2.2).
Pic 2.3 Pic. 2.4 Pic. 2.5 If you are not comfortable cutting a straight line you can use a straight edge that is clamped down and ride the saw along the edge. (pic. 2.5) Remember the edges that are going into the trim channels do NOT have to be perfect cuts as you have 3/8” covered in where the panel slides into the channel. When cutting Design Strips to size, make sure to match up the corners in where they will butt together (pic. 2.6). Pic. 2.
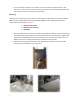
Coring Holes for Shower Head & Valves Use the Bella Core Valve Wall “Measurement Data Sheet” (MDS) to acquire all of the important measurements needed and transfer those to tap on the surface of the panel(s). **Always double check the hardware prior to cutting any holes** You can use a Jigsaw in cutting out the shower head, tub spout or shower valve holes, start by drilling a pilot hole with a drill bit inside the cutout area and then use the jigsaw to follow the cutout lines.
Installing the Panels & ComponentsRemove the printed face of the internal trim from the internal base (Pic 3). Then dry fit both printed face and base to make sure the internal trims are cut 3/8” lower than the top of the wall allowing the (2) external trims to meet together on the inside corner. Pic. 3 Apply the internal base into the corner using silicone & hot glue by starting at the bottom and moving upwards (pic. 3.1), The hot glue will hold the piece in place while the silicone sets up.
In some cases, you will need to trim the edges of the internal base so that it sets on the shower pan flange (pic. 3.3) while allowing the track to come all the way down to the bottom of the panels so that when the internal face is installed it will align with the panels (pic. 3.4) Pic. 3.3 Pic. 3.
Pic. 3.5 Pic. 3.6 Pic 3.7 If you have (2) internal trims you must cut the panels 1 ¼” shorter than the wall to wall measurements from left to right. You will then slide the panel all the way into the left channel (pic. 3.8) and then position the right side at the channel and slide it in about ½ way (pic. 3.9) keeping the left side in the channel as well (pic. 3.10). Pic 3.8 Pic. 3.9 Pic. 3.
o Install panel and use the spacer bars to hold the panels tight until the silicone tacks up (pic. 3.13), don’t over tighten. Pic. 3.12 Pic. 3.13 Design StripsInstalling Design Strips Dry fit the Back Wall Design Strip (DS) to make sure the top of the DS aligns to the top of the line drawn on the wall and to back corners. Apply silicone to the back of the Design Strip and into the groove (female) of the panel (pic. 4.1). Install the tongue of Back Wall DS into the groove of panel Pic. 4.
Pic. 4.2 Dry fit the Opposite Wall Design Strip (DS) making sure the top of the DS aligns to the top of the line drawn on the wall and to the lines drawn on the outside edges. o o Apply silicone to the back of the DS and groove of the back bottom panel Install the tongue of DS into the groove of panel Installing Top Panel Layer Dry fit Top Level Back Panel aligning top of panel to line on the wall as well as the tongue (male) fitting into the groove (female) of DS.
Pic. 4.3 Other Design Strips (Stone)- 16 The first step is you must cut both the Tongue (male) & Groove (female) off of the panels and make sure that the top of all the panels are at the same height & level. Once you have the lower level of panels installed and level then you must cut some wood blocks (spacers)that are the same height as your DS along with the grout line you want on both sides.
Remove the spacer blocks and install the DS with 1/8” spacers on the bottom & top of the DS that will be grouted later. IF SPEED IS AN ISSUE…….. 17 After installing the lower level of panels, set the 1/8” spacers on top of the panels, cut the DS to size and then apply the DS with a quick set epoxy.
Make sure that the DS & panels are flush on the same plane by adding more adhesive to one or the other. Vertical KitsDry fit Back Panel aligning top of panel to line on the wall for bottom of Design Strip. 18 Prior to installing the back panel, place a bead of silicone inside the channels of the internal trims. Use 100% silicone circles on the backside of the panels about 4” in between each one (pic. 4.4). These circles will provide suction when pressed firmly to the wall.
Pic. 4.4 Pic. 4.5 When using two internal trims, you must cut the panels 1¼” shorter than the wall to wall measurements using left to right measurements. Slide the panel all the way into the left channel and then position the right side at the channel and slide it in about half-way in keeping the left side in the channel as well. Dry fit the wall opposite valve wall to make sure it fits by the top of the panel meeting the line on the wall and the outside line on wall for the edge of the panel.
o Install panel & use the spacer bars to hold the panels tight until the silicone tacks up (pic. 4.7) Pic. 4.7 Seaming Panels (Tongue & Groove)With the tongue & groove panels the seam will almost disappear if installed properly. Install the groove panel first, place tape on the edge (pic. 4.8) and apply the color matched silicone inside the groove (pic. 4.9).
Horizontal Seam Fill the female groove with silicone (pic. 4.11) and then install the panel at a 45-degree angle (pic. 4.12). Then engage the male (tongue) and pull tight (pic. 4.13). Wipe any excess silicone from the panels. Pic. 4.11 Pic. 4.12 Pic. 4.13 Cutting & Installing the Trim Pieces Measure the trim pieces using the “point to point” Measurement Data Sheets (MDS), accounting for all miters.
Once all pieces are cut-to-size and ready to install, prior to applying silicone, Start by running a 4” scrap piece of the trim behind the top and exterior edges in where the trims will be adhered to make sure there are no blockages (pic. 5.3). Pic 5.3 Dry fit all Exterior Trim Pieces to make sure all miters line up together and that they slide in behind the panels with no issues and then cut to size, make sure to install any mitered pieces together so that they can be adjusted for the best fit.
Corner ShelvesPrior to installing the Corner Shelve it is necessary to adhere the biscuits. Start by applying silicone inside the middle slots (pic. 6.1), then insert the biscuits inside the slots until only the tab is exposed (pic. 6.2 & 6.3)), then let it cure for at least 2 hours. Pic. 6.1 Pic. 6.2 Pic. 6.3 After you have determined where you want the corner shelve located, press the dish to the wall in where both biscuits are touching the walls (pic 6.4).
Dry fit the dish, pull out, fill the slots on the panels with the color coordinating silicone and then insert dish at the back end of the slot and slide forward until it stops at front end of slot (pic. 6.5). Clean up both sides of dish and then reapply the silicone on the top and bottom of the dish (pic. 6.6). Pic. 6.
Tub DecksWhen using the Bella Core Poly for a tub skirt then mitering the panels may be required for any angled pieces (pic. 8.1). Pic. 8.1 After cutting and mitering, dry fit the panels to make sure there is a tight fit. Then place a bead of the color coordinating silicone between the joint as well as 100% silicone on the back. Now, install both pieces together so that they can be pulled tight and then use tape to hold them together until the adhesive sets up (pic. 8.2).
FinishingUse the color coordinating caulk in all joints and seams and wipe clean (pics. 9.1 & 9.2 & 9.3). Pic. 9.1 Pic. 9.2 Pic. 9.3 Once everything has been adhered and cured clean off any excess silicone or debris using denatured alcohol and cheese cloth for agitation.
Care & MaintenanceBellaCore Poly is manufactured from the finest impact-resistant PVC on the market. The Poly is a durable, non-porous surface that is designed to provide years of and enjoyment. With reasonable care and maintenance, under normal use, Bella CORE Poly System will retain its beautiful finish with minimal care.