
Installation Guide


4
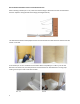
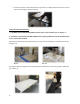
Plug the drain with a rag to prevent any debris from entering and remove any existing soap dishes.
Determine the location for the new soap dish(s). It is a good idea to check with the homeowner and ask
if they have a preference for the soap dish location. For a standard recessed soap dish, knock out a 14”
W X 13” T hole in the tile wall where the new soap dish will be located. For any other size of recessed
soap dish, knock out a hole in the wall approximately 1” bigger than necessary to allow the soap dish to
be easily installed. Always remove any debris to prevent damage to the bathtub and floor. For corner
and surface mounted soap dishes, it is not necessary to make an opening in the tile wall.
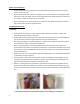
Hardware Removal-
If it is necessary to remove chrome fixtures from the plumbing wall prior to the panel installation, use
the following steps as a guide:
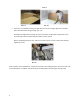
1) Remove the tub spout by turning it counter clockwise or loosening the setscrew located on the
bottom of the sprout near the wall. If the homeowner(s) desire to reuse the old trim, notify
them that it may require force to remove old hardware and potentially cause damage.
2) Remove the small cover on the valve handle(s) to allow access to the screw that secures the
handle to the stem. Remove the screw and slide the handle off of the valve stem. If the handle
does not slide off easily, use a chrome puller to remove it. Otherwise, the valve stem will break.
3) Remove the showerhead using the same procedures for removing the tub spout (number 1).
4) Make sure that the pipe (nipple) that attaches to the tub spout protrudes out far enough to
accommodate the additional ¼” that the wall panel will add to the tile wall. If the pipe does not
protrude far enough, a licensed plumber will need to change or extend the nipple to
accommodate for the wall panel. Always change or extend the nipple before installing the
panels.
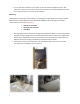
* There are two different trim options which will be used on the outside perimeter, ½ Bullnose that will
lay flat or flush on the wall and a Full Bullnose that has a 3/8” lip that will wrap around another surface
or fill a gap like a tub flange or shower pan flange. Your Kit includes both so discard the unused option.
½ Bullnose Full Bullnose