INSTRUCTION MANUAL / RECIPE GUIDE MANUAL DE INSTRUCCIÓNES / GUÍA DE RECETAS www.bellahousewares.com facebook.com/Bellalife twitter.com/Bellalife For customer service questions or comments Dudas o comentarios contactar el departamento de servico al cliente 1-866-832-4843 www.sensioinc.com ©2012 Sensio. BELLA® is a registered trademark of Sensio Inc., Montréal, Canada H3B 3X9 BELLA® es una marca registrada de Sensio Inc.
TABLE OF CONTENTS Important Safeguards ............................................................................................................2 Notes on the Paddle..............................................................................................................3 Notes on the Plug .................................................................................................................3 Notes on the Cord..................................................................................
IMPORTANT SAFEGUARDS WARNING: When using an electrical appliance, basic safety precautions should always be followed to reduce the risk of fire, electric shock, and/or injury, including the following: 1. READ ALL INSTRUCTIONS BEFORE USING. 2. To protect against risk of electric shock, do not place cord, plug, or base of appliance in water or any other liquid. 3. Close supervision is necessary when any appliance is used by or near children. This is not a toy or children’s product.
NOTES ON THE PADDLE Unit may take up to 30 minutes (or less) to create ice cream depending on the ingredients. If the paddle changes direction repeatedly, the ice cream is ready. Press the power ON/OFF button to the (O) OFF position and unplug the Ice Cream Maker from the electrical outlet. NOTES ON THE PLUG This appliance has a polarized plug (one blade is wider than the other). To reduce the risk of electric shock, this plug will fit in a polarized outlet only one way.
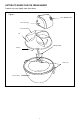
GETTING TO KNOW YOUR ICE CREAM MAKER Product may vary slightly from illustrations.
BEFORE USING FOR THE FIRST TIME 1. 2. Carefully unpack the Ice Cream Maker and all parts. Your Ice Cream Maker will be assembled; the mixing paddle will be packed inside the freezer bowl. Remove the motor housing / cord from the lid. Rest the lid on a clean, flat surface. Press the 2 release pins while pulling the lid up and off the motor (see Figure 2). Set motor aside in a clean, dry area. Figure 2 Release Pins Paddle Lock 3. 4. 5. 6. 7.
OPERATING INSTRUCTIONS 1. 2. 3. 4. 5. 6. 7. 8. 9. 10. 11. 12. 13. 14. Place empty freezer bowl in an upright position, towards the back wall of the freezer for at least 12 hours before processing. Prepare ice cream or dessert mixture and refrigerate in an airtight container until cold, or store for up to 3 days until use. IMPORTANT: Mixture must be cold before processing frozen desserts.
HINTS AND SUGGESTIONS FOR BEST RESULTS • • • • • • • • • • • • • • • Always plan ahead! Freeze the clean, empty freezer bowl for at least 12 hours before processing. Ice cream or dessert recipes can be made ahead and refrigerated in an airtight container until cold or for up to 3 days before churning. Recipes using fresh-cooked ingredients should be cooled 2 hours to overnight before using. Fresh or frozen fruits may taste less sweet when frozen. Adding extra sugar or sweetener may be necessary.
USER MAINTENANCE INSTRUCTIONS This appliance requires little maintenance. It contains no user serviceable parts. Do not try to repair it yourself. Any servicing that requires disassembly other than cleaning must be performed by a qualified appliance repair technician. CARE & CLEANING INSTRUCTIONS CAUTION: Never immerse the motor housing, plug or cord in water or any other liquid. 1. Always unplug the unit before cleaning. 2.
RECIPES ––––––––––––––––––––––––––––––––––––––––––––––––––––––– E-Z CREAMY CHOCOLATE ICE CREAM ––––––––––––––––––––––––––––––––––––––––––––––––––––––– SOFT-SERVE VANILLA ICE CREAM WITH ADD-INS ––––––––––––––––––––––––––––––––––––––––––––––––––––––– CHOCOLATE ROCKY ROAD ICE CREAM ––––––––––––––––––––––––––––––––––––––––––––––––––––––– FRESH BERRY SWIRL CHEESECAKE ICE CREAM ––––––––––––––––––––––––––––––––––––––––––––––––––––––– DAIRY-FREE BANANA ICE CREAM –––––––––––––––––––––––––––––––––––––––––––––––––––––
E-Z CREAMY CHOCOLATE ICE CREAM Makes 4 to 6 servings ––––––––––––––––––––––––––––––––––––––––––––––––––––––– NOTE: For a denser, harder ice cream or frozen dessert, transfer churned soft-serve dessert to an airtight plastic container and store in the freezer for 2 hours or until the desired consistency is reached ––––––––––––––––––––––––––––––––––––––––––––––––––––––– 3/4 cup super fine sugar 2-1/4 cups heavy cream 3/4 cup unsweetened cocoa powder 6 large egg yolks* –––––––––––––––––––––––––––––––––––––––––
SOFT-SERVE VANILLA ICE CREAM WITH ADD-INS 3 servings 2 servings ––––––––––––––––––––––––––––––––––––––––––––––––––––––– 1/2 cup 3/4 cup 6 tablespoons 1/2 cup 1-1/2 cups 1 cup super fine sugar half and half,well chilled heavy cream, well chilled 2 teaspoons 1 teaspoon pure vanilla extract 3/4 cup 1/2 cup add-ins ––––––––––––––––––––––––––––––––––––––––––––––––––––––– 1. Place all ingredients into a small mixing bowl or blending jar. Blend until mixture is well-mixed and frothy. 2.
CHOCOLATE ROCKY ROAD ICE CREAM Makes 4 to 6 servings –––––––––––––––––––––––––––––––––––––––––––––– 1 cup sweetened condensed milk 1/2 cup unsweetened cocoa powder 1 cup half and hald (may substitute heavy cream) 3 teaspoons vanilla extract 1/2 cup chopped pecans, or nuts of your choice 1/2 cup miniature marshmallows ––––––––––––––––––––––––––––––––––––––––––––––––––––––– 1. In a medium saucepan over low heat, cook and stir condensed milk and cocoa until smooth and slightly thickened, 5 minutes.
FRESH BERRY SWIRL CHEESECAKE ICE CREAM Makes 4 to 5 servings ––––––––––––––––––––––––––––––––––––––––––––––––––––––– 1 cup super fine sugar 4 oz.
DAIRY-FREE BANANA ICE CREAM Makes 2 -3 servings ––––––––––––––––––––––––––––––––––––––––––––––––––––––– 2 ripe bananas 1-1/2 cups vanilla almond milk 1/4 cup light agave nectar 1/4 cup brown sugar 2 teaspoons vanilla extract 1/8 teaspoon salt ––––––––––––––––––––––––––––––––––––––––––––––––––––––– 1. Place all ingredients together in a blender or processor and puree until smooth and creamy. 2.
Limited ONE-YEAR Warranty SENSIO Inc. hereby warrants that for a period of ONE YEAR from the date of purchase, this product will be free from mechanical defects in material and workmanship, and for 90 days in respect to non-mechanical parts. At its sole discretion, SENSIO Inc. will either repair or replace the product found to be defective, or issue a refund on the product during the warranty period.
MEDIDAS DE SEGURIDAD IMPORTANTES PRECAUCION: Al utilizar un electrodoméstico, siempre deben cumplirse las precauciones de seguridad básicas a fin de evitar el riesgo de incendio, descargas eléctricas y lesiones, incluidas las siguientes: 1. LEA TODAS LAS INSTRUCCIONES ANTES DE UTILIZAR EL ELECTRODOMÉSTICO. 2. Para protegerse del riesgo de descarga eléctrica, no sumerja el cable, el enchufe ni la base en agua ni en ningún otro líquido. 3.
20. No exponga el tazón para congelador a temperaturas superiores a 105°F/41°C. 21. No coloque el tazón para congelador o la caja del motor en el lavavajillas. La paleta de mezclar y la tapa de plástico transparente se pueden lavar en el estante superior del lavavajillas. SOLO PARA USO DOMÉSTICO GUARDE ESTAS INSTRUCCIONES NOTAS SOBRE EL REMO La unidad puede tardar hasta 30 minutos (o menos) para crear helado dependiendo de los ingredientes.
CONOZCA SU MÁQUINA PARA HACER HELADO El producto puede diferir levemente de las ilustraciones.
ANTES DE UTILIZAR POR PRIMERA VEZ 1. 2. Retire con cuidado la máquina para hacer helado y todas las piezas del embalaje. Su máquina para hacer helado estará armada; la paleta de mezclar estará dentro del tazón para congelador. Quite la caja del motor/el cable de la tapa. Apoye la tapa sobre una superficie limpia y plana. Presione las dos perillas de desenganche mientras tira la tapa hacia arriba, retirándola del motor (ver figura 2). Deje el motor a un lado, en un lugar limpio y seco.
INSTRUCCIONES DE FUNCIONAMIENTO 1. 2. 3. 4. 5. 6. 7. 8. 9. 10. 11. 12. 13. Colóquelo en posición vertical, cerca de la pared trasera del congelador por al menos 12 horas antes de procesar. Prepare helado o mezcla para postres y colóquelo en el refrigerador en un recipiente hermético por hasta 3 días hasta que lo utilice. IMPORTANTE: La mezcla debe estar fría antes de procesar postres congelados.
14. Indique la fecha de preparación y el tipo de postre en el recipiente. IMPORTANTE: Consuma el helado recién preparado al poco tiempo de su procesamiento. Después de 1 ó 2 semanas, la consistencia del helado se deteriora y se puede perder el sabor fresco. PRECAUCIÓN: Para garantizar el mejor sabor y consistencia, y para evitar enfermedades, no vuelva a congelar para su consumo postres que se hayan descongelado total o parcialmente.
INSTRUCCIONES DE MANTENIMIENTO PARA EL USUARIO Este electrodoméstico requiere poco mantenimiento. No contiene piezas que puedan ser reparadas por el usuario. No intente repararlo usted mismo. Cualquier mantenimiento para el que sea necesario desarmar el aparato, aparte de la limpieza, debe ser realizado por un técnico autorizado para reparar electrodomésticos. INSTRUCCIONES DE LIMPIEZA Y CUIDADO PRECAUCIÓN: Nunca sumerja la caja del motor, el enchufe o el cable en el agua, ni en ningún otro líquido. 1.
RECETAS ––––––––––––––––––––––––––––––––––––––––––––––––––––––– HELADO DE CHOCOLATE FÁCIL Y CREMOSO ––––––––––––––––––––––––––––––––––––––––––––––––––––––– CREMA DE HELADO DE VAINILLA CON COMPLEMENTOS ––––––––––––––––––––––––––––––––––––––––––––––––––––––– HELADO DE TARTA DE QUESO CON REMOLINO DE BAYAS FRESCAS ––––––––––––––––––––––––––––––––––––––––––––––––––––––– REMOLINO DE BAYAS ––––––––––––––––––––––––––––––––––––––––––––––––––––––– HELADO DE BANANA SIN LÁCTEOS –––––––––––––––––––––––––––––––––––––––––
HELADO DE CHOCOLATE FÁCIL Y CREMOSO De 4 a 6 porciones ––––––––––––––––––––––––––––––––––––––––––––––––––––––– Nota: Para lograr una consistencia más espesa y dura o un postre congelado, coloque el postre procesado en un recipiente de plástico hermético y guárdelo en el congelador durante 2 horas o hasta llegar a la consistencia deseada.
CREMA DE HELADO DE VAINILLA CON COMPLEMENTOS 3 porciones 2 porciones 1/2 taza 6 cucharadas Azúcar superfina 3/4 taza 1/2 taza Mezcla de crema y leche, bien fría 1-1/2 taza 1 taza Crema entera, bien fría 2 cucharadita 1 cucharadita Extracto de vainilla puro 3/4 taza 1/2 taza Complementos ––––––––––––––––––––––––––––––––––––––––––––––––––––––– ––––––––––––––––––––––––––––––––––––––––––––––––––––––– 1. Coloque todos los ingredientes en un tazón pequeño o en un vaso mezclador.
HELADO DE CHOCOLATE ROCKY ROAD De 4 a 6 porciones 1 taza de leche condensada endulzada 1/2 taza de cacao en polvo sin azúcar 1 taza de mezcla de leche y crema (puede reemplazarse por crema entera) 3 cucharaditas de extracto de vainilla 1/2 taza de pecanas picadas o cualquier fruto seco de su elección 1/2 taza de mini malvaviscos ––––––––––––––––––––––––––––––––––––––––––––––––––––––– 1.
HELADO DE TARTA DE QUESO CON REMOLINO DE BAYAS FRESCAS De 4 a 5 porciones 1 taza de azúcar superfina 4 onzas de queso crema, a temperatura ambiente 2 yemas de huevo grandes.
HELADO DE BANANA SIN LÁCTEOS De 2 a 3 porciones 2 bananas maduras 1-1/2 tazas de leche de almendras aromatizada con vainilla 1/4 taza de miel de agave claro 1/4 taza de azúcar moreno 2 cucharaditas de extracto de vainilla 1/8 cucharaditas de sal ––––––––––––––––––––––––––––––––––––––––––––––––––––––– 1. Coloque todos los ingredientes en una licuadora o procesadora y procese hasta que estén suaves y cremosos. 2.
Garantía limitada de UN AÑO Mediante la presente, SENSIO Inc. garantiza que, durante el plazo de UN AÑO a partir de la fecha de compra, este producto no presentará defectos mecánicos en el material ni en la mano de obra, y durante 90 días, no los presentará en las piezas no mecánicas. A su entera discreción, SENSIO Inc. reparará o reemplazará el producto que resulte defectuoso, o emitirá un reembolso por el producto durante el plazo de garantía.