
Installation Guide


2
Faucet Installation
1
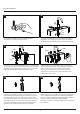
1.Shut o water supplies. Remove old faucet.Clean
sink surface in preparation for new faucet.
2
2.Place the spout through center hole (The hole diameter
should be 1-3/8”) of the sink. Under sink,secure rmly to
sink with rubber washer(15),metal washer(14)and nut(13).
5A
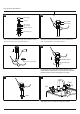
5A.Stainess steel Braided Faucet supply Tubes:This the
simplest of all installations.If you are using stainless steel
braided faucet supply tubes,this faucet requires one end of
the supply tube to have a 1/2” female IPS connection.The
other end of this supply tube must match the thread on the
water supply ttings or shut o valve under your sink.Once
you have identied the required tube,carefully follow the
manufacture’s installations instructions for each tube.
5B
5B.Ball Nose Flexible Supplies: If you are using ball-nose
exible supplies to connect the faucet to water supply lines;
Slip coupling nut behind ball-nose of exible supply tube.
Ball nose coupling will go Partially into IPS shank or tting.
Tighten coupling nut (DO NOT OVER TIGHTEN).
lnstall opposite end according to manufacture’s instructions
for both tubes.
3
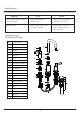
3.Insert the Valve body assembly(8) with the hot supply label
on the
left (hot) side. Hold the body in the proper position.
Assemble me
tal washer(9) and mounting nut(10) onto body
underside of sink
,tighten it with the locking screws.
4
4.Align the blocks (1, 2, 3) and tabs (A, B, C) to the quick
connect (K). Push the quick connect (K) rmly upward and
snap onto the blocks (1,2,3). Pull down moderately to
ensure each connection is secure. If it is necessary to
remove the x-over hose, press on the tabs (A, B, C) and
pull the quick connect (K).
15
14
13
A
1
2
3
B
C
K
Hot
Cold
9
8
10
Hot