Model# 67416-3C01 67416-3C04 67416-3C27H2 SKU# 000000 000000 000000 INSTALLATION AND CARE GUIDE TWO-HANDLE ROMAN TUB FAUCET Questions, problems, missing parts? Before returning to the store, call Pegasus Customer Service 8 a.m. - 7 p.m., EST, Monday - Friday 9 a.m. - 6 p.m., EST, Saturday 1-877-580-5682 WWW.HOMEDEPOT.COM/PEGASUS THANK YOU We appreciate the trust and confidence you have placed in Glacier Bay through the purchase of this roman tub faucet.
Table of Contents Important Information ..............................2 Warranty ...................................................2 Pre-Installation .........................................2 Planning Installation ..............................2 Tools and Hardware Required ...............2 Package Contents ..................................3 Installation ................................................4 Operation...................................................7 Care and Cleaning ......................
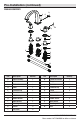
Pre-Installation (continued) PACKAGE CONTENTS A B D C L K M N E O P F Q G H I J R S T U V W Part Description Quantity Part Description Quantity A Spout assembly 1 M 2.5mm hex wrench 1 B Set screw 1 N Flange 2 C 2.
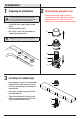
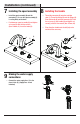
Installation 1 Preparing for installation 2 Removing the protective cap □ CAUTION: Always turn off the water supply before removing an existing faucet or replacing any part of a faucet. Open the faucet handle to relieve water pressure and ensure that the water is completely shut off. □ Shut off the water supply. Remove the old faucet. □ Clean the mounting surface. □ Drill 1-3/8 in. holes in the finished deck as shown in the diagram below. Remove the protective cap (E).
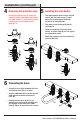
Installation (continued) 4 Removing the protective caps 5 Installing the valve bodies □ Remove the protective caps (P). Loosen the flanges (Q) from the valve bodys (R & S). Adjust the rubber washers (T), metal washers (U) and mounting nuts (V) to the bottom of valve bodys (R & S). □ From underneath the deck, insert the cold end valve (S) with the rubber washer (T), metal washer (U) and mounting nut (V) through the hole on the right (cold) side.
Installation (continued) 7 Installing the spout assembly 8 Installing the handle □ Install the spout assembly (A) onto the connector (F). Be sure the spout assembly (A) is resting firmly on the deck. □ Push down on spout assembly (A) and tighten set screw (B) with the Hex wrench (Hex: 2.38mm, C). Insert the index (D). A B □ Thread the connector (O) onto the cartridge stem (1). Thread the flange (N) onto the flange (Q). Place the handle (K) onto the connector (O).
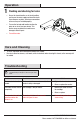
Operation 1 Flushing and checking for leaks □ Ensure the faucet handles are in the off position, and turn on the water supply and check for leaks. If you discover any leaks, check your connections to ensure they are installed properly. □ Turn on the hot and cold handles to allow the water to run for at least one minute. This flushes away any debris that could cause damage to internal parts. □ Turn off the water. Care and Cleaning □ To clean, wipe down with a damp cloth and dry with a towel.
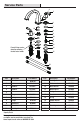
Service Parts 4 5 1 2 6 7 16 8 3 9 17 10 18 11 19 Faucet ID tags can be found by removing the hot water handle 20 12 13 21 14 15 22 Part Part Number Part Description Part Number 1 Set screw RP50167 12 Cartridge C RP20014 2 Index RP80534 13 Rubber washer RP64023 3 Handle H RP13451* 14 Metal washer RP64024 4 Handle C RP13452* 15 Mounting nut RP56014 Set screw RP50002 16 O-ring RP60056 6 Flange RP80533* 17 Connector RP70459 7 O-ring RP60098 18 O-ring
Questions, problems, missing parts? Before returning to the store, call Pegasus Customer Service 8 a.m. - 7 p.m., EST, Monday - Friday 9 a.m. - 6 p.m., EST, Saturday 1-877-580-5682 WWW.HOMEDEPOT.COM/PEGASUS Retain this manual for future use.
Modelo núm. SKU núm. 67416-3C01 000000 67416-3C04 000000 67416-3C27H2 000000 GUÍA DE USO Y MANTENIMIENTO GRIFO DE DOS LLAVES PARA BAÑERA ROMANA ¿Problemas, preguntas o piezas faltantes? Antes de regresar a la tienda, llama al servicio al cliente de Pegasus de lunes a viernes entre 8 a.m. y 7 p.m. y los sábados entre 9 a.m. y 6 p.m.(hora estándar del Este) 1-877-580-5682 WWW.HOMEDEPOT.COM/PEGASUS GRACIAS Agradecemos la con anza que has depositado en Glacier Bay al comprar este grifo para bañera romana.
Tabla de contenido Información importante .........................11 Garantía...................................................11 Pre-instalación .......................................11 Planificación de la instalación .............11 Herramientas y herrajes necesarios ....11 Contenido del paquete .........................12 Instalación ..............................................13 Funcionamiento ......................................16 Cuidado y limpieza ................................
Pre-instalación (continuación) CONTENIDO DEL PAQUETE A B D C L K M N E O P F Q G H I J R S T U V W Pieza Descripción Cantidad A Ensamblaje del caño 1 B Tornillo de fijación 1 C Llave hexagonal de 2.38 mm 1 D Índice 1 E Tapa protectora 1 F Conector 1 G Cuerpo intermedio 1 Pieza Descripción Cantidad M Llave hexagonal de 2.
Instalación prepararse para la 1 Cómo instalación 2 Removing the protective cap □ PRECAUCIÓN: Cierra siempre el suministro de agua antes de quitar un grifo existente o reemplazar cualquier pieza de un grifo. Abre la llave del grifo para liberar la presión de agua y asegúrate de que el suministro de agua esté completamente cerrado. □ □ □ Remove the protective cap (E). Loosen the connector (F) from the middle body (G).
Instalación (continuación) 4 Removing the protective caps 5 Installing the valve bodies □ Remove the protective caps (P). Loosen the flanges (Q) from the valve bodys (R & S). Adjust the rubber washers (T), metal washers (U) and mounting nuts (V) to the bottom of valve bodys (R & S). □ Desde la parte inferior de la plataforma, inserta el cuerpo de la válvula con la arandela (S) de goma (T), la arandela metálica (U) y el tornillo de montaje (V) por los orificios del lado derecho (agua fría).
Instalación (continuación) instalar el ensamblaje 7 Cómo 8 Installing the handle del caño □ Instala el ensamblaje del caño (A) en el conector (F). Asegúrate de que el ensamblaje del caño (A) descanse firmemente sobre la cubierta. □ Push down on spout assembly (A) and tighten set screw (B) with the Hex wrench (Hex: 2.38mm, C). Insert the index (D). A B □ Thread the connector (O) onto the cartridge stem (1). Thread the flange (N) onto the flange (Q). Place the handle (K) onto the connector (O).
Funcionamiento purgar las tuberías y 1 Cómo comprobar que no haya fugas □ Asegúrate de que las manijas del grifo estén cerradas, abre el suministro del agua y comprueba que no haya filtraciones. Si descubres alguna filtración, verifica tus conexiones para asegurarte de que estén instaladas adecuadamente. □ Abre los manerales del suministro de agua fría y caliente y deja que corran durante al menos un minuto cada una. Esto elimina cualquier desecho que pudiera dañar las piezas internas.
Piezas de repuesto 4 5 1 2 6 7 16 8 3 9 17 10 18 11 19 Las etiquetas de identificación de la mezcladora pueden verse al quitar el maneral del agua caliente.
¿Problemas, preguntas o piezas faltantes? Antes de regresar a la tienda, llama al servicio al cliente de Pegasus de lunes a viernes entre 8 a.m. y 7 p.m. y los sábados entre 9 a.m. y 6 p.m.(hora estándar del Este) 1-877-580-5682 WWW.HOMEDEPOT.COM/PEGASUS Conserva este manual para uso futuro.
Modèle n° 67416-3C01 67416-3C04 67416-3C27H2 UGS n° 000000 000000 000000 GUIDE D’INSTALLATION ET D’ENTRETIEN ROBINET DE BAIGNOIRE ROMAINE À DEUX MANETTES Questions, problèmes, pièces manquantes? Avant de retourner au magasin, appelez le service à la clientèle Pegasus entre 8 h et 19 h, HNE, du lundi au vendredi au entre 9 h et 18 h, HNE, le samedi au 1-877-580-5682 WWW.HOMEDEPOT.COM/PEGASUS THANK YOU Nous vous remercions d’avoir fait confiance à Glacier Bay en achetant ce robinet de baignoire romaine.
Table des matières Information importante ..........................20 Garantie...................................................20 Pré-installation .......................................20 ................20 Outils et quincaillerie requis ................20 Contenu de l’emballage .......................21 Installation ..............................................22 Utilisation ................................................25 Entretien et nettoyage ............................25 Dépannage ............
Pré-installation (suite) CONTENU DE L'EMBALLAGE B A D C L K M N O E P F Q G H I J R S T U V W Pièce Description Quantité A Bec du robinet 1 B Vis de pression 1 C Clé hexagonale de 2,38 mm 1 D Indicateur 1 E Capuchon de protection 1 F Raccord 1 G Corps central 1 H Rondelle en caoutchouc 1 I Rondelle en métal 1 J Écrou de montage 1 K Manette 2 L Vis de pression 2 Pièce 21 Description Quantité M Clé hexagonale de 2,5 mm 1 N Bride 2 O Raccord 2 P
Installation en vue de 1 Préparation l'installation 2 Removing the protective cap □ ATTENTION : Coupez l’alimentation en eau CAUTION: Always turntoujours off the water supply before avant d’enlever un robinet ou de any remplacer removing an existing faucetexistant or replacing part of a n’importe quelle partie du robinet. Ouvrez la poignée du faucet. Open the faucet handle to relieve water pressure robinet pourthat libérer pression de l’eau et vous and ensure the la water is completely shut off.
Installation (suite) 4 Removing the protective caps 5 Installing the valve bodies □ Remove the protective caps (P). Loosen the flanges (Q) from the valve bodys (R & S). Adjust the rubber washers (T), metal washers (U) and mounting nuts (V) to the bottom of valve bodys (R & S). P Q □ À partir du dessous de la plaque, insérez le robinet d’eau froide (S) à l’aide de la rondelle en caoutchouc (T), de la rondelle en métal (U) et de l’écrou de montage (V) à travers le trou du côté droit (froid).
Installation (suite) 7 Installation du bec du robinet 8 Installing the handle □ Installez le bec (A) sur le raccord (F). Assurez-vous que le bec (A) repose fermement sur la plaque. □ Push down on spout assembly (A) and tighten set screw (B) with the Hex wrench (Hex: 2.38mm, C). Insert the index (D). A B □ Thread the connector (O) onto the cartridge stem (1). Thread the flange (N) onto the flange (Q). Place the handle (K) onto the connector (O).
Utilisation 1 Purge et recherche de fuites □ Assurez-vous que les manettes du robinet sont en position fermée, puis ouvrez l’eau et recherchez les fuites. Si vous découvrez des fuites, vérifiez vos raccords pour vous assurer qu’ils sont installés correctement. □ Ouvrez les manettes d’eau chaude et froide pour laisser couler l’eau pendant au moins une minute. Cela chasse les débris éventuels qui pourraient endommager les pièces internes. □ Turn off the water.
Pièces de rechange 4 5 1 2 6 7 16 8 3 9 17 10 18 11 19 Les étiquettes d’identité du robinet sont repérées en retirant la manette d’eau chaude.
Questions, problèmes, pièces manquantes? Avant de retourner au magasin, appelez le service à la clientèle Pegasus entre 8 h et 19 h, HNE, du lundi au vendredi au entre 9 h et 18 h, HNE, le samedi au 1-877-580-5682 WWW.HOMEDEPOT.COM/PEGASUS Conservez ce manuel pour référence future.