870/20002/3 06/17 BELLE PRO TROWEL GB Operators Manual 6 US Operators Manual 17 28 E Manuel De L'Opérateur Manual del Operador P Manual de Operação 50 NL Handleiding 61 DK Betjeningsvejledning 72 D Bedienungshandbuch 83 I Manuale Dell'Operatore 94 S 105 NO Bruksanvisning Betjene Håndbok SF Käyttöohje 127 PL Instrukcja Obsługi 138 RUS Рyкoвoдcтвo для oпepaтopa 149 EST Kasutusjuhend 160 LV Lietotāja rokasgrāmata 171 LT Naudojimo Instrukcija 182 BG 193 GR Oпepaт
EC DECLARATION OF CONFORMITY / DECLARATION CE DE CONFORMITE / DECLARACIÓN DE CONFORMIDAD CE / DECLARAÇÃO CE DE CONFORMIDADE / EG-VERKLARING VAN OVEREENSTEMMING / EF OVERENSSTEMMELSESERKLÆRING GB F E P We, Belle Group Sheen UK, Sheen, Nr.
EGKONFORMITÄTSERKLÄRUNG / DICHIARAZIONE CE DI CONFORMITÁ / EG-VERKLARING VAN OVEREENSTEMMING / EC SAMSVARSERKLÆRING / EY-YHDENMUKAISUUSILMOITUS / DEKLARACJA ZGODNOSCI Z PRZEPISAMI UE D I S NO SF PL Wir, Belle Group Sheen UK, Sheen, Nr.
ɋȿɊɌɂɎɂɄȺɌ ɋɈɈɌȼȿɌɋɌȼɂə / EÜ VASTAVUSDEKLARATSIOON / 3!(+23§! 2Ò #$*+ 1"() Ò Ò$2Ò 3(3(*3($2Ò#$*+ 1 "() / £©² ¤¢ ¤ ² ǻǻ ǺǽȀȌȇǽ ǿǸȈǸȀȀǽȀȄȈǽȈǸȇ RUS EST LV LT BG GR Ɇɵ, ɧɢɠɟɩɨɞɩɢɫɚɜɲɢɟɫɹ, ɨɬ ɢɦɟɧɢ Belle Group Sheen (ȼɟɥɢɤɨɛɪɢɬɚɧɢɹ), Sheen, Nr.
ES PROHLÁŠENÍ O SHODĊ / DECLARATIE DE CONFORMITATE CE / EU MEGFELELĖSÉGI NYILATKOZAT / EC UYUM B÷LD÷RGES÷ / EC IZJAVA O USKLAćENOSTI / PREHLÁSENIE O ZHODE CZ RO HUN HR TR SK My, Belle Group Sheen UK, Sheen, Nr.
G How To Use This Manual This manual has been written to help you operate and service the Pro Trowel safely. This manual is intended for dealers and operators of the Pro Trowel. Foreword The ‘Machine Description’ section helps you to familiarise yourself with the machine’s layout and controls. The ‘Environment’ section gives instructions on how to handle the recycling of discarded apparatus in an environmentally friendly way.
Technical Data Pro Trowel 900 Model Pro Trowel 1200 A - Width (mm) 975 1206 B - Height (mm) 1008 10089 C - Length (mm) 2021 2130 D - Storage Height (mm) 900 900 E - Storage Length (mm) 1363 1472 Engine Honda GX160 (Hp) 5.5 N/A Engine Robin EX17 (Hp) 6 N/A Engine Honda GX270 (Hp) 9 9 Engine Robin EX27 (Hp) 9 9 101 116.5 Troweling Area 065m2/900mm 1.02m2/1200mm Troweling Speed (Varies with HP) 65 - 131 RPM 65 - 131 RPM Weight (Kg) D C E Environment Safe Disposal.
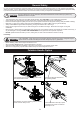
G Machine Description 1. Petrol Tank 2. Throttle Lever 3. Cutout Switch 4. Air Filter Housing 5. Exhaust Guard 6. Engine Oil Tank / Dipstick 7. Belt Guard 8. Engine Oil Drain Plug. 9. Edge Guard A 10. Engine ON / OFF Switch A 11. Recoil Starter 12. Choke Lever 13. Petrol ON / OFF Lever. 14. Pitch Control Lever. 15. Lifting Handle 16. Lifting Bar Health and Safety PPE (Personal Protective Equipment). Suitable PPE must be worn when using this equipment i.e.
G General Safety For your own personal protection and for the safety of those around you, please read and ensure you fully understand the following safety information. It is the responsibility of the operator to ensure that he/she fully understands how to operate this equipment safely. If you are unsure about the safe and correct use of the Pro Trowels, consult your supervisor or Altrad Belle. CAUTION • • • • • • • • Improper maintenance can be hazardous.
Assembly Instructions Handle Assembly 1. Secure handle in place using M12 x 90 (x1) and M12 x 75 (x1) bolts. (See Diagram 1) Tighten the bolts to a torque setting of 30Nm. 2. Screw the cable down to it’s maximum length so the bolt is at the bottom of the slot. (See diagram 2) 3. Fit the threaded end of the cable through the hole in the yoke arm boss. Secure in place using M8 washer and nut. (See diagram 3) Tighten the M8 nut until all play has been removed from the yoke arm. 2. 1. 3. 4.
Assembly Instructions Clutch Cable Assembly - Manual Clutch 1. Position the cable through the cable retainer (Check that the outer cable is fully engaged into the cable retainer), then fasten a cable tie to hold the outer cable in place.Ensure the cable is routed as Diagrams 1 & 2 show. Now ¿t the 75mm long spring onto the cable. (See diagram 3) 3 1 2 2. Fit the cable through the hole in the end of the Pivot Arm then screw the 5/16” UNF bolt in to the side of the engine (See diagram 4).
G Pre-start Checks Pre start-up inspection. The following Pre-start-up inspection must be performed before the start of each work session or after every four hours of use, whichever is ¿rst. Please refer to the service section for detailed guidance. If any fault is discovered, the Pro Trowel must not be used until the fault is recti¿ed. 1. 2. 3. 4. 5. Thoroughly inspect the Pro Trowel for signs of damage. Make sure that the belt guard is secure before using the machine.
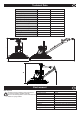
Operating Instructions B Using The Trowel Guiding the trowel on the slab is very simple. Get into operator’s position behind the centre of handle with good footing and apply the throttle slowly until desired speed is obtained. - Push handle down and machine will move to the right. - Lift handle up and machine will move to the left. - Slightly twist to the right and the machine will move forward. - Slightly twist to the left and the machine will move backward.
Operating Instructions Pro Trowel Manual Clutch Controls The controls shown below in Diagram 1. are use Engage and Disengage the Manual Clutch. Pro Trowel Throttle Control Lever The Throttle Lever shown below in Diagram 2. is used to control the Engine RPM and the Blade RPM. This can also be seen in Figure 2 of the Decal shown below. 1. 2.
Service and Maintenance MAINTENANCE The Altrad Belle Pro Trowels are designed to give many years of trouble free operation. It is, however, important that the simple regular maintenance listed in this section is carried out. It is recommended that an approved Altrad Belle dealer carries out all major maintenance and repairs. Always use genuine Altrad Belle replacement parts, the use of spurious parts may void your warranty. Before any maintenance is carried out on the machine, switch off the engine.
G Problem Engine will not start. Troubleshooting Guide Cause No fuel. Remedy Open fuel tap. Fill fuel tank . Switch engine on. Clean and reset plug gap. Close choke. Open choke, fully open throttle, pull recoil starter until engine Engine switched off. Spark plug fouled. Engine cold. Engine Àooded. ¿res. Cutout Switch in OFF position. Move Cutout Switch to ON position. Leaving Swirls in Concrete. Rolling Concrete. Bouncing.