BELLE 870/10006/3 09/17 RPC 60 GB US F E P NL DK D I • Spare Parts Book • Pièces Détachées • Libro Despiece • Lista de Peças • Onderdelen Boekje • Reservedele Skrift • Ersatzteilhandbuch • Manuale dei Ricambi • Bruksanvisning • Bruksanvisning • Varaosaluettelo • Lista Części Zamiennych • Запасные Части Книга • Varuosade Nimekiri • Rezerves Daļu Saraksts • Atsarginiu Daliu Sarašas • Част Списък • Část Barevný Pruh • Részek Oldalra Dől • Rezervni Djelovi Knjiga 154 S NO SF PL RUS EST LV LT BG CZ HUN HR
EC DECLARATION OF CONFORMITY / DECLARATION CE DE CONFORMITE / DECLARACIÓN DE CONFORMIDAD CE / DECLARAÇÃO CE DE CONFORMIDADE / EG-VERKLARING VAN OVEREENSTEMMING / EF OVERENSSTEMMELSESERKLÆRING GB F E P NL DK We, Belle Group Sheen UK, Sheen, Nr.
EGKONFORMITÄTSERKLÄRUNG / DICHIARAZIONE CE DI CONFORMITÁ / EG-VERKLARING VAN OVEREENSTEMMING / EC SAMSVARSERKLÆRING / EY-YHDENMUKAISUUSILMOITUS / DEKLARACJA ZGODNOSCI Z PRZEPISAMI UE D I S NO SF PL Wir, Belle Group Sheen UK, Sheen, Nr.
ɋȿɊɌɂɎɂɄȺɌ ɋɈɈɌȼȿɌɋɌȼɂə / EÜ VASTAVUSDEKLARATSIOON / ATBILSTĪBAS DEKLARĀCIJA / ES ATITIKTIES DEKLARACIJA / £©² ¤¢ ¤ ² ǻǻ ǺǽȀȌȇǽ ǿǸȈǸȀȀǽȀȄȈǽȈǸȇ RUS EST LV LT BG GR Ɇɵ ɧɢɠɟɩɨɞɩɢɫɚɜɲɢɟɫɹ ɨɬ ɢɦɟɧɢ %HOOH *URXS 6KHHQ ȼɟɥɢɤɨɛɪɢɬɚɧɢɹ 6KHHQ 1U %X[WRQ 'HUE\VKLUH 6.
(6 352+/Çá(1Ê 2 6+2'Ċ '(&/$5$7,( '( &21)250,7$7( &( (8 0(*)(/(/Ė6e*, 1<,/$7.2=$7 (& 8<80 %÷/'÷5*(6÷ (& ,=-$9$ 2 86./$ć(1267, 35(+/Ç6(1,( 2 =+2'( CZ RO HUN HR TR SK My, Belle Group Sheen UK, Sheen, Nr.
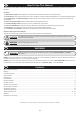
GB How To Use This Manual This manual has been written to help you operate and service the ‘RPC’ safely. This manual is intended for dealers and operators of the ‘RPC’. Foreword The ‘Machine Description’ section helps you to familiarise yourself with the machine’s layout and controls. The ‘Environment’ section gives instructions on how to handle the recycling of discarded apparatus in an environmentally friendly way.
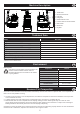
GB Machine Description 7 1 6 2 9 1. Throttle lever. 2. Recoil Starter Handle. 1322 5 4 8 3 3. Fuel Tank. 4. Lifting Point. 5. Handle Release Catch. 6. Forward / Reverse Control Handle. 7. Main Handle. 8. Belt Guard. 9.
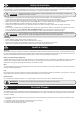
GB Safety Instructions For your own personal protection and for the safety of those around you, please read and ensure you fully understand the following safety information. It is the responsibility of the operator to ensure that he/she fully understands how to operate this equipment safely. If you are unsure about the safe and correct use of the ‘RPC’, consult your supervisor or Altrad Belle. CAUTION • • • • • • • • Improper maintenance can be hazardous.
Start And Stop Procedure GB Hatz Diesel Engine (Crank Handle) 1. If possible, disengage the engine from any driven equipment. The auxiliary equipment should always be placed in neutral. 2. Set speed control lever to a position between START and max. START, according to requirements, Selecting a lower engine will reduce speed when starting. 3. Make sure that the stop lever, if ¿tted, is in the operating position. 4. Turn decompression lever until stop is reached.
GB Operating Instructions • Take the compactor to where it is required. Where it is necessary to use lifting equipment to position the compactor, make sure the lifting equipment has a WLL (Working Load Limit) suitable for the compactors weight (see Technical Data section or the machine serial plate). Attach suitable chains or slings ONLY to the lifting point on the top of the compactor. • Having carried out the checks listed in the ‘Pre start’ section, you may start the engine.
GB Service & Maintenance The Altrad Belle ‘RPC’ range of Reversible Plate Compactors are designed to give many years of trouble free operation. It is, however, important that the simple regular maintenance listed in this section is carried out. It is recommended that an approved Altrad Belle dealer carries out all major maintenance and repairs. Always use genuine Altrad Belle replacement parts, the use of spurious parts may void your warranty.
GB Service & Maintenance Assembly of the Control Pump 1. Carefully clean the housing with compressed air on the inside. Check for scratches on sliding bores for O Rings and there are no sharp edges. 2. Press the Bushing in to Housing. 3. Lubricate the Lip Seal with Hydraulic Oil and slip it on the Rack (open side away from the rack). 4. Lubricate the Rack with Hydraulic Oil and slide it into the Housing until the Lip Seal is in the groove, making sure the teeth are in the right position.