
Technical data


9
Using the Ovens
Replacing light bulbs
There are 2 oven lights, 1 in each
cavity.
To replace an oven light bulb
WARNING - switch off the electricity
supply to the appliance at the socket,
to avoid the risk of electric shock.
Wait unti l the oven is cool, then
remove the oven shelves. The oven
light is at the rear of the oven cavity.
Unscrew the lens cover (turn anticlock-
wise). Unscrew the bulb and replace.
Replace lens cover.
Please note that the oven light bulb is
not covered by guarantee.
Using the top oven
The top oven can be used in the same
way as the main oven to cook a full
ran ge of dishes, h owever it is a
secondary oven and there are some
differences.
The top oven cavity is smaller in size
and therefore better suited to smaller
dishes and food portions. Please do
not over load the oven or use
cookware which is too large. Foods
which rise will get better resullts when
cooked in the main oven as will large
dishes and joints of meat.
Ignition top oven
Push in and turn the main oven control
knob anti clockwise to the ‘
FULL ON’
position (gas mark 9). The ignition
system will spark automatically. Push
in the control knob to ignite the gas.
The sparking will stop. If after 15
seconds, the burner has not lit, turn off
the oven and leave the compartment
door open. Wait at least one minute
before a further attempt to ignite the
burner.
Do not hold the control knob in for
more than 15 seconds.
Turn the control knob clockwise to the
required setting.
To turn off, return the control knob to
the “off” position.
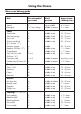
Zones of heat - top oven
Unlike the main oven, the temperature
at the top of the top oven corresponds
with the Gas mark selected, and it is
slightly cooler towards the bottom of
the oven.