Users Guide & Installation Handbook Belling Electric Range
Our Warranty Should you need it . . . . Inside the paperwork which has come with this appliance, there is a leaflet and card explaining the terms of our extended warranty and guarantee. In order to apply for a one year guarantee, simply fill in the details on the card and post it off, this will register your appliance. Should you wish to take out extended warranty, please fill in the details on the leaflet and post this off. Alternatively, you can register, and apply for extended warranty on line at: www.
Contents User’s Section . . . . . . . . . . . . . . . . . . . . . . . . . . . . . . . . . . . . . . . . . . . . . . . . . . . . . . Before Using Your Cooker. . . . . . . . . . . . . . . . . . . . . . . . . . . . . . . . . . . . . . . . . . . . . . About Your Cooker. . . . . . . . . . . . . . . . . . . . . . . . . . . . . . . . . . . . . . . . . . . . . . . . . . . Hob & Cooker Safety . . . . . . . . . . . . . . . . . . . . . . . . . . . . . . . . . . . . . . . . . . . . . . . . . Chip Pan Fires . . . . . .
Before Using Your Cooker ! i i ! i i ! Before using this appliance please make sure that you have removed all packaging and wrapping. Some of the furniture inside this appliance may have additional wrapping. It is also advised that you turn the ovens and/or grill on for a short while, this will burn off any residues left from manufacturing. There may be a smell which accompanies this process - but this is nothing to worry about and is harmless.
Hob & Cooker Safety Always ensure that pan bases are dry, and flat before ! using them on the hob. Always position pans over the centre of the element, and turn the handles to a safe position so they cannot be knocked or grabbed. Always use pans which are no smaller than 100mm (4”), or larger than 250mm (10”). Always take care when removing food from the oven as the area around the cavity may be hot.
Chip Pan Fires What causes a chip pan fire? Chip pan fires start when oil of fat overheats and catches fire, or when oil or fat spills on to the cooker because the pan has been filled too high. They can also start when wet chips are put into hot oil, making it bubble up and overflow. Preventing a chip pan fire Never fill the pan more than a third full with oil or fat. Never leave the pan alone with the heat on - even for a few seconds.
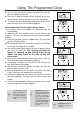
Using The Programmer/Clock Through your programmer you will be able to set the time of day, set the minute minder, and use the semi and fully automatic cooking functions. The programmer is vital to the working of your appliance, and reading this section will make sure that you get the most out of your ovens. What your timer symbols mean. Automatic symbol A The programmer buttons (push button timer) There are three buttons on this type of timer.
Using The Programmer/Clock Setting an alarm tone (Push button timer) Press and hold the minus button. Once the minus button is released, the tone is selected. You can change tone by repeatedly pressing the minus button (3 tones) Setting the minute minder (push button timer) To set the Minute Minder, press the centre button once. The bell symbol will appear and start flashing. The flashing will last for approx. 5 seconds so the time must be set within this time frame.
Using The Programmer/Clock Use the Plus and Minus buttons to select the time the oven is required to turn off. Once this is done the oven will turn itself off at the preselected time. To turn off the alarm press any button. To cancel the Semi Automatic programme at any time, press the plus and minus buttons together. A A Fully Automatic Cooking (push button timer) This function allows the cooker to switch on and off automatically It requires both the duration and the end time to be entered.
Using The Programmer/Clock The programmer Icons (touch control timer) There are three icons on this type of timer. The table below shows you what the symbols look like, depending on the model type, and their functions. Note - some functions require you to ‘touch and hold’ an icon for a few seconds, whilst others require you just to ‘touch’ the icon without holding it.
Setting the Programmer Setting the minute minder (touch control timer) To set the Minute Minder, touch and hold the centre icon. The bell symbol will appear and start flashing. Important - The flashing will last for approx. 5 seconds so any setting must be set within this time frame. Use the Plus and Minus icons to set the length of time required. Once this has been done, the Minute Minder is set. When the desired length of time has counted down the alarm will sound.
Setting the Programmer Fully Automatic Cooking (Touch Control timer) This function allows the cooker to switch on and off automatically It requires both the duration and the end time to be entered. The timer will work out the start time and begin cooking. Touch and hold the Function (centre) icon. The bell will flash and beep. Touch the function (centre) icon again. (This will skip past the Minute Minder).
Using Your Ceramic Hob About your hob Your hob may have halogen element (s) as well as the standard ceramic elements. In terms of care and use the procedure remains the same as with the other elements. The hot hob light The hot hob light will come on when one of the hotplates is switched on, or when it has begun to warm up. It will remain on for a short time after the last element has been switched off to serve as a reminder that the hob top may still be warm to the touch.
Using Your Ceramic Hob Notes for Ceramic / Halogen hobs: Warning: Do not stare at the halogen hob element while it is in use - doing so may temporarily impair your vision. Do not use the ceramic glass surface of the hob as a work surface or chopping board, this will cause damage to the glass. Do not use commercial simmering aids as they cause excess heat which can damage your hob top and cause a hazard.
Using Your Grill Before you start grilling. . . . Before you use the grill, make sure you have placed the grill shelf in the position you need as once the grill is on you may injure yourself if you try to move the shelf. Do not close the door while the grill is in use. Turn the selector control knob to the heat setting you require. To switch off, return the control knob to the ‘off’ position. The cooling fan will come on during use, and may continue to run for some time afterwards.
Using Your Main Oven The main oven may be controlled by the programmer (see The Programmer/Clock for details). The programmer, if fitted, must be set to manual before it can be used, or programmed. Switching on the fanned / conventional oven Use the main oven control to turn your oven on, and select your temperature. Your appliance may be fitted with a thermostat indicator light.
Oven & Grill Functions The chart below details all of the functions which are available. Your oven may not have all of the functions shown here. Main Oven Function Recommended Uses Base Heat Only Used to finish off the bases of food following cooking using the conventional or fanned modes. The base heat can be used to provide additional browning for pizzas, pies and quiche. Use this function towards the end of cooking.
Fanned Oven Guide Some adjustment will have to be made to conventional cooking temperatures. The table below shows conventional cooking temperatures, fanned temperatures and gas marks. For optimum results using the fanned oven setting, conventional temperatures need to be converted to the fanned oven temperatures. For example and item which would cook at 180˚C will now cook at the fanned oven temperature of 160˚C.
Cooking Guide Pre-heating To get the best results from your oven, we recommend pre-heating for around 5 to 15 minutes before placing your dishes in. This is especially important for items which are chilled, frozen, batter based, yeast based or whisked sponges. If you are using a fanned function, you should still preheat but for a shorter time. The items in the cooking guide below are based on a pre-heated oven, but can be adjusted to take into account personal taste.
Roasting Guide Roasting times depend on the weight, shape and texture of the meat and personal preference. In order to calculate the roasting time, weigh the meat or poultry, including the stuffing, and follow the times given below. Meat joints (including chicken) should be roasted at 180 - 200˚C Conventional/ 160 - 180˚C Fanned for 20 - 30 mins per 450g/1lb, plus 20 minutes on shelf position 2. Frozen meat must be thoroughly thawed before cooking.
Roasting Guide Roast turkey Roasting turkey perfectly involves cooking two different types of meat - the delicate light breast meat, which must not be allowed to dry out, and the darker leg meat, which takes longer to cook. The turkey must be roasted long enough for the legs to cook, so frequent basting is necessary. The breast meat can be covered once browned. Turkey should be roasted at 180 - 200˚C Conventional/ 160 - 180˚C Fanned for 20 - 30 mins per 450g/1lb, plus 20 minutes.
General Baking Guide Trouble-shooting - Fruit Cakes PROBLEM POSSIBLE CAUSE Fruit sinking to the bottom Low oven temperature which may cause the cake to take longer to set, allowing the fruit to sink. Or, too much liquid, or raising agent. The fruit may not have been properly washed and dried. Cake sinking / dipping in the centre Too much raising agent in the mixture. Too hot, or too cool an oven. Or, not enough liquid or insufficient creaming.
Cleaning Your Electric Hob Ceramic glass hobs (if fitted) The ceramic hotplates, and hob top can be cleaned using a clean, damp cloth or kitchen paper. Please ensure that the elements are cooled fully to avoid steam burns. You can use a specialist ceramic cleaner to restore the surface, but use sparingly to avoid coating the hob top too thickly, too much cream cleaner will lead to discolouration. Use a dry, clean cloth to polish the surface.
Cleaning your Cavities Cleaning the oven cavities Some foods can cause fat to spit, especially if you have open roasted, this leaves the inside of the cavity greasy. It is important to clean the oven cavity as a build up of fat can damage the appliance and may invalidate your guarantee. ! Chrome plated parts. Use a moist soap filled pad, or place in a dishwasher. Shelf runners can be removed to enable you to clean then thoroughly.
Cleaning your Appliance Painted & Plastic parts Only use a clean cloth wrung out in hot soapy water. Do not use abrasive cleaners, such as “Cif”, wire or nylon cleaning pads on these parts. Stainless steel & Aluminium surfaces Only use a clean cloth wrung out in hot soapy water, and dry with a soft cloth. Stubborn marks can be removed using a stainless steel cleaner. Supplies can be purchased from the Customer Care Centre.
Cook Shop Product description Product code Quantity Where used Rectangular carbon filters 082612620 2 Hoods Round carbon filters 082611571 1 Hoods Ceramic hob scraper kit 082606781 1 All ceramic glass hobs including induction.
Before you call. . Problem? There’s condensation on the doors. Advice Condensation is caused by hot, moist air meeting a cooler surface (i.e. the oven door). You cannot always prevent it, but you can minimise it when it happens by doing the following: Pre-heat the oven at a high temperature before putting food in the oven, and cover the food you are cooking wherever possible. Whenever you can, cook wet foods at higher temperatures. Don’t leave food in the oven to cool down.
Changing Light Bulbs Warning: There is a risk of electric shock, so always make sure you have turned off and unplugged your appliance. Not all appliances have the same number and type of bulbs. Before replacing your bulb, open the top/main oven door and see which type you have. Then use the table to help you change your bulb correctly. Please remember that bulbs are not covered by your warranty. Bulbs can be purchased from hardware stores (always take the old bulb with you). No.
Installing Your Cooker Always make sure that your appliance is fitted correctly, by a competent electrician. This is a type X appliance regarding installation requirements, and must be earthed. Before you start Always make sure that you have carefully read through the installation pages of this book - careful planning at the beginning will ensure a quick and easy installation.
Installing Your Cooker Clearances This cooker may be fitted flush to the base units of your kitchen. No shelf, overhang, cupboard, or cooker hood should be less than 650mm above the hob top, but please check this with the hood manufacturers instructions. If your appliance has a side opening door, we recommend a side clearance of 60mm to allow the oven door to fully open. The cooker must have a side clearance above hob level of 90mm up to a height of 400mm.
Installing Your Cooker Fitting the plinth (if applicable) If your appliance has a storage drawer at the bottom, you access the required holes through the base of the drawer after lifting the mat. Open the appliance doors, and loosen screw A located on bracket (2). Do not remove this screw entirely. Insert screw B, through slot (3) and screw into the small hole at the bottom of bracket (2). Make sure that the plinth cover is flush to the appliance, but not over tightened.
Installing Your Cooker Connecting the electricity supply - Terminal Block type A Warning: This appliance must be earthed! Access to the mains terminal is gained by opening the terminal block cover at the rear of the appliance - use a flat bladed screw driver for this. Equipment you will need: Flat bladed screw driver Connection between the consumer unit (45A MCB/Fuse) and the cooker control unit should be made with 10mm2 cable.
Installing Your Cooker Connecting the electricity supply - Terminal Block type B This appliance must be fitted using a double pole unit of 45 ampere minimum capacity with 3mm minimum contact at all poles. Access to the mains terminal is gained by removing the terminal block cover at the rear of the appliance. Connection should be made with a 10.0mm2 twin and earth cable. First strip the wires then push the cable through the cable clamp.
Technical Data - Notes Fuel Type Ceramic electric Hotplate Burner / Element Hob Hob Hob Hob Hob Fuel Type Electric @ 240V - Small Medium Large Warming zone Dual zone: Single Dual kW Rating 1.2kW 1.5kW 1.8kW 0.1kW 0.7kW 2.2kW Fanned oven Dual Variable grill (90/100size) Dual Variable grill (110 size) 2.1kW 2.0kW 1.7 - 2.5kW 1.8 - 2.7kW 1.7 - 2.6kW 1.8 - 2.8kW Oven lamps Single Variable grill (90 size) 25W each 1.
Service Record Please record your model number and serial number in the space below. Where are my model and serial numbers? Freestanding HL appliances: Freestanding appliances: Built in oven: Hobs: base of storage drawer front frame near oven cavity front frame near oven cavity base plate of the hob Having these numbers to hand will help us to help you, quickly and more efficiently. When contacting us, please use the Customer Care number on the back cover of this handbook.
Contact Us Should you need to get in touch with us (UK and Northern Ireland only), please call Belling Customer Care Centre Helpline on: 0844 815 3746 For customers outside the UK and Northern Ireland, please contact your local supplier. Glen Dimplex Home Appliances Limited is the owner of the Belling brand and is part of the Glen Dimplex group of companies. 08 2749901 © 11.2010 Electric Range Model Names: Country classic 100E, Classic 90E, 100E, 110E, DB4 90E.