
User guide
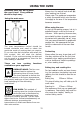
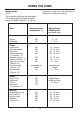

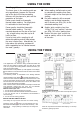
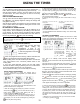
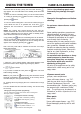
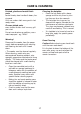

Table Of Contents

ALARM VOLUME SETTING
You can select the 3-level volume of your oven by pressing the
button. Alarm volume is changed with every push on the key.
Note: By factory default, volume is set to the highest. In the event
of power failure, the volume setting will be reset to the factory
default, if changed.
DISPLAY BRIGHTNESS SETTING
You can select the 3-level display brightness setting by pressing
the
button. The display brightness setting will change with
every push on the key.
Note: By factory default, the brightness is set to the highest. In the
event of power failure, the brightness setting will be reset to the
factory default, if changed.
IN THE EVENT OF POWER FAILURE
In the event of power failure your oven will be switched off for
safety reasons. This is indicated by the flashing of the hand icon
on the display. All current cooking programmes will be deleted.
Display shows 12:00 and the clock should be set. First switch on
the oven by pressing the
button (see Clock setting).
THE FLASHING HAND ICON INDICATES THAT THE OVEN IS SWITCHED OFF
AND THAT YOU NEED TO PRESS THE
BUTTON TO SWITCH TO THE
NORMAL POSITION.
COOKING WITHOUT A PROGRAM (MANUAL)
It means that you start and finish
cooking without making any
programming. If there is any
programme in the memory you need
to reset the programme. Press the
button to reset.
1. If there is a programme in the memory, it will be reset when the
button is pressed and manual cooking will be started.
2. After putting in the oven the food that you want to cook set the
oven control button to the concerned position shown in the
cooking table.
3. Your oven works manually. Check your food with certain
intervals and finish cooking by switching the oven control button
to off (zero) position (since there is no programme).
Now you finished cooking. Your food is ready for servicing.
SEMI AUTOMATIC PROGRAMMING
It is the instant start of cooking and stopping after a
predetermined period. In this programme, you need to enter the
cooking time.
1) The time is 18:30 2) Switch to the cooking 3) Enter the time length.
time setting mode by + or - keys.
1. Switch the oven selector switch and thermostat button to the
positions indicated on the cooking table.
2. Enter the cooking time by pressing the (+) button in 5 seconds
after pressing the
button. You can reduce the time by the (-)
button. During setting
icon starts flashing and after 5
seconds the display is fixed showing the time.
3. As an example you can enter the desired period as 2 hours 15
minutes. Cooking starts. After 5 seconds clock setting will appear
on the display. You can view the remaining time by pressing the
button any time during cooking.
4. After entering this value the clock will switch off the power and
the alarm will beep. HAND icon will start flashing. You can silence
the alarm beep by pressing any button. Current time of the day,
sign and a flashing sign will appear on the display.
If you wish to restart the oven press the
button and then the
oven will start working manually.
6. Cooking will end by bringing the oven control button to off (0)
position.
The display to be shown when the
cooking starts
The display to be shown when the
cooking finishes
When the cooking programme is completed, audible warning is on and will remain
on for 7 minutes if not switched off before.
You have finished the semi automatic cooking. Your food is ready
for servicing.
AUTOMATIC PROGRAMMING
With this programme, cooking duration and the time to finish
cooking are programmed beforehand. Current time of the day
must be set before starting programming.
1) The time is 18:30 2) You want the food
to be ready at 20:45.
You can set the finish
time by pressing the
and buttons.
3) You can set the
cooking time by
pressing the and
buttons. Let’s
enter the cooking time
as 1:00 hour.
Your oven is in standby mode and the display shows
as the current time of the day and standby signs. The
oven will not work. It starts working at 19:45 and the
icon is
displayed with the current time. The oven works for 1:00 hour and
stops at 20:45. The
sign appears with the end hour.
1. Prepare the food that you want to cook and put it in the oven.
Bring the oven selector switch and the thermostat button to the
position shown in the cooking table.
2. Press the
button. Enter the end time of cooking by pressing
the
button In 5 seconds. Let’s enter the end time as 20:45.
While entering the time, auto
sign and the flashing sign
appear with the time. After 5 seconds
sign and the word
“auto” appear on the display. The oven is in operation.
3. Enter the cooking time by pressing first the
button and then
the (-) button. The display is automatically set for 2:15 hours
cooking time. Let’s say that we want to set the cooking time as
1:00 hour. We can change the time as 1:00 instead of 2:15 hours
by pressing the (-) button. In 5 seconds after making the setting,
the current time of the day (18:30), the word “auto” and the
sign appear. The oven will switch to the standby mode and it will
not work.
4. When the oven is in standby mode, you can view the end time
of cooking by pressing the
USING THE TIMER
15