Modelo: BS-11060 Radio CD, AM/FM ST, Panel frontal Extraíble MANUAL DE INSTRUCCIONES 022444 240403
PRECAUCIONES Y CUIDADOS • Este aparato está diseñado para funcionar sólo con masa negativa de 12V. El aparato se podrá usar con toda seguridad, cuando el terminal negativo de la batería esté conectado a una parte metálica del chasis del vehículo. • No use altavoces con impedancia menor a 4 ohm. , y no deje que los cables de los altavoces se junten cuando el aparato esté conectado, pues ello causaría un cortocircuito. • Debido a que es una unidad de alta potencia.
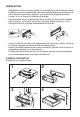
INSTALACION - Asegúrese de retirar el panel frontal de la unidad antes de instalar la misma. - Extraiga el marco embellecedor, haciendo ligera presión hacia arriba en su parte superior izquierda y derecha, y tirando hacia adelante al mismo tiempo, a fin de liberar los tetones de anclaje. - Introduzca las llaves de extracción de la unidad, en las ranuras situadas bajo el marco, en la parte izquierda y derecha, hasta percibir un “clic”. - Extraiga la faja de montaje deslizándola hacia atrás.
INSTRUCCIONES PARA EXTRAER Y FIJAR EL PANEL FRONTAL El panel frontal de esta unidad puede ser extraído para prevenir a la unidad de robos. Antes de extraer el panel de mandos, asegúrese apagar la unidad mediante el botón “POWER”. 1 Pulse el botón de “RELEASE”. Panel frontal REL extracción 2 Tire del panel hacia Usted, tomándolo por la zona IZQUIERDA y levantando ligeramente para salvar el resalte que evita la caída del mismo. Asegúrese de no dejar caer el panel cuando esté retirándolo de la unidad.
Precauciones en el manejo del Panel de Mandos: • No use una fuerza innecesaria para extraer el panel. • No intente insertar primero la parte izquierda, ya que pueden partirse los anclajes. Si realiza esta operación, pulse primero el botón EJECT antes de recolocar el panel en posición adecuada. • No deje el panel sobre el asiento ó el salpicadero, para evitar que el sol lo caliente en exceso. Evite cualquier otra fuente de calor • No limpie el panel con disolventes.
Localización de controles 4 22 14 10 3 5 16 19 20 21 8 12 17 13 9 7 6 18 23 15 1 2 11 24 CONTROLES Y FUNCIONES BASICOS 1. 2. 3. 4. 5. 6. 7. 8. 9. 10. 11. 12.
FUNCIONAMIENTO EN RADIO 1. Control de Encendido / Apagado (PWR) Presionando este control la unidad es encendida ó apagada. NOTA: Al insertar un disco la unidad se enciende automáticamente. 2. Apertura de panel (REL) Presione este botón para extraer el panel de mandos. Ver apartado de INSTRUCCIONES PARA EXTRAER Y FIJAR EL PANEL FRONTAL. 3. Selector de audio (SEL) : Volumen, Graves, Agudos, Balance, Fader. Presione este botón para seleccionar el modo deseado, VOL (volumen), BAL (balance) , FAD (fader).
Puesta en hora del reloj: Presione el selector (DSP) y vuelva a pulsarlo de nuevo manteniendo la pulsación durante 3 segundos, hasta que el display parpadea. Presione el control de VOL + para el ajuste de HORAS Presione el control de VOL - para el ajuste de los MINUTOS. Presione de nuevo este control para retornar al modo normal. 10. Selector de Bandas (BND) Pulse este control para seleccionar la banda deseada. EL DISPLAY mostrará la banda actual (FM / AM) y la frecuencia de la emisora actual. 11.
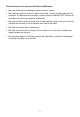
provocará un “Reset” de la unidad. Realice esta operación cuando detecte que la unidad tiene un mal funcionamiento. Aunque no es una circunstancia normal, el micro-procesador el cual controla el funcionamiento de esta unidad, (semejante a los ordenadores) puede ser afectado por descargas electrostáticas.
DIAGRAMA DE CABLEADO 8 6 4 2 7 5 3 1 8 6 4 2 7 5 3 1 A ALIMENTACION B ALTAVOCES ¡ IMPORTANTE ! No unir cables de positivo ni de negativo de altavoces entre sí, ni a masa. CONECTOR ( A ) DE ALIMENTACION 1. 2. 3. 4. ROJO 5. 6. 7. AMARILLO 8. NEGRO : +12V (CONTACTO) : +12V PERMANENTE (MEMORIAS) : MASA (NEGATIVO) CONECTOR “ B ” ALTAVOCES 1. 2. 3. 4. 5. 6. 7. 7.
ESPECIFICACIONES TÉCNICAS SECCIÓN AM Rango de Frecuencia Frecuencia intermedia Sensibilidad Util : 522-1620 KHz : 450 Khz : 38 dBu (S/N =20dB) SECCIÓN FM Rango de Frecuencia Frecuencia intermedia Sensibilidad Útil Separación estéreo : : : : 87.
88-P1090-xx