
User guide


4
4. Do not locate the PuraGuard QC
™
filter near heat
producing components such as the vehicle exhaust and
provide adequate clearance from moving components
e.g. drive shaft, suspension, pitman arm, etc.
5. Locate the PuraGuard QC
™
filter on the vehicle so that
a minimum of 12 inches of clearance is available
horizontally (90° minimum arc) to allow servicing. This
will permit a strap wrench to be used when replacing
the filter.
6. Be sure that there is sufficient room to attach hoses to
the PuraGuard QC
™
filter.
7. To permit draining of collected contaminants, at least a
6 inch clearance below the filter is recommended.
Nominal clearance above is required.
8. The PuraGuard QC
™
oil coalescing filter must be
installed after a properly functioning air dryer. Failure
to locate the filter after an air dryer can cause the filter
to malfunction. An air dryer eliminates certain conditions
in the discharge line that could compromise the design
of the filter.
9. Do not mount the unit in the engine compartment.
MOUNTING THE PURAGUARD QC
™
OIL
COALESCING FILTER
1. After positioning the PuraGuard QC
™
oil coalescing filter
according to the installation requirements, mark the
position of the mounting holes on the frame rail. Note:
Check the vehicle manual before drilling a frame
member.
2. Use vehicle manufacturer guidelines for mounting
hardware (use at least grade 5 hardware). Torque to
160-200 in-lbs.
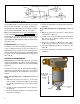
CONNECTING THE AIR HOSES
1. The PuraGuard QC
™
filter supply and delivery ports are
1/2-14 NPT. Install minimum 1/2 inch inside diameter
air hoses. Install fittings prior to mounting the filter.
2. Hoses must be installed without tight turns that might
cause air flow restrictions. Note: Check that the hose
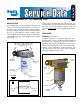
attachment agrees with the air flow arrow symbol (see
Figure 1).
OPERATIONAL TEST
Build the air system to governor cutout. Shut off the engine.
Using a soap solution, check all hoses and fittings leading
to and from the filter for leakage and integrity. Repair any
excessive leaks - exceeding a 1 inch bubble in 5 seconds
- before restoring vehicle to service.
MAINTENANCE KIT INSTALLATION
KIT DESCRIPTION
A kit is available for cartridge replacement.
VEHICLE PREPARATION
1. Park the vehicle on a level surface and prevent movement
by means other than the brakes.
2. Drain all reservoirs to 0 p.s.i.
3. Drain the contents of the sump into a suitable container
for disposal and then close the drain valve.
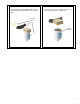
DISASSEMBLY AND CLEANING
1. Using a strap wrench, unscrew the cartridge.
2. Remove and discard the cartridge.
INSPECTION
1. Inspect the PuraGuard QC
™
oil coalescing filter for
broken or missing parts. Replace as necessary.
2. Inspect the drain valve for any build-up that could impair
its function. Clean as necessary.
3. Inspect the housing during filter replacement. Replace
the PuraGuard QC
™
oil coalescing filter if the body is
becoming clogged with carbon or dirt, clean the supply
and delivery ports if necessary.
ASSEMBLY
1. Tighten the replacement cartridge by turning the cartridge
180° after the cartridge seal touches the aluminum body.
Tighten with a strap wrench, do not tighten by turning
the drain valve.
OPERATIONAL TEST
Build the air system to governor cutout. Shut off the engine.
Using a soap solution, check all hoses and fittings leading
to and from the PuraGuard QC
™
filter for leakage and
integrity. Repair any excessive leaks - exceeding a 1 inch
bubble in 5 seconds - before restoring vehicle to service.