
Manual

6
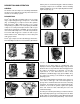
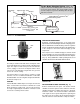
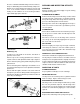
FIGURE 14 - POLYURETHANE SPONGE STRAINER
FIGURE 15 - DRY ELEMENT- PLEATED PAPER AIR
STRAINER
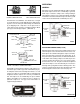
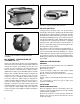
FIGURE 16 - COMPRESSOR INTAKE ADAPTER
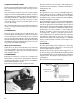
DRY ELEMENT - PLEATED PAPER AIR
STRAINER (FIG. 15)
Remove the spring clips from either side of mounting baffle
and remove the cover. Replace the pleated paper filter and
remount the cleaned cover making sure the filter is in
position. Be sure to replace the air strainer gasket if the
entire air strainer is removed from the compressor intake.
(NOTE: Some compressors are fitted with compressor intake
adapters (Fig. 16) which allow the compressor intake to be
connected to the engine air cleaner.) In this case, the
compressor receives a supply of clean air from the engine
air cleaner. When the engine air filter is changed, the
compressor intake adapter should be checked. If it is loose,
remove the intake adapter, clean the strainer plate, if
applicable, and replace the intake adapter gasket, and
reinstall the adapter securely. Check line connections both
at the compressor intake adapter and at the engine air
cleaner. Inspect the connecting line for ruptures and replace
it if necessary.
AIR LEAKAGE TESTS
Leakage past the discharge valves can be detected by
removing the discharge line, applying shop air back through
the discharge port and listening for escaping air. Also the
discharge valves and the unloader pistons can be checked
for leakage by building up the air system until the governor
cuts out, then stopping the engine. With the engine stopped,
carefully listen for escaping air at the intake. To pinpoint
leakage if noted, squirt oil around the unloader pistons. If
there is no noticeable leakage at the unloader pistons, the
discharge valves may be leaking.
If the compressor does not function as described above, or
leakage is excessive, it is recommended that it be returned
to the nearest Bendix authorized distributor for a factory
rebuilt compressor under the repair exchange plan. If this is
not possible, the compressor can be repaired with genuine
Bendix parts, in which case the following information should
prove helpful.
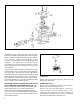
REMOVING AND INSTALLING
REMOVING
These instructions are general and in some cases additional
precautions must be taken.
Drain air brake system.
If water-cooled type compressor, drain engine cooling
system, compressor cylinder head and block.
Disconnect all air lines, water and oil lines to and from
compressor.
Remove compressor mounting bolts and compressor from
engine.
Use a gear-puller to remove the gear or pulley from
compressor crankshaft.
INSTALLATION
ENGINE-LUBRICATED TYPES
Clean oil supply line. Before connecting this line to the
compressor, run the engine briefly to be sure oil is flowing
freely through the supply line.
Clean the oil return line or return passages through the
brackets; these passages must be unrestricted so oil can
return to the engine.