
User's Manual


6
PREVENTIVE MAINTENANCE
GENERAL
Perform the tests and inspections presented at the
prescribed intervals. If the modulator fails to function as
described, or leakage is excessive, it should be replaced
with a new Bendix unit, available at any authorized parts
outlet.
EVERY MONTH, 10,000 MILES OR 350
OPERATING HOURS
1. Remove any accumulated contaminates and visually
inspect the exterior for excessive corrosion and physical
damage.
2. Inspect all air lines and wire harnesses connected to
the modulator for signs of wear or physical damage.
Replace as necessary.
3. Test air line fittings for leakage and tighten or replace as
necessary.
4. Perform the ROUTINE OPERATION AND LEAKAGE
TESTING described in this manual.
OPERATION & LEAKAGE TESTS
LEAKAGE TEST
1. Park the vehicle on a level surface and block or chock
the wheels. Release the parking brakes and build the
air system to full pressure.
2. Turn the engine OFF and make 4 or 5 brake applications
and note that the service brakes apply and release
promptly.
3. Build system pressure to governor cut-out and turn the
engine OFF.
4. After determining the pressure loss with the brakes
released (2 PSI/minute allowed), make and hold a full
service brake application. Allow the pressure to stabilize
for one minute.
5. Begin timing pressure loss for two minutes while watch-
ing the dash gauges for a pressure drop. The leakage
rate for the service reservoirs should not exceed 3 PSI/
minute.
6. If either circuit exceeds the recommended two PSI/
minute, apply soap solution to the exhaust port of the
modulator and any other components in the respective
circuit.
7. The leakage at the exhaust port of most Bendix compo-
nents, including M-32
™
modulators, should not exceed
a one-inch bubble in three seconds. If leakage at the
modulator is determined to exceed the maximum
limits, replace the modulator.
OPERATION TEST
To properly test the function of the modulator will require two
(2) service technicians.
1. Park the vehicle on a level surface and block or chock
the wheels. Release the parking brakes and build the
air system to governor cut out.
2. Turn the engine ignition key to the OFF position then
make and hold a full brake application.
3. With the brake application held and one (1) service
technician posted at one (1) of the modulators, turn the
vehicle ignition key to the ON position. ONE OR TWO
SHORT bursts of air pressure should be noted at the
modulator exhaust. Repeat the test for each modulator
on the vehicle. If at least a single burst of exhaust is not
noted or the exhaust of air is prolonged and not
short,
sharp and well defined, perform the Electrical Tests.
ELECTRICAL TESTS
1. Before testing the solenoid assembly of a suspect
modulator, its location on the vehicle should be confirmed
using the Trouble Shooting or Start Up procedure for the
specific antilock controller in use. (See the Service Data
Sheet for the antilock controller for this procedure.)
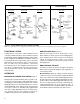
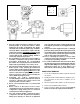
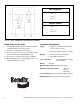
2. Proceed to the modulator in question and inspect its
wiring connector. Disconnect the connector and test the
resistance between the pins ON THE MODULATOR.
Refer to Figures 10 and 11.
A. HOLD TO SOURCE (41-42): Read 4.9 to 5.5 Ohms.
B. EXHAUST TO SOURCE (43-41): Read 4.9 to 5.5 Ohms.
C. EXHAUST TO HOLD (43-42): Read 9.8 to 11.0 Ohms.
D. Individually test the resistance of each pin to vehicle
ground and note there is NO CONTINUITY.
If the resistance readings are as shown, the wire harness
leading to the modulator may require repair or
replacement. Before attempting repair or replacement
of the wire harness, refer to the test procedures specified
for the antilock controller in use for possible further testing
that may be required to substantiate the wire harness
problem. If the resistance values are NOT AS STATED,
replace the modulator.
WARNING! PLEASE READ AND FOLLOW
THESE INSTRUCTIONS TO AVOID
PERSONAL INJURY OR DEATH:
When working on or around a vehicle, the following
general precautions should be observed at all times.
1. Park the vehicle on a level surface, apply the
parking brakes, and always block the wheels.
Always wear safety glasses.