name. 5. You can now perform the following tasks: a. Press (Option) to select whether to edit or delete the memo, or send this memo to others through SMS. b. Press to view the information in the memo. Then press (Option) to edit or delete the memo c. Press (Back) to return to the Calendar screen. You can move the red box to other dates to create additional memos (dates that already contain memos will be marked by a yellow box); you can also create a second memo for the same date.
completed, you can scroll to the item and then press to mark it to remind yourself that the task has been done. If you press (Option), you can activate the Auto Delete, which will automatically clear any to do items that you have marked as completed. Note You can use this feature to create a list of notes. (Option) and select Add to bring up the editor screen. 1. Press Enter the desired text and press . 2. A message on the screen will ask whether you wish to add a password for this note.
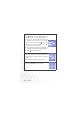
Alarm Clock If you activate the Alarm Clock feature, when the specified date and / time arrive, the phone will sound the alarm, even if your phone is turned off. Use the following steps to set an alarm: 1. Select an alarm you wish to set and activate. 2. Press to select the feature for activation. The configuration fields for the alarm will appear in the lower part of the screen. Day Used to set the alarm to go off on a particular day from Monday to Sunday. Press (Edit) to display the days of the week.
Time Duration Allows you to set the length of the alarm. Press desired alarm duration and then press (Edit) to select the . 3. Lastly, you must press to save all your current Alarm Clock settings. After completing Alarm Clock settings, will appear in the external display's status bar; status bar. will appear in the main display's When the alarm rings, there are two ways to turn it off: / • Press (Snooze) to stop the alarm. The alarm will ring again five minutes later. • Press to turn off the alarm.
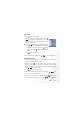
Calculator Allows you to use the phone as a calculator. Use to perform the mathematical operations shown on the screen. 8 You can enter numbers up Entered numbers and calculation results will appear in this field. Press to enter a decimal point. to a maximum of 8 digits in length.
2. Used to set the exchange rate. Press (Option) and select Rate Setting, then enter the rate for converting from Currency 1 to Currency 2. The conversion calculation result will be displayed in the same line as the bottom currency on the screen. Use the to view the calculation result. The calculation can provide precision up to two decimal places. 8 The exchange rate field can accommodate a maximum of five digits (including decimal digits). 8 Press to enter a decimal point. 3.
Stopwatch 1. Press to start the stopwatch. 2. While the stopwatch is running, you can press (Split) to save up four elapsed times (such as in a race). The display will show the saved times in the lower part of the screen. 8 Pressing (Back) while the stopwatch is running will bring up the "Quit?" warning message (the stopwatch will continue to run). Press stop the stopwatch or screen. 3. Press (Yes) to (No) to return to the timer to halt the stopwatch. 4.
timer will stop and return to the timer screen. If you press (No), you will exit the countdown timer screen, but the countdown timer will continue the countdown. You can then perform other tasks, and when the countdown is finished, the "Time's Up" message will appear and an alert sound will be played. Press (Exit) to exit the screen. Memory Status Shows the amount of memory, including space for storing pictures, animations, and ring tones on the phone.
Games Your phone provides a number of exciting games that you can use to entertain yourself when you have a spare moment. Champion Soccer This game lets you manage one of the world's top eight soccer teams in its quest to win the greatest prize in world soccer. 1. After choosing this option, select Start to enter the game's opening screen. Press START to begin a new round of play. and select 2. Select World Cup Mode or Arcade Mode.
3. In the World Cup Mode, you can select your own team with the opposing team selected at random by the phone. If your team wins, you face the next team as you make a challenge for the World Cup title. In the Arcade Mode, you can select your own team and the opposing team to play a single game. Press to select a flag representing a national team, and then press to confirm. 4. After the message announcing the first half appears, press 114 Menus to begin the game.
Game Controls •Controls the direction of the player's movement. •When attacking, use •When on defense, use these three keys to select which player to pass the ball to. these three keys to select players to move. •Controls the direction of the player's movement. •When attacking, •When on defense, press to take a shot on goal. press to tackle. During the game, you need to control your three players on the pitch, while your goalkeeper is controlled by the phone.
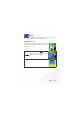
Game screen The opposing team The opposing team's score Your team Your score The number of the player you are controlling. Timer Full pitch view White point: The position of the player you are controlling Black point: The ball's location Blue points: Your teammates Red points: Players on the opposing team. Game options • START: Begins a new game. • Continue: Resumes an interrupted game. Usable only in the World Cup Mode. • Controls: Brings up an explanation of how to use keys during a game.
• Exit: Quits this game.
Dragon Fight The flying dragon that you control must make incursions into hostile territory and destroy enemies. Select Start to enter the game's opening screen, and then press to begin play. The more enemies you destroy, the higher your score. If you collide into an enemy, you lose one flying dragon.
Internet Your phone includes a built-in WAP browser, allowing you to use the phone for mobile Internet connectivity. You can browse the online services offered by the network operator or ISP, such as information on financial news, sports, travel, and entertainment. To use the phone to get online, necessary WAP and GPRS settings must be made in this menu.
Start Browser Starts up the browser and connects to the homepage. Browsing a webpage Referring to the soft key commands at the bottom of the screen, press and to perform needed tasks while browsing a webpage. Press to scroll up or down a webpage. For details on browsing a webpage, inquire with the network operator providing WAP services. Your Internet connectivity service will determine the layout and content of the webpages you view.
Home Returns to the home page. To designate a particular page to be your home page, go to 9 Settings → 1 Homepage. Exit Closes the browser and returns you to the main menu screen. Inbox When your phone receives a message that can only be viewed using a WAP browser, you enter this WAP inbox to read the message. Bookmarks You can open the Bookmarks menu and select webpage bookmarks. View Allows you to see the current bookmarks and bookmarks folders.
Move to Folder: Moves a bookmark to the designated folder. Delete All: Deletes all bookmarks and book-marks folders. Hotkeys: Allows you set a numerical key as a hotkey for a bookmark. After completing the setting, you can press this numerical key to directly link to the webpage represented by the bookmark. Mark Site Adds the current webpage to your bookmarks list.
Homepage Designates a homepage. When you start up the WAP browser or if you select Home from the browser's menu, the screen will display the homepage you designate. a. Press (Edit) and then enter the URL of the webpage that you wish to use as your homepage. (Some WAP service providers do not allow users to set a homepage.) b. Select the Save option to designate the URL you entered as your homepage. Select Use Default to use the homepage designated by your WAP service provider.
Set Proxy Your phone can save the settings for six WAP proxy servers. You can select one of these proxy settings for use as a default so that your phone will connect to that proxy server when you begin an Internet session. You can also go to the menu Internet → Wap Service → Wap Settings to select the server that you wish to activate. See page 126. Circuit Prompt The Circuit Prompt is a message displayed before each circuit data call is made. It reads, "Circuit is down.
Authentication You can decide whether your phone should store your user name and passwords for websites that require them. If you allow your phone to authenticate you automatically, you will not need to re-enter your user name and password each time you visit the same website. Advanced Restart Browser Restarts the browser, and automatically returns to the designated homepage.
WAP Message Starts up the browser and displays the WAP inbox so you can read WAP messages. Enter Address Starts up the browser and connects to the URL you enter. Resume Returns to the last webpage you viewed. Clear Cache Clears webpage content that the browser temporarily stores in memory. WAP Settings In this menu, you can make settings for the WAP servers of six different network operators, and select the server that you would like to use when connecting to the Internet.
By scrolling to a particular group of WAP server settings that you wish to modify, and then pressing (Option), you can create a new group of settings, edit the settings, or delete the settings. WAP server settings include the fields listed below. Press (Edit) to edit the setting in each field. When you are finished with the settings for all fields, you must press in order for this group of WAP server settings to be saved. • Profile Name: Gives the WAP server settings a name.
CSD/GPRS: Use the dialup network preferentially. Only if there is no dialup network will the GPRS network be used. CSD: Use only the dialup network. A dialup network is a GSM Circuit Switch Data Service (CSD / for short). Using a dialup network can be likened to using a home computer's modem, in that before connecting to the Internet a number must be dialed. As for GPRS, it like the LANs used at company, where users do not need to dial a number to access the network.
Line Type: This is the type of dialup connection. Press to select. Baud Rate: The default value is 9600, which is the standard speed for data connections with a GSM mobile phone. Auth Type: This is information needed for telecommunications protocol authentication.
JAVA Your phone provides Java support, allowing you to download and install Java applications that you like, such as various Java games, from sites provided by your network operator. You can then run these Java applications directly on your phone. If you do not need an application, you can remove it from your phone at any time, replacing it with another downloaded application. The JAVA menu contains the following items: Application Browser All Java applications will be listed in this menu.
• Network Access: Some types of Java games are only playable online (for example, mahjong), and using the phone to go online entails an extra cost. However, it may not be possible to determine from a game's name alone whether or not it is an online game. Therefore, this setting allows you to be presented a prompt asking if you wish to go online to play a game before actually running the program.
Application Browser and terminate the Internet connection. After installation is complete, you can enter a new URL to download a Java application from another site. 3. In addition, you can also use the WAP browser to download Java applications. The browser screen will first display information about the applications. After you have read this information, you can run the download command shown on the screen to begin downloading the desired application to the MyApps group on the phone.
Move: Removes the Java application from the MyApps group and places it in another group in the Applications Browser. Scroll to the group where you wish to move the application and then press . 8 To move a Java application to a group other than MyApps when it is currently the only group, you must press (Option) in the JAVA → Applications Browser menu and select New to create a new group. • Press to show the names of the executable files of the applications.
Multimedia Picture This image library stores the phone's default pictures, as well as images received in EMS messages, or downloaded through WAP services or using multimedia communications tools. The file formats supported by the phone are BMP, PNG, GIF, JPEG (progressive or marithmetic-encoded saves not supported), and EMS picture. Scroll to the desired picture to access the following options: • Press to display this picture.
Set Wallpaper: Use the picture as the wallpaper for the standby screen. Animation This animation library stores the phone's default animations, as well as animations received in EMS messages, or downloaded through WAP services or using multimedia communications tools. The procedure for using this menu is the same as that described above for the Picture menu. The phone supports the following animation file formats: GIF, EMS animation.
8 Ring tones that support the EMS format (such as Chimes High) cannot be set as the phone's alert sound for incoming calls, so they do not offer this menu option. • Rename: Allows you to give a new name to the ring tone. 8 The phone's default ring tones cannot be renamed, so they do not present this option. • Edit: Allows you to edit the ring tone. 8 The phone's default ring tone cannot be edited, and only Composer offers this option.
Composer You can edit your own polyphonic ring tone melodies, and use them as alert sounds for incoming calls. A polyphonic ring tone consists of musical tones in multiple channels. The Composer function allows you to create a maximum of 8 channels, mixing them to create the final polyphonic ring tone. Note format Length Octave Pitch Sharp Entering default notes Press to to enter the eight pitches in an octave as quarter notes: Do Re Mi Fa So La Ti.
Adjusting the length of a note The default note length is a quarter note (the screen uses the number 4 to represent a quarter note). Press to increase the note's length (the number on the screen will increase); press to reduce the note's length (the number on the screen will decrease).
Steps for creating a polyphonic ring tone 1. The first time you enter the Composer menu, you will see 8 channels that you can select for editing. Each channel can be used to save one passage of music that you have created. Scroll to the channel that you wish to edit, and then press to enter the ring tone editing window to begin composing the music for this channel. 2. Edit notes according to the procedures described above.
• Play All: Plays the polyphonic ring tone that results from mixing all channels. • Play Channel: Plays the channel you have currently scrolled to (if this channel does not contain any music that you created, this option will not appear). • Save: Select this option and your phone will automatically mix the music you have created in the channels into a polyphonic ring tone, and save this ring tone to the menu Multimedia → Melody → My Melodies. Press and enter a name for the ring tone and it will be saved.
next/previous photo. 3. When the display shows photo thumbnails, or after you press to display a photo in full screen, you can press (Option) to perform the following tasks with that photo: • Send Photo: This option enables you to send the selected photo to others through MMS. You can also do so by selecting the menu: Messages → Create → MMS. For details on using the MMS function, see page 67. • Set to Wallpaper: Designates this photo as the wallpaper for the main display's standby screen.
• Delete all: Deletes all of the photos stored in the Album menu. (this option is only available when the screen shows photo thumbnails). • Face Morph: You are able to change a person's facial expression shown in the photo with this Face Morph function, and then save photos showing different expressions of that person. Follw the steps below to perform the Face Morph function: a.
c. To reset a red spot's position, press remove that spot, press position, and then press (Undo) to first to display it again in its default to adjust its position. 8 The moment you finish setting the four spots' positions and press , you can immediately press all of the spots's positions. (Reset) to reset d. When the spots are in desired positions, press . The screen will show "Press number key to change," and then will bring up the original photo with that person's face remaining unchanged.
e. Press to intensify/reduce expression effects. Intensity levels will be displayed at the top right corner of the screen ranging from 1 to 5; the default value is 2. f. When the photo shows desired expression effects, you can press and save this new photo as a separate file. Enter this new photo's file name, and then press to save it to the Album menu. g. After you have saved the photo showing the expression effects you want, the original photo will appear.
Settings Date & Time Used to set the time and date, as well as the format in which the time and date will be displayed on the startup screen. Time 1. Press to select either the Auto or Set mode for this item: Auto: Automatic time zone adjustment. If during travel, you move between time zones, the phone will automatically adjust the time displayed on the screen based on the time zone prompts provided by the local network operator so that you always have access to accurate local time.
Secondary Time Allows you to display the time in another designated time zone. If you choose to activate this option, the standby screen will display the time in that time zone along with your local time. Time in secondary time zone Power On/Off Allows you turn the phone on and off at specified times to conserve power. When riding in an airplane or in any other situation where you cannot use a mobile phone, remember to deactivate the Power On/Off option.
Profiles A profile is a group of settings that determine whether the phone will alert you to incoming calls through a ring tone or a vibrating alert, and how ring tones in general are used on the phone. These settings allow the phone's operation to best suit the environment you are in. 1. Press to scroll to the desired profile and then press to activate this profile. You can choose from among the following profiles: Normal This is the default profile.
Handsfree This profile is only active when a hands-free kit is attached to the phone. Once this profile is activated, the main display's status bar will show the show the icon; the external display will icon. Airplane When you are on a plane, you can select this profile to turn off the phone. Once this profile is activated, the phone will automatically be powered off, and all alarms will be suspended. If the phone is turned off by long-pressing still turn the phone at the appointed times.
particular environment. 8 After entering the Edit menu, the setting for each option will be displayed, providing a overview of the profile. Vibrate Includes the following setting options: • Ring Only: When there is an incoming call, the phone will use a ring tone but no vibrating alert. • Vibrate Only: When there is an incoming call, the phone will use a vibrating alert but no ring tone. • Ring & Vibrate: When there is an incoming call, the phone will use both a vibrating alert and a ring tone.
Ring Volume Press to adjust the ring tone volume or mute the ring tone. Answer Mode • Send Key: Allows incoming calls to be answered only by pressing . • Any Key: Allows any key except to be used to answer an incoming call. In this mode, is used to reject an incoming call, and not to answer. • Automatic: If the Automatic answer mode is activated, the phone will ring for five seconds, and then the incoming call will be automatically answered (only the Handsfree profile allows this setting).
Display Theme A display theme consists of a combination of display color and the standby screen wallpaper. Different display colors are paired with different preset wallpapers, so when you change the display color, the standby screen wallpaper will also change. Scroll to the color that you wish to use and then press (View) to preview the color matched with the standby screen wallpaper. Press the setting.
Photo: Here you can select a photo saved in the phone memory as the wallpaper. can also use this feature to change the wallpaper matched / You with a color in the Theme option. Welcome Message Used to select and configure the animation/picture/text that is displayed when the phone is turned on, as well as the music that is played. • Animation: Only the animation selected in this option will be displayed when the phone is turned on.
Contrast Press to adjust the contrast of the screen's display. Press to confirm the setting. Brightness Press to adjust the brightness of the phone's display backlighting. Press to confirm the setting. Backlight Setting You can turn the phone's keypad backlighting and display backlighting on or off, as well as set the length of time that backlighting will remain activated after the flip is opened or a key is pressed.
• Always On: The external display will remain on, cycling continuously through displays of the time and animations. Because the S670C's external display drains power from the battery when it is on, selecting Cycle or Always On will reduce battery life. OLED Animation Setting You can set the animations to show on the external display. Press (Select) to make your selections; press (Cancel) to clear the animations that you have selected. When you are finished, press to confirm your selections.
Call Settings Call Divert 8 Requires the support of the network operator. Forward All Forwards all incoming calls to a designated phone number or voicemail inbox. When you use this feature, you must enter a phone number to which to forward incoming calls. 8 After the Forward All mode is activated, the standby screen will display the icon. When Busy The phone will divert incoming calls to another number when you are in the middle of another call.
Call Barring You can request that your network operator block the dialing or receiving of certain calls. The call barring services below require the support of your network operator. To activate or cancel any of the options below, you must enter the network password provided by the network operator. All Outgoing Blocks dialing of any calls from the phone. Intl. Out If this option is activated, no international calls can be made with your phone. Intl.
Call Waiting If there is an incoming call when you are in the middle of another call, the screen will display the number of the incoming call and call waiting message to alert you. You can activate, cancel, or view the status of this feature from this menu. 8 You must apply to the network operator for the call waiting service in order to use this feature. Auto Redial If there is no answer at a number you have dialed, the phone will automatically redial.
Fixed Dial Number After this feature is activated, the phone will only be able to dial numbers on the Fixed Dial Number list. If a number is not on the list, calls cannot be made to this number. 8 When you activate or cancel this feature, you must enter the PIN2 code. , If the PIN2 code is entered incorrectly three consecutive times, the PIN2 code will be locked down. You will need the PUK2 code to unlock the PIN2 code. Contact your network operator to obtain the PUK2 code.
Minute Beep Once this option is activated, the phone will emit a beep once every minute during a call. Network Generally speaking, the choice of the network that your phone uses is configured automatically. When turned on, the phone will automatically connect to the network provided by your network operator, or will automatically connect to the roaming network when you are outside the coverage of your regular network.
Band Setting According to your requirements, you can set an appropriate band in the GSM network system. Connection Mode Used to set whether the phone will also search for a GPRS network when it is turned on. • GPRS & GSM: When it is turned on, the phone will search for available GPRS and GSM networks. • GSM Only: When it is turned on, the phone will search only for a GSM network. Security You can use a PIN code, phone password, and SIM card lock authentication to prevent unauthorized use of the phone.
If you wish to change the PIN1 code, you must press in the Enable item to select On, so that you will be able to enter and confirm the new password. PIN2 Code Used to change the PIN2 code. The procedure is the same as for the PIN1 code. Phone Lock Activates/deactivates or changes the phone's startup password. The startup password prevents unauthorized persons from using your phone.
password. If the password is entered correctly, the phone will be able to recognize the new SIM card and use it normally. The next time the phone is turned on with this SIM card inserted, the phone will not ask again for you to enter the SIM Lock password. 8 Your phone can recognize a maximum of three different SIM cards. Before setting the SIM Lock feature, you must enter the previously set SIM Lock password (the default SIM Lock password is 1234). The password must be between 4 and 8 digits in length.
4. After completing settings, press . The phone will prompt you to enter and confirm the Screen Lock password. You have two choices: a. If you do not wish to change the password, press to activate the Screen Lock feature using the previously set password. b. If you wish to change the password, enter the new password in the New Password and Confirm fields, then press to use the new password and activate the Screen Lock feature.
Outside Access When the User Group service is activated, enabling Outside Access will allow users in the group to make calls to numbers outside the group. However, incoming calls will still be restricted to calls from within the group. Restore Restores all of the phone's settings to their factory defaults.
Care and Maintenance Take note of the points noted below to ensure that you are using the phone properly and to extend the lifespan of the phone. • Store the phone and its accessories out of the reach of children. • Keep the phone and accessories dry, and use the phone in environments where the temperature is between – 20°C and 55°C. High or low temperatures outside this range may damage the phone. • If possible, do not use or store the phone in excessively dusty or dirty environments.
Troubleshooting If you encounter problems while using the phone, or if it performs erratically, you can consult the information in the chart below. If your particular problem cannot be resolved using the information in the chart, contact the dealer where you purchased the phone. Problem Possible cause Solution • The network signal is too Move to a location where the weak at your current network signal can location — for example, in properly received.
Problem Possible cause • The standby time is related to your network operator's system configuration. The same phone used with different network operators' systems will not provide exactly the same length of standby time. Shortened standby time • The battery is depleted. In Use a new battery. high-temperature environments, battery life will be shortened. • If you are not able to connect to the network, the phone will continue to send out signals as it attempts to locate a base station.
Problem Possible cause • SIM card invalid. Unable to connect to the network. You cannot answer incoming calls. Solution Contact your network operator. • You are not within the Check the service area with network's service area. your network operator. • Poor signal. Move to an open space, or if you are inside a building, move closer to a window. • You have activated Go to the menu Phone Book → Privacy Manager and then select Off in order to deactivate this option.
Problem Possible cause • The battery or battery Solution Contact the dealer. charger is damaged. Battery will not charge. • The phone's temperature Adjust the battery charging is below 0 °C or higher environment to avoid extremes of temperature. than 45°C. • Poor contact between the Check all connectors to battery and charger. Unable to enter information into the Phone Book. Unable to select certain features. • The Phone Book's memory is already full.