
Product Info Part 3


Getting Your P31 Connected and Synchronized 99
1. Make sure that the power of your P31 is on. Connect the USB
connector on P31 to a USB port on the PC using the supplied
Data cable.
2. On your PC, click the Start
StartStart
Start button on Windows Taskbar and
select Programs
ProgramsPrograms
Programs, BenQ
BenQBenQ
BenQ, Synchronise
SynchroniseSynchronise
Synchronise. Or, you can also right-
click the icon on the Windows status area located at the lower
right corner of the screen and select Synchronise
SynchroniseSynchronise
Synchronise.
3. The synchronization will start automatically.
You can also perform synchronization via infrared or Bluetooth
connection.
To perform synchronization via infrared connection:
1. Enable the infrared function of your PC.
2. Enable the infrared function of P31.
3. Right-click on the icon and select Properties.
4. Check the Infrared checkbox and click Close. If infrared connec-
tion is established and the icon changes to , you can start
the synchronization operation.
To perform synchronization via Bluetooth connection:
1. Refer to "Establishing Bluetooth Connection" on page 93 to
establish Bluetooth connection with the PC.
2. Right-click on the icon and select Properties.
3. Check the Bluetooth checkbox and click Close. If Bluetooth con-
nection is established and the icon changes to , you can
start the synchronization operation.
Performing Remote Synchronization with a Server
Performing Remote Synchronization with a ServerPerforming Remote Synchronization with a Server
Performing Remote Synchronization with a Server
If you are frequently on the move and need to keep your data
synchronized, remote sync will be an ideal choice. Remote syn-
chronization requires support of the following from your net-
work service provider:
• GPRS or dial-up data connection service
• A synchronization server
In order to perform remote synchronization, you need to cor-
rectly configure the remote synchronization settings.
Configuring Remote Synchronization Settings
Configuring Remote Synchronization SettingsConfiguring Remote Synchronization Settings
Configuring Remote Synchronization Settings
Consult your network service provider and obtain the following
information:
• Remote synchronization server address
• User name and password
Next, configure the remote synchronization settings following
the steps below.
1. In the Main screen, tap the Remote sync
Remote syncRemote sync
Remote sync program icon.
2. Tap Edit
EditEdit
Edit and select Preferences
PreferencesPreferences
Preferences.
3. According to the data obtained form your network service pro-
vider, complete the settings on the Server
ServerServer
Server and Protocol
ProtocolProtocol
Protocol tabs.
4. Tap Done
DoneDone
Done.
Performing Remote Synchronization
Performing Remote SynchronizationPerforming Remote Synchronization
Performing Remote Synchronization
1. In the Main screen, tap the Remote sync
Remote syncRemote sync
Remote sync program icon.
2. Tap Remote sync
Remote syncRemote sync
Remote sync and select Start sync
Start syncStart sync
Start sync.
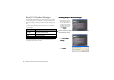
Backing up and Restoring Data
In order to ensure the safety of your personal data, we recom-
mend that you regularly back up the data on your P31 to PC.
Using P31 Handset Manager, you can perform data back up and
restoration easily.