Joybee 150 (DA-150) Digital Audio Player User Manual Welcome
Copyright Copyright 2003 by BENQ Corporation. All rights reserved. No part of this publication may be reproduced, transmitted, transcribed, stored in a retrieval system or translated into any language or computer language, in any form or by any means, electronic, mechanical, magnetic, optical, chemical, manual or otherwise, without the prior written permission of this company.
Table of Contents Your Joybee 150 Digital Audio Player ....................1 Introduction .......................................................................... 1 Package Contents .................................................................. 1 System Requirements ............................................................ 2 Touring the Joybee 150 Digital Audio Player ...................... 3 Buttons/Ports .......................................................................................
Listening to FM Radio While Reading eBooks .................................. 18 Memory Management ...........................................................19 Inquiring Memory Status .................................................................... 19 Deleting Files ........................................................................................ 19 Clearing Folder .................................................................................... 19 Quick Format ..............................
Your Joybee 150 Digital Audio Player Introduction Congratulations on your purchase of the Joybee 150 Digital Audio Player! The Joybee 150 Digital Audio Player not only provides multiple functions for high quality music playback and voice recording but consumes lower power to extend your good time. It supports MP3 and WMA music formats, multi-language display and 8 pre-set EQ modes (5 EQ modes for WMA music). Besides, it also features language repeated reading, making it an ideal tool for language learning.
System Requirements Microsoft Windows 98SE/ME/2000/XP Pentium 200MHz or higher USB port CD-ROM drive 60MB hard disk space 32MB system memory 2 Your Joybee 150 Digital Audio Player
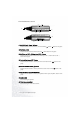
Touring the Joybee 150 Digital Audio Player Buttons/Ports (11) (15) (14) (13) (12) (16) (11) (12) (13)(14) (15) (16) (1) (7) (5) (8) (6) (3) (2) (9) (10) (4) (1) LCD Display Displays the status of the player. (e.g. song title, play time..., etc.) (2) ON/OFF/Play ( )/Pause( ) Button When player power is off, press this button to turn on the player and the startup screen will appear. When the player is in standby mode, press this button to start playing.
(4) Power Switch Slide this switch to the ON position to turn on the power of the player, and to the OFF position to turn it off. Keep the switch in the ON position in normal conditions. Should the player fail to respond to your operation and become freezed, slide this switch to the OFF position and then to the ON position to reset it, and then press the key to turn it back on.
While playing, hold down this button for 2 seconds to change the EQ settings. There are 8 pre-set modes available: Normal, Classic, Live, Rock, Pop, Jazz, Treble and Bass (5 modes available for WMA music: Normal, Classic, Live, Rock and Pop). (11) Microphone For voice recording. (12) Wired remote control jack For connecting the wired remote control. (13) Earphone jack For connecting the earphone. (14) Hand strap hole For installing the hand strap.
The Wired Remote Control (7) (2) (9) (1) (5) (6) (8) (4) (1) ON/OFF/Play ( )/Pause( (3) ) Button Executes the same actions as those by the ON/OFF/Play( )/Pause( )button on the player. (2) Stop/Menu Button Executes the same actions as those by the Stop( )/Menu button on the player. (3)/(4) Volume up (VOL +)/Volume down (VOL -) Button Executes the same actions as those by the Volume up (VOL +)/Volume down (VOL -) button on the player.
The LCD Display (1) (3) (5) (2) (4) (6) (7) (8) (9) (11) (10) (12) (13) (14) (15) (16) No. Description (1) Appearance of this icon indicates that the player is in playback mode. (2) Appearance of this icon indicates that the player is in pause status. Appearance of this icon indicates that the player is in language repeated reading (3) mode. When this icon appears in combination with icon (3), the player is in single track (4) repeat mode .
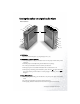
Getting the Joybee 150 Digital Audio Player Ready Connecting Earphone and Remote Control As illustrated, plug the earphone into the earphone jack on the wired remote control, and then the wired remote control into the wired remote control jack on the Joybee 150 Digital Audio Player.
Charging the Battery Connect the battery charger to the Joybee 150 Digital Audio Player and a wall outlet as shown to begin charging the built-in battery. When charging, the indicator light on the charger will light up red. It will turn into amber as the charging time passes by. After about 3 hours, the indicator light turns into green and the battery is fully charged. Now you can disconnect the player from the charger. If time allows.
Installing Joybee 150 Digital Audio Player Software Insert the Joybee 150 Digital Audio Player CD-ROM into your CD-ROM drive. A few seconds later, a software installation menu will appear on your computer screen. Click on an item to select it and start installing the selected software. If the autorun function of your CD-ROM drive is disabled, look for the file!#Setup.exe# in the CD-ROM directory using Windows Explorer and double-click on it. The software installation menu will then appear.
Installing the USB Driver Installing in Windows ME/Windows 2000/Windows XP Turn on the power of the Joybee 150 Digital Audio Player by pressing the button, and then connect it to the USB port of your computer using the USB cable. A New Hardware Found message will appear and installation will be completed automatically. Installing in Windows 98 In addition to clicking Install Joybee 150 Driver on the software installation screen, you can also install the USB driver following the steps below: 1.
Using the Joybee 150 Digital Audio Player Turning the Player On and Off In power off status, press the button to turn on the player. In playback and recording modes, press the standby mode. In power on status, press and hold the button to stop playing or recording and enter button for about 2 seconds to turn off the player. Do not use the power switch to turn on or off the player. Should you do so, please wait for 5 seconds before turning the player on. Playing Music 1.
Section Repeat;While playing, press the A-B / TRP button to set the starting point for section repeat. The icon "An" will appear on the display. Press the A-B / TRP button again to set the ending point. The icon "AnB" will appear on the display and meanwhile the player will start playing the section repeatedly. Press the A-B / TRP button to cancel section repeat. The icon "AnB" disappears and resumes to normal playback mode.
Press the it. or button to scroll to a play mode, and then press the button twice to select Repeat Time Here you can setup the length of time period for the Time Length Repeat function. The selectable time period length ranges from 10 seconds to 254 seconds. Press the or button to scroll to a time length , and then press the button twice to select it.
reaches a preset level. Recording will be stopped and a new recorded file will be created when there is a long period of silence in between the sound signal. The length of silence period is determined by the sampling rate: the higher the sampling rate, the shorter the silence period. When the silence period exceeds 1 minute, the Joybee 150 Digital Audio Player will exit the recording mode automatically, otherwise it will continue to record the next file.
Press the or button to scroll to a desired item, and then the button to select it. Sampling Frequency The higher the sampling frequency (with larger number before kHz), the higher the sound quality and it will also result in larger recorded files. In MPEG1 LAYER3 recording mode, you can select a sampling frequency at 32kHz, 44.1kHz or 48kHz. When recording music, it is recommend that you use a sampling frequency at 44.1kHz.
FM Radio To ensure FM reception quality, the backlight of the display will be disabled automatically in the FM Radio mode, Please be sure to wear the earphone when searching for radio stations. The earphone cable is used as a signal reception antenna in the FM Radio mode. Entering and Exiting the FM Radio Mode 1. Press the 2. Press the button to turn on the player and the main menu will appear on the display. or button to scroll to FM Radio and press the button. 3.
1. On the preset radio station list, press the EQ/REP button several times until FM Level appears on the display. 2. Press the it. or button to scroll to an appropriate level, and press the button to select Setting up Frequency Step The frequency step setting allows the Joybee Digital Audio Player to be used in different countries where the FM frequency steps are different. 1. On the preset radio station list, press the EQ/REP button several times until Frequency Step appears on the display. 2.
Memory Management 1. Press the button to turn on the player and the main menu will appear on the display. 2. Press the or button to scroll to Memory Management and press the button. 3. The memory management options menu will appear on the display. Press the or button to sroll to an option and press the button to access configuration settings. Inquiring Memory Status 1. On the memory management options menu, press the Memory Info. and press the button. or button to scroll to 2.
1. On the memory management options menu, press the Format and press the button. or button to scroll to Comp. 2. You will be asked if you are sure to proceed with format operation. Press button. the or button to scroll to YES and press the All files in the memory will be cleared after format is performed. The difference between Complete Format and Quick Format lies in the error checking process. Quick Format does not perform error checking to the memory while Complete Format does.
Manual: If this option is selected, the backlight of the display will be turned on when you press a button on the Joybee 150 Digital Audio player, and go off after 15 seconds if there are no subsequent button operations. Press the or button to scroll to an option and press the button to select it. Lyrics Sync You can activate and deactivate the lyrics sync function with this option. 1. On the system setup options menu, press the press the button. or button to scroll to Lyrics Sync and 2.
3. Click the Start button on Windows Taskbar and select Programs, BenQ Joybee 150 Digital Audio Player, System Update Tool to open the System Update Tool program. 4. Click the Browse... button in Upgrade Firmware to browse for the update firmware file. 5. When the file is located, click to select the file and click Open, Upgrade. 6. When the update operation is completed, a dialogue box will appear, asking you to disconnect the Joybee 150 Digital Audio Player from the PC and restart the player.
Updating Font 1. On the system setup options menu, press the the button. or button to scroll to Update and press 2. Connect the Joybee 150 Digital Audio Player to the USB port of your computer using the USB cable. You will be prompted by the display of the player if connection has been made successfully.
5. When the update font file is located, click to select the file and click Open, Update. Before performing firmware upgrade and font update, if the player can not be connected successfully, please do the following: 1. Right-click on the System Update Tool program window and select “USB Driver”, “Install Driver” in the submenu that appears. 2. The computer will generate and execute a cmd.exe file automatically. When done, it is recommended that you restart the computer.
Setting Up the Startup and Shutdown Screen The Joybee 150 Digital Audio Player allows you to personalize the startup and shutdown screens. To do so, first you need to convert the image file into the format that can be accepted by the Joybee 150 Digital Audio Player using the Startup/Shutdown Screen Editing Tool. Second, copy the converted file to the player and follow the steps below to select the file to use.
Using the Joybee 150 Digital Audio Player Software Using the Lyrics Editing and Conversion Tool The Joybee 150 Digital Audio Player Lyrics Editing and Conversion Tool allows you to combine and convert the lyrics text files (.txt format) and song files (.mp3, .wav formats) into .mpr files for the lyrics sync function of the player. To open the Lyrics Editing and Conversion Tool, Click the Start button on Windows Taskbar and select Programs, BenQ Joybee 150 MP3 Player, Lyrics Editing and Conversion Tool.
Convert to LYR file Synchronize (Click this button to insert a synchronization point) Open the song file for the lyrics Remove the last inserted sync point Step 1: Synchronize the lyrics with the song Your computer must have a sound card and an earphone or speaker for this operation. 1. Click the button to open a lyrics text file (in .txt format). You can also copy lyrics from elsewhere and paste it onto the Lyrics Editing and Conversion Tool window directly. 2.
Step 2: Combine and convert the synchronized lyrics file (.lyr file) and the music file into a .mpr file and transfer it to the Joybee 150 Digial Audio Player 1.Click Convert on the menu bar and select MP3->MPR. The following window will appear on the screen. 2. Click the Browse... button to browse for and select the MP3 music file. 3. Click the Browse... button to browse for and select the corresponding synchronized .lyr lyrics file. 4. Click Covert. A message box will appear when conversion is done. 5.
4. Click the Browse... button next to the Lyric Folder drop-down menu and select the directory where the corresponding lyrics files are located. Click the LYR radio button on the right. 5. Click the Browse... button next to the Output Folder drop-down menu and select the directory where converted .mpr files will be located. 6. Click the Convert button to start converting selected files. You will be prompted by a message box when the operation is finished.
To open theStartup/Shutdown Screen Editing Tool, click the Start button on Windows Taskbar and select Programs, BenQ Joybee 150 MP3 Player, Startup & Shutdown Screen Editing Tool. The Main Screen The table below is an introduction to the function of each button on the main screen: Button Function Open image files in .bmp, .jpg or .gif formats. Save as .lgo startup/shutdown screen files. Information about the software.
Transfer the .lgo startup/shutdown screen file to the Joybee 150 Digital Audio Player and see "Setting Up the Startup and Shutdown Screen" on page 25 to select the .lgo file as the startup or shutdown screen.
Using QMusic QMusic is a software program that helps you to easily organize your music collection. You can use it to play music CDs and MP3 files, convert CD music into .mp3 format, create playlists for playing music, burn music CDs and compile your own music album. When used with the Joybee 150 Digital Audio Player, you can easily convert CD music into .mp3 format and transfer it to the player. You can also let QMusic update the music files in the player automatically.
Music Playing Buttons Feature Buttons You can use these buttons to play music. The detailed information of playlist will appear here, including total number of songs and total playback time. When playing music, you can use these buttons to change play mode. Right Qanel Shows songs in the selected playlist/media on the left panel. Status Bar Search Window System Buttons Display You search for a song by entering its name and pressing the magnifier icon. Used to control the QMusic window.
Adding songs to the Joybee 150 Digital Audio Player using QMusic After QMusic is opened, connect the Joybee 150 Digital Audio Player to your computer using the USB cable. The icon will appear on the left panel of QMusic and all directories in the player will appear below it. Adding CD music to the Joybee 150 Digital Audio Player 1. Insert a music CD into the CD-ROM drive of your computer.
2. Check the checkboxes next to the songs you want to transfer to the palyer. When finished, click the button. QMusic will convert selected songs into MP3 format. 3. When QMusic has done with the conversion process, it will place all converted files in a New Album playlist on the left panel. Click on it and you will see a list of converted files on the right panel. 4. Click to select the songs you want to transfer to the Joybee 150 Digital Audio Player on the right panel.
on the list at once, click the first song on the list, press and hold the Shift key on the keyboard and then click to select the last song on the list. If you want to delete a song on the list, click the song and press the Delete key on the keyboard. 5. Click and drag the selected songs on the right panel to the MP3 directory under the icon. Before dragging the selected songs to the Joybee 150 Digital Audio Player, make sure that there is enough memory space.
Adding new songs to the Joybee 150 Digital Audio Player from your computer 1. Click the My Joybee playlist on the left panel. 2. Click the button and then browse for and select the .mp3, .wav or .wma song files you want to transfer to the Joybee 150 Digital Audio Player. Click Open and the selected song files will be added to the My Joybee playlist.
3. Click the icon on the left panel. 4. Click the button. The songs you just added will be transferred by QMusic to the player. QMusic will ask you whether you want to delete the songs that are already in the player. If you want to keep these songs, please back them up in your computer before continuing. Before dragging the selected songs to the Joybee 150 Digital Audio Player, make sure that there is enough memory space.
Let QMusic automatically update the songs upon getting connected to the Joybee 150 Digital Audio Player 1. Click the My Joybee playlist on the left panel. 2. Click the button and then browse for and select the .mp3, .wav or .wma song files you want to transfer to the Joybee 150 Digital Audio Player. Click Open and the selected song files will be added to the My Joybee playlist.
3. Click the button. 4. Click the Joybee tab on the dialogue box that appears.
5. On the Joybee tab, click to select Automatically launch QMusic when Joybee inserted and Automatically transfer MP3 files to Joybee when inserted, then click the button. 6. Disconnect the Joybee 150 Digital Audio Player and then reconnect it to the computer. QMusic will automatically update the songs in the player with the songs in the My Joybee playlist. From now on, you only have to place the new songs under the My Joybee playlist on the left panel.
Notes, FAQ and Troubleshooting Tips Notes Do not put too many files under each directory or in the root directory to prevent the system from slowing down. If a large number of files must be put in the player, organize the files into different directories. Do not store data in the player to its full memory capacity. Allow at least 0.5 MB for the system to manage memory to prevent the system from slowing down or improper data storage status.
FAQ and Troubleshooting Tips Why can’t I play certain songs in WMA format using my Joybee 150 Digital Audio Player? Some WMA songs currently available from the Internet are copyright protected. This kind of protection method prevents unauthorized person from playing protected song files. These songs can only be played using a Window Media Player program that has been authorized.
Why do different songs have different sound volumes? Because the parameter of the volume level when recording each song may not be the same, the volume level of different songs are different. The file size is smaller than the free memory available in my player, but I still cannot tranfer it to my player The Joybee 150 Digital Audio Player allocates memory in cluster of 16KB or 32KB.