BL912 LCD Monitor User Manual Downloaded from ManualMonitor.
Copyright Copyright © 2013 by BenQ Corporation. All rights reserved. No part of this publication may be reproduced, transmitted, transcribed, stored in a retrieval system or translated into any language or computer language, in any form or by any means, electronic, mechanical, magnetic, optical, chemical, manual or otherwise, without the prior written permission of BenQ Corporation.
Servicing Do not attempt to service this product yourself, as opening or removing covers may expose you to dangerous voltages or other risks. If any of the above mentioned misuse or other accident such as dropping or mishandling occurs, contact qualified service personnel for servicing.
Table of Contents Copyright ......................................................................................................................................2 Getting started .............................................................................................................................5 Getting to know your monitor ................................................................................................7 Front view....................................................................
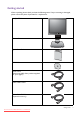
Getting started When unpacking please check you have the following items. If any are missing or damaged, please contact the place of purchase for a replacement. BenQ LCD Monitor Monitor Base Quick Start Guide CD-ROM Power Cord (Picture may differ from product supplied for your region.) Video Cable: D-Sub Video Cable: DVI-D (Optional accessory) Getting started Downloaded from ManualMonitor.
• Available accessories and the pictures shown here may differ from the actual contents and the product supplied for your region. For cables that are not supplied with your product, you can purchase them separately. • Consider keeping the box and packaging in storage for use in the future when you may need to transport the monitor. The fitted foam packing is ideal for protecting the monitor during transport. Always keep the product and accessories out of reach of small children.
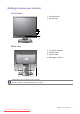
Getting to know your monitor Front view 1. Control buttons 2. Power button 1 2 Back view 3. 4. 5. 6. 3 4 5 AC power input jack DVI-D socket D-Sub socket Kensington lock slot 6 • Above diagram may vary depending on the model. • Picture may differ from product supplied for your region. Getting to know your monitor Downloaded from ManualMonitor.
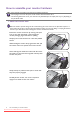
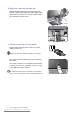
How to assemble your monitor hardware • If the computer is turned on you must turn it off before continuing. Do not plug-in or turn-on the power to the monitor until instructed to do so. • The following illustrations are for your reference only. Available input and output jacks may vary depending on the purchased model. 1. Attach the monitor base. Please be careful to prevent damage to the monitor.
You should position the monitor and angle the screen to minimize unwanted reflections from other light sources. 2. Connect the PC video cable. Either Do not use both DVI-D cable and D-Sub cable on the same PC. The only case in which both cables can be used is if they are connected to two different PCs with appropriate video systems. To Connect the D-Sub Cable Connect the plug of the D-Sub cable (at the end without the ferrite filter) to the monitor video socket.
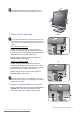
4. Route the cables via the cable clip. Release the cable retaining clip by squeezing the clip inwards as illustrated. Position the cables together and reinsert the clip over them to retain the cables neatly in place behind the monitor stand. 5. Connect-to and turn-on the power. Plug the other end of the power cord into a power outlet and turn it on. Picture may differ from product supplied for your region. Turn on the monitor by pressing the power button on the monitor.
How to detach the stand base 1. Prepare the monitor and area. Turn off the monitor and the power before unplugging the power cable. Turn off the computer before unplugging the monitor signal cable. Protect the monitor and screen by clearing a flat open area on your desk and placing a soft item like a towel on the desk for padding, before laying the screen face down on a flat clean padded surface. Please be careful to prevent damage to the monitor.
Using the monitor wall mounting kit The back of your LCD monitor has a VESA standard mount with 100mm pattern, allowing the installation of a wall mount bracket. Before starting to install a monitor wall mounting kit, please read the precautions carefully. Precautions • Install your monitor and monitor mounting kit on a wall with flat surface. • Ensure that the wall material is stable to support the weight of the monitor.
Getting the most from your BenQ monitor To gain the most benefit from your new BenQ LCD monitor, you should install the custom BenQ LCD Monitor driver software as provided on the BenQ LCD Monitor CD-ROM. The circumstances under which you connect and install your BenQ LCD Monitor will determine which process you need to follow to successfully install the BenQ LCD Monitor driver software.
How to install the monitor on a new computer This instruction details the procedure for selecting and installing the BenQ LCD Monitor driver software on a new computer which has never had a monitor driver installed before. This instruction is only suitable for a computer which has never been used before, and for which the BenQ LCD Monitor is the first ever monitor to be connected to it.
How to upgrade the monitor on an existing computer This instruction details the procedure for manually updating the existing monitor driver software on your Microsoft Windows computer. It is currently tested as compatible for Windows 8 and Windows 7 Operating System (OS).
How to install on Windows 8 system 1. Open Display Properties. Move the cursor to the lower-right of the screen or press the Windows + C buttons on the keyboard to bring up the Charm bar. Go to Settings, Control Panel, Devices and Printers and right-click the name of your monitor from the menu. Alternatively, right-click the desktop and select Personalize, Display, Devices and Printers, and right-click the name of your monitor from the menu. 2. 3. 4. 5. 6. 7. Select Properties from the menu.
How to install on Windows 7 system 1. Open Display Properties. Go to Start, Control Panel, Hardware and Sound, Devices and Printers and right-click the name of your monitor from the menu. Alternatively, right-click the desktop and select Personalize, Display, Devices and Printers, and right-click the name of your monitor from the menu. 2. Select Properties from the menu. 3. Click the Hardware tab. 4. Click Generic PnP Monitor, and then the Properties button. 5.
How to adjust your monitor The control panel 1 2 No. 18 Name Description 1. Control keys Accesses the functions or menu items displayed on the screen, right next to each key. 2. Power key Turns the power on or off. How to adjust your monitor Downloaded from ManualMonitor.
Basic menu operation All OSD (On Screen Display) menus can be accessed by the control keys. You can use the OSD menu to adjust all the settings on your monitor. 1 2 Low Blue Light Input Brightness Menu Exit 4 3 Low Blue Light Input Brightness Menu Exit 1. Press any of the control keys. 2. The hot key menu is displayed. The top three controls are custom keys and are designated for particular functions. 3. Select Menu to access the main menu. 4.
No. OSD in hot key menu OSD icon in main menu • By default, the key is the hot key for Input. To change the default settings, see Customizing the hot keys on page 21. • For Down/Decrease adjustment. Custom Key 2 Custom Key 3 Function / • By default, the key is the hot key for Brightness. To change the default settings, see Customizing the hot keys on page 21. • Enters sub menus. • Selects menu items. Menu • Activates the main menu. • Returns to the previous menu. Exit Exits OSD menu.
Picture optimization The easiest way to obtain an optimal display from an analog (D-Sub) input is to use the Auto Adjustment function. Go to Display and Auto Adjustment to optimize the currently displayed image to the screen. When you connect a digital input signal using a digital (DVI) cable to your monitor, the Auto Adjustment function will be disabled, because the monitor will automatically display the best image.
Choosing an appropriate picture mode for reading Your monitor features a picture mode that is suitable for reading e-books and documents. 1. Press any of the control keys to bring up the hot key menu, and press Menu to access the main menu. 2. Go to Picture Advanced and Picture Mode. 3. Select Reading. The setting will take effect immediately. 22 How to adjust your monitor Downloaded from ManualMonitor.
Navigating the main menu You can use the OSD (On Screen Display) menu to adjust all the settings on your monitor. Press any of the control keys to bring up the hot key menu, and press Menu to access the main menu. See Basic menu operation on page 19 for details. Available menu options may vary depending on the input sources, functions and settings. Menu options that are not available will become grayed out. And keys that are not available will be disabled and the corresponding OSD icons will disappear.
Display menu Available menu options may vary depending on the input sources, functions and settings. Menu options that are not available will become grayed out. And keys that are not available will be disabled and the corresponding OSD icons will disappear. Mode: Standard Display Auto Adjustment Picture Input Picture Advanced H. Position System V. Position 50 Pixel Clock Phase 1. Select Menu from the hot key menu. 2. Use or 3. Select 4. Use to select Display.
Item Phase Function Range Adjusts the pixel clock phase timing to synchronize with the analog input video signal. See also: Picture optimization on page 21. 0 to 63 Not applicable to a digital input signal. Navigating the main menu Downloaded from ManualMonitor.
Picture menu Available menu options may vary depending on the input sources, functions and settings. Menu options that are not available will become grayed out. And keys that are not available will be disabled and the corresponding OSD icons will disappear. Mode: Standard Display Brightness Normal Picture Contrast Bluish Picture Advanced Sharpness Reddish System Gamma User Define R 50 B G 100 100 100 Color Temperature Hue Saturation Reset Color 1. Select Menu from the hot key menu. 2.
Item Function Color Normal Temperature Range Allows video and still photographs to be viewed with natural coloring. This is the factory default color. Bluish Applies a cool tint to the image and is factory pre-set to the PC industry standard white color. Reddish Applies a warm tint to the image and is factory pre-set to the news print standard white color. User Define The blend of the Red, Green and Blue primary • R (0~100) colors can be altered to change the color tint of • G (0~100) the image.
Picture Advanced menu Available menu options may vary depending on the input sources, functions and settings. Menu options that are not available will become grayed out. And keys that are not available will be disabled and the corresponding OSD icons will disappear. Mode: Standard Display Picture Mode Standard Picture Senseye Demo Low Blue Light Picture Advanced Dynamic Contrast Movie System Overscan Game Display Mode Photo Color Format sRGB Eco User 1. Select Menu from the hot key menu. 2.
Item Function Range Movie For viewing videos. Game For playing video games. Photo For viewing still images. sRGB For better color matching representation with the peripheral devices, such as printers, digital cameras, etc. Eco For saving electricity with low power consumption by providing minimum brightness for all running programs. User Applies a combination of picture settings defined by users. Senseye Demo Displays the preview of screen images under the selected mode from Picture Mode.
Item Color Format Function Determines the color space (RGB or YUV) based on the detected video signal. You might need to manually set the Color Format if colors shown on the monitor screen do not display properly. 30 RGB • For D-Sub (VGA) input source from PC. • For DVI input source. YUV For D-Sub (Component converted from VGA) input source from a video device. Navigating the main menu Downloaded from ManualMonitor.
System menu Available menu options may vary depending on the input sources, functions and settings. Menu options that are not available will become grayed out. And keys that are not available will be disabled and the corresponding OSD icons will disappear. Mode: Standard Display OSD Settings Language 5 sec. Picture Custom Key 1 Display Time 10 sec. Picture Advanced Custom Key 2 OSD Lock 15 sec. System Custom Key 3 20 sec. DDC/CI 25 sec. Auto Power Off 30 sec.
Item OSD Settings Function Language Range Sets the OSD menu language. • English • Français The language options displayed on your OSD may • Deutsch differ from those shown on the right, depending • Italiano on the product supplied in your region. • Español • Polski • Česky • Magyar • SiCG/BiH/CRO • Română • Nederlands • Русский • Svenska • Português •日本語 • 繁體中文 • 简体中文 Display Time Adjusts the display time of the OSD menu. • 5 sec. • 10 sec. • 15 sec. • 20 sec. • 25 sec. • 30 sec.
Item DDC/CI Function Range Allows the monitor settings to be set through the software • ON on the PC. • OFF DDC/CI, short for Display Data Channel/Command Interface, which was developed by Video Electronics Standards Association (VESA). DDC/CI capability allows monitor controls to be sent via the software for remote diagnostics. Auto Power Off Sets the time to power off the monitor automatically in power saving mode.
Troubleshooting Frequently asked questions (FAQ) The image is blurred. Read the instructions on the link "Adjusting the Screen Resolution" on the CD, and then select the correct resolution, refresh rate and make adjustments based on these instructions. How do you use a VGA extension cable? Remove the extension cable for the test. Is the image now in focus? If not, optimize the image by working through the instructions in the "Adjusting the refresh rate" section on the link "Adjusting the Screen Resolution".
Faint shadow from the static image displayed is visible on the screen. • Activate the power management function to let your computer and monitor go into a low power "sleep" mode when not actively in use. • Use a screensaver to prevent the occurrence of image retention. Is the prompt on the display illuminated in orange? If the LED is illuminated in orange, the power management mode is active. Press any button on the computer keyboard or move the mouse.