
Operation Manual


11Overview
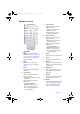
Remote control
1. POWER
Toggles the projector between
standby mode and on. See "Starting
up the projector" on page 26 and
"Shutting down the projector" on
page 28 for details.
2. Blank
Hides the screen picture. See
"Hiding the image" on page 35 for
details.
3. Mute
Toggles projector audio between
on and off.
4. Up arrow key
When the On-Screen Display
(OSD) menu is on:
- Navigates up to select the desired
menu items.
When the On-Screen Display
(OSD) is off:
-Launches the Ver tic al
Keystone window. Use this
button to manually correct
distorted images resulting from
an angled projection.
5. Left arrow key
When the On-Screen Display
(OSD) menu is on:
- Navigates left to select the
desired menu items.
- Makes adjustments, such as
brightness, contrast, etc.
6. Down arrow key
When the On-Screen Display
(OSD) menu is on:
- Navigates down to select the
desired menu items.
When the On-Screen Display
(OSD) is off:
- Launches the Vertic al
Keystone window. Use this
button to manually correct
distorted images resulting from
an angled projection.
7. Back
Goes back to upper level of OSD.
8. Source
Displays the source selection bar.
9. Previous
Plays previous video, audio, photo
slideshow, or document (working
with MHL only).
10. Play/Pause
Plays or pauses a video, music, or
photo slideshow (working with
MHL only).
11. Rewind
Rewinds video and audio playback
(working with MHL only).
12. AUTO
Automatically determines the best
picture timings for the displayed
image. See "Auto-adjusting the
image" on page 34 for details.
CH100_EN.book Page 11 Wednesday, March 2, 2016 11:54 AM