DC C640 Digital Camera User Manual Welcome Downloaded From camera-usermanual.
Copyright Copyright 2007 by BenQ Corporation. All rights reserved. No part of this publication may be reproduced, transmitted, transcribed, stored in a retrieval system or translated into any language or computer language, in any form or by any means, electronic, mechanical, magnetic, optical, chemical, manual or otherwise, without the prior written permission of this company.
turning the equipment o. and on, the user is encouraged to try to correct the interference by one or more of the following measures: • Reorient or relocate the receiving antenna. • Increase the separation between the equipment and receiver. • Connect the equipment into an outlet on a circuit different from that to which the receiver is connected. • Consult the dealer or an experienced radio/TV technician for help. Downloaded From camera-usermanual.
Downloaded From camera-usermanual.
1.1 Checking the package contents ............................................. 1 1.2 Camera components .......................................................... 1 1.2.1 Front view ........................................................... 1 1.2.2 Rear view ............................................................. 2 1.2.3 LED indicators ..................................................... 2 2. Preparing Your Camera for Use ............................................... 3 2.
English 3.7.2 Setting the metering ............................................ 13 3.7.3 Setting the white balance ...................................... 13 3.7.4 Setting the ISO ................................................... 13 3.7.5 Setting the Exposure ............................................ 14 3.7.6 Setting the AEB .................................................. 14 3.7.7 Setting the highlight ............................................ 14 3.7.8 Setting the sharpness ......................
Touring Your Camera 1.1 Checking the package contents Carefully unpack your kit box and ensure that you have the following items. 1. 2. 3. 4. 5. 6. 7. 8. • • • 1.2 User Manual Digital camera USB cable AA batteries Hand strap Software CD-ROM Pouch AV cable Available accessories may vary depending on sales region. If any of the items are missing or appear to be damaged, contact your dealer. Save the packaging in case you need to ship your camera for service.
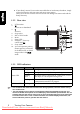
• English If your BenQ camera's lens remains extended after an involuntary shutdown, simply replace the batteries with new ones and restart your camera. Never forces the lens inwards since this action will damage the camera and void the BenQ Warranty. 1.2.2 Rear view 1. 2. LCD monitor W Zoom-out or thumbnail 3. T Zoom-in 4. Strap eyelet 5. REC or PLAY mode 6. Menu 7. Status LED 8. Navigator -- four-way control and OK 9. Scene mode 10.
Preparing Your Camera for Use 2.1 Installing the batteries You can use two AA batteries to power up the camera. Make sure that the power of the digital camera is off before inserting or removing the batteries. To insert the batteries: 1. Make sure the camera is turned off. 2. Open the battery cover. 3. Insert the batteries in the correct orientation as shown in the illustration. 4. Close the battery cover. To remove the batteries: 1. Make sure the camera is turned off. 2.
English 3 Using the Camera 3.1 Navigator You can use the Navigator with four-way control and one OK button to access numerous controls of your camera. 1. 2. 3. 4. 5. 3.2 Up or Play (video playback only) Focus mode or left Down Flash mode or right OK LCD monitor information (REC mode) P 6M EV -1.0 1. Scene mode 2. Flash 3. Macro 4. Self-timer/Burst 5. Resolution 6. Quality 7. Shots remaining 4 9999 ISO A 100 8. ISO 9. White balance 10. Metering 11. EV compensation 12. Focus Area 13.
Getting started 3.3.1 Turning the power on / off • Press the [ ] button until the digital camera turns on. Or, you can press the [ button when the camera is off to turn on the camera. • To turn the power off, press the [ ] ] button again. 3.3.2 Choosing the screen language 1. Press MENU, and then press [ ]/[ ] to move to the Setup menu. 2. Press [ ] or [ ] to move to Language, and then press [ language you want. 3. Press OK. ] or OK to select the 3.3.3 Setting the date and time 1.
English • To review the last captured image, press the button. Press the button to return to Snapshot mode. • The LCD monitor darkens in strong sunlight or bright light. This is not a malfunction. • To prevent your images from being blurred while pressing the shutter button, always hold the camera steady. This is especially important when you are shooting under low lighting conditions, under which your camera may reduce the shutter speed to ensure your images are properly exposed. 3.3.
- Flash mode Description Off Record a single image. 2 sec. The shutter release will be delayed for 2 seconds. 10 sec. The shutter release will be delayed for 10 seconds. Double Record two images in a shot after pressing the shutter release button 10 and 12 seconds. Burst Keep pressing the shutter button fully to take a continuous shooting. Release the shutter button to stop shooting. English Icon 2 10 3.3.
3.4.1.2 Selecting the Scene mode English 1. Set the camera to the REC mode. 2. Press the MODE button to show the scene mode palette. 3. Use the four-way control to select a desired mode and press OK to confirm the setting. Icon Mode Description Program The camera makes settings suitable for the shooting conditions. Movie For recording movie clips. Voice REC For recording audio. Sunset Enhance the red hue for recording sunset images.
3.4.2 Using the menus 2. Press the MENU and then press the [ 3. Press [ ] / [ the submenu. ]/[ English When a menu is displayed, the four-way control and the OK button are used to make the desired settings. 1. Turn the power on, and set the camera to the REC mode. ] to select the REC menu. ] or the OK button to launch ] to select a menu item and then press [ 4. Press [ ] / [ ] to select an option and press the OK button to apply the setting. 5. Press the MENU button to close the menu. 3.4.2.
Menu item Available settings English Metering / White Balance / / / / / / / 3.4.3 Setup menu 1. Turn the power on, and set the camera to the REC or PLAY mode. 2. Press the MENU, and then press the [ 3. Press [ ] / [ the submenu. ]/[ ] to select the Setup menu. ] to select a menu item and then press [ ] or the OK button to launch 4. Press [ ] / [ ] to select an option and press the OK button to apply the setting. 5. Press the MENU button to close the menu. 3.4.3.
Functions File No. Use this function if the camera experiences a "Folder cannot be created" error or if you want to restart numbering, for example, after erasing all files. TV Out [Series] Store the latest used file number no matter deleting files or inserting a new memory card. [Reset] Reset file numbering each time the memory card is changed. Resetting the file number is useful for avoiding the file name duplication when images are downloaded to a computer.
3.5 Recording movie clips English 1. Turn the power on, and set the camera to the Movie mode. 2. Compose the subject on the monitor. • Aim the focus area to the subject that you want to take. • The LCD monitor displays the available recording time 3. Start recording. • Press the shutter button to start recording. • Using the zoom button to adjust the image size. • The White Balance is set and locked to the settings of the first frame. • Sound cannot be recorded while pressing the zoom button.
There are 3 different light metering options available on your camera. Icon Mode Description Center Light is measured from the entire shooting screen, but gives more importance to the values near the center. Multi Selects an exposure based on readings from multiple points in the subject area Spot Selects an exposure based on a single reading taken from the center of your picture. 3.7.
3.7.5 Setting the Exposure English Set the exposure value manually to compensate for unusual lighting conditions such as indirect indoor lighting, dark backgrounds, and strong backlighting. 3.7.6 Setting the AEB Sets the auto exposure bracketing (AEB) to shoot 3 continuous images, each with a different exposure setting: correctly exposed, underexposed, and overexposed. 3.7.7 Setting the highlight Make the subject stand out from its surroundings.
The Date Stamp function can be used to add a date to your pictures as you take them. 3.7.11 Setting Stabilizer With more sensibility and faster shutter speed to bright up the pictures, effectively prevent blur image caused by hand shack or target movement, one can take good pictures with little effort. 3.7.12 Setting Face tracking After initializing face tracking function, the lens will lock the main character in the picture and follow the movements.
3.8.2 Playing back movie clips English 1. Turn the power on, and set the camera to the PLAY mode. 2. Press [ ] or [ ] to select a movie clip that you want to playback. 3. Start playing back. • Press [ • Press [ ] to start playing the movie clip. ] to stop the movie clip, or press [ press [ ] again to resume. ] to pause it. When the movie paused, • During movie playing back, press [ ] to fast forward or press [ ] to rewind it.
Protect... Start Delete... Interval: Slideshow... Music: DPOF... Transition: Copy to Card... OK Set English 3. Change the slide show settings. • Use the four-way control to set the slideshow interval, music, transiton and repeat. • You can set the interval between 1~10 seconds. 4. Playing the slide show. • Press the OK button to start the slideshow. • During the slide show, press the OK button to pause the slideshow and press the OK button again to resume. 10s 1 MENU Back 3.8.
English 5. Delete images. • Press the MENU button, then select [Yes] and press the OK button. All selected images will be deleted. • To cancel delete, press the MENU button in this step. 3.8.8 Setting the DPOF for printing The Digital Print Order Format (DPOF) setting allows you to select images on the memory card for printing and specify the number of print copies in advance using the camera.
PC Dependent Features 4.1 English 4 Bundled software The camera is supplied with the following software. To install the software, refer to the information supplied with respective CDs. ArcSoft PhotoImpression 5 Combine l'édition de photos avec des outils d'amélioration créative et de partage d'outils qui maximise votre expérience média numérique.
4.2.1 Step 1: Connect the digital camera to your computer English 1. Connect the supplied USB cable to the computer USB port and turn on the camera. 2. The LCD screen turns off when the connection to the computer has been successfully completed. 4.2.2 Step 2: Download images or video clips When the digital camera is turned on and connected to your computer, it is considered to be a disk drive, just like a floppy disk or CD.
Troubleshooting Refer to the symptoms and solutions listed below before shipping your camera for service. If the problem persists, contact your local reseller or service center. Symptom Cause The camera cannot be There is no battery or the battery is powered up. not inserted correctly. The battery has no power. The battery power is draining quickly. Solution Insert the battery correctly. Recharge your batteries or replace with new batteries. The external temperature is extremely low.
English Symptom Cause Solution I cannot download images. The free space on the hard disk of your computer is insufficient. Ensure that the hard disk has enough space for running Windows and that the drive for loading image files has free space equal to or greater than the memory card in the camera. There is no power being supplied to Recharge your batteries or replace the camera. with new batteries if necessary. The camera does not shoot even when pressing the shutter button.
Specifications Image Sensor 1/2.5-inch CCD Effective Pixels: 6.0 Mega pixels LCD Display 2.5" LTPS TFT LCD Lens Focal Length: f = 6.2 -18.6 mm (35 mm film equivalent: 37.5-112.5 mm) F No.:F2.8/F5.2 Focusing TTL Auto Focus Shutter Mechanical shutter: Up to 1/2000 sec. Range: Macro: 15 cm, Normal: 40 cm ~ infinity Flash Modes: Auto/Forced flash/Red-eye reduction/Flash off/Slow Sync Range: 0.5 ~ 2.0m Self-timer 2 sec. /10 sec.
English 7 Service Information Technical Support For free driver updates, product information and news releases, visit the following web site: http://www.BenQ.com 24 Service Information Downloaded From camera-usermanual.