
User's Manual


BenQ DC 5530 User’s Manual
English
PC DEPENDENT FEATURES24
4.2 USB Mode
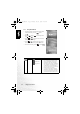
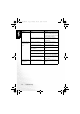
1. Insert the conversion adapter into the conversion adapter
terminal of the camera as shown in the illustration.
2. Connect the end of the smaller plug of the USB cable to
the conversion adapter.
3. Connect the other end of the USB cable to an available
USB port on your computer.
4. Turn on the camera.
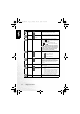
The USB screen is displayed.
5. A “Removable Disk” icon appears in “My Computer.”
Click this icon to access your images or video clips.
• When connecting to a computer, it is necessary to install a
battery or use an AC power adapter.
• The DC E520 is USB 2.0 high-speed compatible, which
makes the transmitting speed efficient.
4.3 PictBridge Mode
If a printer that supports PictBridge is available, images can be printed without using a
computer by connecting the camera directly to a PictBridge compliant printer.
Connecting the Camera to a PictBridge compliant Printer
1. In Playback Mode, press the
[] button and scroll to PictBridge.
2. Select [ ] and then you will be prompted to connect a
USB cable to the camera and the PictBridge compliant
printer.
• To establish the connection, connect a USB cable.
• To cancel, press the [] button.
3. When the connection is established, you will be asked to
select [Print One], [Print All], or [Print Index]. Select the
desired option and then press the OK button.
4. [Setup], [Print], and [Exit] options will be displayed on
the bottom of the LCD monitor.
• If you select [Setup], [Pictbridge setup] screen will be
displayed. You may set [Copies], [Size], and [Quality],
if desired.
• If you are satisfied with the settings, select [Print] to
proceed.
• If you want to cancel, select [Exit].
• The functions described above may differ due to the
design of the printer you connect to.
DC_E520_UM.book Page 24 Monday, May 30, 2005 10:56 AM