MS612ST/MX613ST Digital Projector User Manual Welcome
Table of contents Important safety instructions .........................3 Introduction........................7 Projector features .................................. 7 Shipping contents.................................. 8 Projector exterior view .......................... 9 Controls and functions ....................... 10 Adjusting the sound.............................33 Controlling the projector through a LAN environment .............................34 Presenting from a USB Reader............
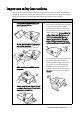
Important safety instructions Your projector is designed and tested to meet the latest standards for safety of information technology equipment. However, to ensure safe use of this product, it is important that you follow the instructions mentioned in this manual and marked on the product. Safety Instructions 1. Please read this manual before you operate your projector. Save it for future reference. 2. Do not look straight at the projector lens during operation.
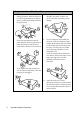
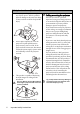
Safety Instructions (Continued) 7. 10. The lamp becomes extremely hot during operation. Allow the projector to cool for approximately 45 minutes prior to removing the lamp assembly for replacement. 8. Do not operate lamps beyond the rated lamp life. Excessive operation of lamps beyond the rated life could cause them to break on rare occasions. 11. Do not place this product on an unstable cart, stand, or table. The product may fall, sustaining serious damage.
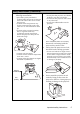
Safety Instructions (Continued) 13. Do not place this projector in any of the 14. following environments. - Space that is poorly ventilated or confined. Allow at least 50 cm clearance from walls and free flow of air around the projector. - Locations where temperatures may become excessively high, such as the inside of a car with all windows rolled up. - Locations where excessive humidity, dust, or cigarette smoke may contaminate optical components, shorten the projector's life span and darken the image.
Safety Instructions (Continued) 17. Do not step on the projector or place any objects upon it. Besides probable physical damage to the projector, doing so may result in accidents and possible injury. Ceiling mounting the projector We want you to have a pleasant experience using your BenQ projector, so we need to bring this safety matter to your attention to prevent possible damage to person and property.
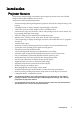
Introduction Projector features The projector integrates high-performance optical engine projection and a user-friendly design to deliver high reliability and ease of use. The projector offers the following features.
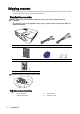
Shipping contents Carefully unpack and verify that you have all of the items shown below. If any of these items are missing, please contact your place of purchase. Standard accessories The supplied accessories will be suitable for your region, and may differ from those illustrated. *The warranty card is only supplied in some specific regions. Please consult your dealer for detailed information.
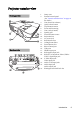
Projector exterior view 1. 2. Front/upper side 2 1 5 6 3 8 7 9 4 10 Rear/lower side 15 16 17 18 19 20 21 22 3. 4. 5. 6. 7. 8. 9. 10. 11. 12. 13. 14. 15. 16. 17. 18. 19. 20. 11 21. 22. 13 23 12 23. Lamp cover External control panel (See "Controls and functions" on page 10 for details.
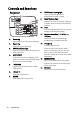
Controls and functions Projector 1 8 2 8. TEMPerature warning light 9. Lights up red if the projector's temperature becomes too high. LAMP indicator light 10. Indicates the status of the lamp. Lights up or flashes when the lamp has developed a problem. Auto 9 3 4 10 11 5 12 6 13 7 14 11 11. 1. Focus ring 2. Adjusts the focus of the projected image. 12. Zoom ring 3. Adjusts the size of the image. POWER indicator light 4. Lights up or flashes when the projector is under operation.
Remote control 9. 8 1 9 2 10 3 4 Capture 10. 5 12 13 11. 14 15 16 1. POWER 12. 2. Toggles the projector between standby mode 13. and on. Freeze 3. Freezes the projected image. CAPTURE Left/ 5. Starts the FAQ function. BLANK 6. Used to hide the screen picture. Digital Zoom (+, -) 7. Magnifies or reduces the projected picture size. Volume +/- 8. Adjusts the sound level. MENU/EXIT / Manually corrects distorted images resulting from an angled projection.
Remote control effective range Infra-Red (IR) remote control sensors are located on the front and the top of the projector. The remote control must be held at an angle within 30 degrees perpendicular to the projector's IR remote control sensors to function correctly. The distance between the remote control and the sensors should not exceed 8 meters (~ 26 feet). Make sure that there are no obstacles between the remote control and the IR sensors on the projector that might obstruct the infra-red beam.
Positioning your projector Choosing a location Your projector is designed to be installed in one of four possible installation locations: 1. Front Table Select this location with the projector placed on the table in front of the screen. This is the most common way to position the projector for quick setup and portability. 3. Rear Ceiling Select this location with the projector suspended upside-down from the ceiling behind the screen.
Obtaining a preferred projected image size The distance from the projector lens to the screen, the zoom setting, and the video format each factors in the projected image size. For example, if you are using a 120-inch screen, the recommended projection distance is 2422 mm and the vertical offset is 91 mm. If your measured projection distance is 3.0 m (3000 mm), the closest match in the "Distance from screen (mm)" column is 3028 mm. Looking across this row shows that a 150'' (about 3.8 m) screen is required.
Connection When connecting a signal source to the projector, be sure to: 1. 2. 3. Turn all equipment off before making any connections. Use the correct signal cables for each source. Ensure the cables are firmly inserted. • In the connections shown below, some cables may not be included with the projector (see "Shipping contents" on page 8). They are commercially available from electronics stores. • The connection illustrations below are for reference only.
• Many notebooks do not turn on their external video ports when connected to a projector. Usually a key combo like FN + F3 or CRT/LCD key turns the external display on/off. Locate a function key labeled CRT/LCD or a function key with a monitor symbol on the notebook. Press FN and the labeled function key simultaneously. Refer to your notebook's documentation to find your notebook's key combination. • The D-Sub output only works when an appropriate D-Sub input is made to the COMPUTER 1 jack.
Operation Starting up the projector 1. Plug the power cord into the projector and into a power outlet. Turn on the power outlet switch (where fitted). Check that the POWER indicator light on the projector lights orange after power has been applied. Please use the original accessories (e.g. power cord) only with the device to avoid possible dangers such as electric shock and fire. 2. Press POWER on the projector or POWER on the remote control to start the projector.
Adjusting the projected image Adjusting the projection angle The projector is equipped with 1 quick-release adjuster foot and 1 rear adjuster foot. These adjusters change the image height and projection angle. To adjust the projector: 1. Press the quick-release button and lift the front of the projector. Once the image is positioned where you want it, release the quick-release button to lock the foot in position. 2. Screw the rear adjuster foot to fine-tune the horizontal angle.
Correcting keystone Keystoning refers to the situation where the projected image is noticeably wider at either the top or bottom. It occurs when the projector is not perpendicular to the screen. To correct this, you will need to manually correct it following ONE of these steps. • Using the remote control Press / on the projector or remote control to display the Keystone correction page. Press to correct keystoning at the top of the image. Press to correct keystoning at the bottom of the image. Press / .
Using the menus The projector is equipped with On-Screen Display (OSD) menus for making various adjustments and settings. Below is the overview of the OSD menu. Main menu icon Main menu DISPLAY Off Wall Color Auto Aspect Ratio Keystone Position Sub-menu Status ENTER Phase 0 H. Size 0 Digital Zoom 3D Sync On Disable 3D Sync Invert Teaching Template Highlight Current input signal Analog RGB MENU Exit Press MENU/ EXIT to the previous page or to exit.
Securing the projector Using a security cable lock The projector has to be installed in a safe place to prevent theft. Otherwise, purchase a lock, such as the Kensington lock, to secure the projector. You can locate a Kensington lock slot on the rear side of the projector. See item 23 on page 9 for details. A Kensington security cable lock is usually a combination of key(s) and the lock. Refer to the lock’s documentation for finding out how to use it.
If you forget the password If the password function is activated, you will be asked to enter the six-digit password every time you turn on Password Error the projector. If you enter the wrong password, the Please try again. password error message as pictured to the right displays lasting for 3 seconds, and the INPUT PASSWORD message follows.
Changing the password 1. 2. 3. 4. Open the OSD menu and go to the SYSTEM SETUP: Advanced> Security Settings > Change Password menu. Press MODE/ENTER. The message “INPUT CURRENT PASSWORD” appears. Enter the old password. i. If the password is correct, another message “INPUT NEW PASSWORD” displays. ii. If the password is incorrect, the password error message displays lasting for three seconds, and the message “INPUT CURRENT PASSWORD” displays for your retry.
Switching input signal The projector can be connected to multiple devices at the same time. However, it can only display one full screen at a time. When starting up, the projector automatically searches for the available signals. Be sure the Quick Auto Search function in the SOURCE menu is On if you want the projector to automatically search for the signals.
Magnifying and searching for details If you need to find the details on the projected picture, magnify the picture. Use the direction arrow keys for navigating the picture. • Using the remote control 1. Press Digital Zoom+/- to display the Zoom bar. Press Digital Zoom+ to magnify the center of the picture. Press the key repeatedly until the picture size is suitable for your need. 2. Use the directional arrows ( , , , ) on the projector or remote control to navigate the picture. 3.
About the aspect ratio • In the pictures below, the black portions are inactive areas and the white portions are active areas. • OSD menus can be displayed on those unused black areas. 1. Auto: Scales an image proportionally to fit 4. the projector's native resolution in its horizontal or vertical width. This is suitable for the incoming image which is neither in 4:3 nor 16:9 and you want to make most use of the screen without altering the image's aspect ratio.
Optimizing the image Using Wall Color In the situation where you are projecting onto a colored surface such as a painted wall which may not be white, the Wall Color feature can help correct the projected picture’s colors to prevent possible color difference between the source and projected pictures. To use this function, go to the DISPLAY > Wall Color menu and press / to select a color which is closest to the color of the projection surface.
8. The confirmation message “Setting Saved” displays. Fine-tuning the image quality in user modes According to the detected signal type, there are some user-definable functions available when User 1 or User 2 is selected. Based on your needs, you can make adjustments to these functions by highlighting them and pressing / on the projector or remote control. Adjusting Brightness The higher the value, the brighter the image. And the lower the setting, the darker the image.
3D Color Management In most installation situations, color management will not be necessary, such as in classroom, meeting room, or lounge room situations where lights remain on, or where building external windows allow daylight into the room. Only in permanent installations with controlled lighting levels such as boardrooms, lecture theaters, or home theaters, should color management be considered.
7. 8. 9. Repeat steps 3 to 6 for other color adjustments. Make sure you have made all of the desired adjustments. Press MENU/EXIT to exit and save the settings. Setting the presentation timer Presentation timer can indicate the presentation time on the screen to help you achieve better time management when giving presentations. Follow these steps to utilize this function: 1. 2. Go to the SYSTEM SETUP: Basic > Presentation Timer menu and press MODE/ ENTER to display the Presentation Timer page.
Remote paging operations Connect the projector to your PC or notebook with a USB cable prior to using the paging function. See "Connection" on page 15 for details. You can operate your display software program (on a connected PC) which responds to page up/down commands (like Microsoft PowerPoint) by pressing PAGE UP/PAGE DOWN on the remote control. If remote paging function doesn't work, check if the USB connection is correctly made and the mouse driver on your computer is updated to the latest version.
Locking control keys With the control keys on the projector locked, you can prevent your projector settings from being changed accidentally (by children, for example). When the Panel Key Lock is on, no control keys on the projector will operate except 1. 2. POWER. Press / on the projector or remote control or go to the SYSTEM SETUP: Basic > Panel Key Lock menu, and select On by pressing / on the projector or remote control. A confirmation message displays. Highlight Yes and press MODE/ENTER to confirm.
1. 2. 3. Press CAPTURE on the remote control. A confirmation message displays. Press CAPTURE or MODE/ENTER again. The message 'Screen Capturing...' displays while the projector is processing the picture. Please wait. 4. If the action is successful, you see the message 'Captured Succeeded' on the screen. The captured picture is saved as My Screen. 5. To view the captured picture displayed as the startup screen, set My Screen in the SYSTEM SETUP: Basic > Splash Screen menu and restart the projector.
Controlling the projector through a LAN environment You can manage and control the projector from a remote computer when they are properly connected to the same local area network. Wireless connection To connect to the projector wirelessly, you have to plug a BenQ wireless dongle (optional) to the USB Type A connector on the projector, and then only a few OSD configuration steps are required. 1. 2. 3. 4. 5. Make sure the projector is turned on.
2. The main page of the Projector Network Display System appears. This web page provides access to a variety of functions with a simple click. 3. Click Download to save Q Presenter software on your computer. See "Displaying images through Q Presenter" on page 39 for details. The Virtual Keypad page displays a virtual keypad with which you can control the projector as if using the physical keypad on the projector. See "Projector" on page 10 for how to operate it. 4.
5. The Display Setting page provides some selective OSD menu items necessary for controlling the projector or adjusting the projected pictures. See the chapter "Menu operation" for how to use them. 6. The Picture Setting page provides all the OSD menu items in the PICTURE menu for adjusting the projected pictures. See "2. PICTURE menu" on page 48 for how to use them.
7. The Information page displays the information about the projector status, network status. 8. To have access to the Admin page, you need to enter a password. The page provides more network settings. The default password is “0000”. If you want to change the password, enter the Basic page.
The Basic page allows you to change the password and set the maximum number of connected computers. The number of connected computer may affect the network display performance. The Wireless LAN page allows you to adjust the Wireless LAN settings. The maximum length for SSID is 16 bytes. Please use different SSID when more than two projectors are connecting through wireless LAN. 9. 38 These quick buttons are always provided on the web page for you to operate the projector.
Displaying images through Q Presenter Downloading and installing Q Presenter Q Presenter is an application running on the host PC. It helps connect your computer to an available network projector and transfer the desktop contents to the network projector via local network connection. 1. 2. 3. 4. Enter the main page of the Projector Network Display System. See steps 1-2 on page 34 for details. Click the Download icon.
2. 3. 40 The Special Feature page provides some advanced functions to manage the projected images. • To display a full screen, click Full Screen. • To display a partial screen, click Selectable. A square appears on your screen. You can adjust its size and place it where you want to project. • To pause projection, click Pause. The Basic Settings page allows you to configure Q Presenter.
4. 5. The Advanced Settings page allows you to configure Q Presenter. • To display still pictures, click the down arrow to reveal a drop-down list and select Graphic. Click Apply. To display video clips, click the down arrow to reveal a drop-down list and select Video. Click Apply. Graphic mode: worse image quality but faster transmission speed. Video mode: better image quality but slower transmission speed. However, the actual transmission speed was determined by the network traffic at that time.
Presenting from a USB Reader This feature displays a slide show of images stored on a USB flash drive connected to the projector. It can eliminate the need for a computer source. Supported image formats: • • JPEG(JPG) BMP • • PNG GIF • TIFF • A square box will display on the filename for unidentified characters. • Thai filename is not supported. • Files in GIF, TIFF, PNG and BMP formats can be displayed for the file size smaller than WXGA (1280 x 800) only.
Shutting down the projector 1. Press POWER and a confirmation message will display prompting you. 2. Press POWER a second time. The POWER indicator light flashes orange, the projection lamp shuts down, and the fans will continue to run for approximately 90 seconds to cool down the projector. If you don't respond in a few seconds, the message will disappear. To protect the lamp, the projector will not respond to any commands during the cooling process.
Menu operation Menu system Please note that the on-screen display (OSD) menus vary according to the signal type selected and the projector model you are using. Main menu Sub-menu Wall Color 1. DISPLAY Aspect Ratio Keystone Position Phase H.
Main menu Sub-menu Options Timer Period Timer Display Presentation Timer Timer Position 1~240 minutes Always/1 min/2 min/3 min/ Never Top-Left/Bottom-Left/TopRight/Bottom-Right Timer Counting Count Down/Count Up Direction Sound Reminder On/Off On/Off Language 4.
Main menu Sub-menu Options Quick Cooling On/Off High Altitude Mode On/Off Mute On/Off Volume Audio Settings Power On/Off On/Off Ring Tone Lamp Mode Normal/Economic Lamp Settings Reset Lamp Timer Equivalent Lamp Hour Change Password Security Change Security Power On Lock 5.
Description of each menu Function Description Wall Color Corrects the projected picture’s color when the projection surface is not white. See "Using Wall Color" on page 27 for details. There are several options to set the image's aspect ratio depending on your input signal source. See "Selecting the aspect ratio" on page 25 for details. Corrects any keystoning of the image. See "Switching input signal" on page 24 for details. Displays the position adjustment page.
Function Description When the 3D Sync function is On: 1. DISPLAY menu 3D Sync (continued) • The brightness level of the projected image will decrease. • The Picture Mode cannot be adjusted. • The Keystone can only be adjusted within limited degrees. 3D Sync Invert When you discover the inversion of the image depth, enable this function to correct the problem. Provides several preset patterns for various teaching purposes. Teaching Template Picture Mode Reference Mode Brightness Contrast 2.
Function Description 3. SOURCE menu Quick Auto Search See "Switching input signal" on page 24 for details. Color Space Conversion See "Changing Color Space" on page 24 for details. Presentation Timer Reminds the presenter to finish the presentation within a certain time frame. See "Setting the presentation timer" on page 30 for details. Language Sets the language for the On-Screen Display (OSD) menus. See "Using the menus" on page 20 for details.
Function 4. SYSTEM SETUP: Basic menu Panel Key Lock Disables or enables all panel key functions except POWER on the projector and keys on the remote control. See "Locking control keys" on page 32 for details. Background Sets the background color for the projector. Color Splash Screen My Screen Allows you to select which logo screen will display during projector start-up. The following options are available: BenQ logo, My Screen, Black screen, Blue screen.
Function Baud Rate Test Pattern Description Selects a baud rate that is identical with your computer’s so that you can connect the projector using a suitable RS-232 cable and update or download the projector’s firmware. This function is intended for qualified service personnel. Selecting On enables the function and the projector displays the grid test pattern. It helps you adjust the image size and focus and check that the projected image is free from distortion.
Function FAQ-Image and Installation 6. INFORMATION menu FAQFeatures and Service Description Displays possible solutions to problems you may encounter. Source Shows the current signal source. Picture Mode Shows the selected mode in the PICTURE menu. Current System Status Resolution Shows the native resolution of the input signal. Color System Shows input system format: NTSC, PAL, SECAM, YUV, or RGB. Equivalent Lamp Hour Displays the number of hours the lamp has been used.
Maintenance Care of the projector Your projector needs little maintenance. The only thing you need to do on a regular basis is to keep the lens and case clean. Never remove any parts of the projector except the lamp. Contact your dealer if other parts need replacing. Cleaning the lens Clean the lens whenever you notice dirt or dust on the surface. • • • Use a canister of compressed air to remove dust.
Lamp information Getting to know the lamp hour When the projector is in operation, the duration (in hours) of lamp usage is automatically calculated by the built-in timer. See "Setting Lamp Mode as Economic" below for more information on Economic mode. To obtain the lamp hour information: 1. Press MENU/EXIT and then press / to highlight the SYSTEM SETUP: Advanced menu. 2. Press to highlight Lamp Settings and press MODE/ENTER. The Lamp Settings page displays. 3.
Timing of replacing the lamp When the Lamp indicator lights up red or a message appears suggesting it is time to replace the lamp, please install a new lamp or consult your dealer. An old lamp may cause a malfunction in the projector and in some instances the lamp may explode. Go to http://lamp.benq.com for a replacement lamp. The LAMP indicator light and TEMPerature warning light will light up if the lamp becomes too hot. Turn the power off and let the projector cool for 45 minutes.
Replacing the lamp • To reduce the risk of electrical shock, always turn the projector off and disconnect the power cord before changing the lamp. • To reduce the risk of severe burns, allow the projector to cool for at least 45 minutes before replacing the lamp. • To reduce the risk of injuries to fingers and damage to internal components, use caution when removing lamp glass that has shattered into sharp pieces.
7. Use the handle to slowly pull the lamp out of the projector. • Pulling it too quickly may cause the lamp to break and scatter broken glass in the projector. • Do not place the lamp in locations where water might splash on it, children can reach it, or near flammable materials. • Do not insert your hands into the projector after the lamp is removed. If you touch the optical components inside, it could cause color unevenness and distortion of the projected images. 8.
Do not turn the power on with the lamp cover removed. Resetting the lamp timer 15. After the startup logo, open the On-Screen Display (OSD) menu. Go to the SYSTEM SETUP: Advanced > Lamp Settings menu. Press MODE/ENTER. The Lamp Settings page displays. Highlight Reset Lamp Timer. A warning message is displayed asking if you want to reset the lamp timer. Highlight Reset and press MODE/ENTER. The lamp time will be reset to “0”. Do not reset if the lamp is not new or replaced as this could cause damage.
Indicators Light Status & Description Power events Orange Green Flashing Green Off Off Stand-by mode. Off Off Powering up. Off Off Orange Flashing Off Off Normal operation. • The projector needs 90 seconds to cool down as it was abnormally shut down without the normal cooling down process. • The projector needs to cool for 90 seconds after the power is turned off. • The projector has shut down automatically. If you try to restart the projector, it will shut down again.
Troubleshooting The projector does not turn on. Cause There is no power from the power cord. Attempting to turn the projector on again during the cooling process. Remedy Plug the power cord into the AC power jack on the projector, and plug the power cord into the power outlet. If the power outlet has a switch, make sure that it is switched on. Wait until the cooling down process has completed. No picture Cause The video source is not turned on or connected correctly.
Specifications Projector specifications All specifications are subject to change without notice. Optical Control Resolution (MS612ST) 800 x 600 SVGA (MX613ST) 1024 x 768 XGA Display system 1-CHIP DMD Lens F/Number F = 2.6-2.78 Lamp (MS612ST) 190 W lamp (MX613ST) 210 W lamp RS-232 serial control 9 pin x 1 IR receiver x 2 Input terminals Power supply AC100–240V, 3.
Dimensions 311.81 mm (W) x 104.07 mm (H) x 244.11 mm (D) 311.81 244.11 104.07 51.1 Ceiling mount installation 160 46.21 80 115 Ceiling Mount screw: M4 x 8 (Max L = 8 mm) 137 Unit: mm 364.40 397.90 446.15 74.19 95.33 156.33 119.21 244.12 311.81 62 Specifications 58.
Timing chart Supported timing for PC input Resolution 640 x 480 800 x 600 720 x 400 1024 x 768 1024 x 576 1024 x 600 1280 x 800 1280 x 1024 1280 x 960 1440 x 900 1400 x 1050 1600 x 1200 640 x 480@67Hz 832 x 624@75Hz 1024 x 768@75Hz 1152 x 870@75Hz 640 x 480 800 x 600 1024 x 768 Mode VGA_60* VGA_72 VGA_75 VGA_85 SVGA_60* SVGA_72 SVGA_75 SVGA_85 720 x 400_70 XGA_60* XGA_70 XGA_75 XGA_85 BenQ BenQ WXGA_60* WXGA_75 WXGA_85 SXGA_60* SXGA_75 SXGA_85 1280 x 960_60* 1280 x 960_85 WXGA+_60* SXGA+_60* UXGA MAC13
Supported timing for HDMI (HDCP) input Resolution Mode 1400 x 1050 1600 x 1200 VGA_60* VGA_72 VGA_75 VGA_85 VGA_120* VGA_70 SVGA_56 SVGA_60* SVGA_72 SVGA_75 SVGA_85 SVGA_120* XGA_60* XGA_70 XGA_75 XGA_85 XGA_120* 1152 x 864_75 1280 x 768_60* 1280 x 768_60* 1280 x 768_75 1280 x 768_85 WXGA_60* WXGA_75 WXGA_85 SXGA_60* SXGA_75 SXGA_85 1280 x 960_60* 1280 x 960_85 1360 x 768_60* WXGA+_60* WXGA+_60* WXGA+_75 WXGA+_85 SXGA+_60* UXGA 1680 x 1050 1680x1050_60 640 x 480 720 x 400 800 x 600 1024 x 768 1152
Timing Resolution Vertical Frequency (Hz) Horizontal Frequency (kHz) Pixel Frequency (MHz) Remark 480i 480p 576i 576p 720/50p 720/60p 1080/50i 1080/60i 1080/24P 1080/25P 1080/30P 1080/50P 1080/60P 720 (1440) x 480* 720 x 480 720 (1440) x 576 720 x 576 1280 x 720 1280 x 720 1920 x 1080 1920 x 1080 1920 x 1080 1920 x 1080 1920 x 1080 1920 x 1080 1920 x 1080 59.94 59.94 50 50 50 60 50 60 24 25 30 50 60 15.73 31.47 15.63 31.25 37.5 45.00 28.13 33.75 27.00 28.125 33.75 56.25 67.5 27 27 27 27 74.25 74.
Warranty and Copyright information Limited warranty BenQ warrants this product against any defects in material and workmanship, under normal usage and storage. Proof of purchase date will be required with any warranty claim. In the event this product is found to be defective within the warranty period, BenQ's only obligation and your exclusive remedy shall be replacement of any defective parts (labor included).
Regulation statements FCC statement (for United States users) CLASS B: This equipment generates, uses and can radiate radio frequency energy and, if not installed and used in accordance with the instructions, may cause harmful interference to radio communications. However, there is no guarantee that interference will not occur in a particular installation.
Accessibility Requirements for Rehabilitation Act of 1973, Section 508 BenQ's commitment to accessible products allows us to support government in making accessible technology choices. BenQ's LCD monitors and projectors are compliant with Section 508 guidelines by including the assistive features as below: • • • • • • • • • • 68 BenQ's monitors have colored "Power" indicators. While the indicator shows green, it means that the monitor is using the full power.