English DV3750 LCD Display User's Manual Welcome
Copyright English Copyright BenQ Corporation. All rights reserved. No part of this User's Manual may be reproduced, transmitted, transcribed, stored in a retrieval system or translated into any language or computer language, in any form or by any means, electronic, mechanical, magnetic, optical, chemical, manual or otherwise, without the prior written permission of BenQ Corporation. Dolby, Pro Logic, and the double-D symbol are registered trademarks of Dolby Laboratories.
8. Heat sources - Keep the product away from heat sources such as radiators, heaters, stoves and other heat-generating products (including amplifiers). 9. Power cord protection - Power-supply cords should be routed so that they are not likely to be walked on or bitten by small animals. Pay particular attention to cords at doors, plugs, receptacles, and the point where they exit from the product. 10. Attachments - Do not use attachments not recommended by the manufacturer.
English 19. Stand - Do not place the product on an unstable trolley, stand, tripod or table. Placing the product on an unstable base can cause the product to fall, resulting in serious personal injuries as well as damage to the product. 20. Careful move - When relocating the product placed on a trolley, it must be moved with the utmost care. Sudden stops, excessive force and uneven floor surfaces can cause the product to fall from the trolley. 21.
Table of Contents English Introduction............................................................................1 Functions and Features ...................................................................................... 1 Package Contents....................................................................2 Getting Started with Your Display.........................................3 Main Unit (Front View).....................................................................................
English Selecting a Picture Mode .................................................................................... 16 Using the Freeze Function.................................................................................. 16 Adjusting Aspect Ratio ....................................................................................... 16 Using the Picture-in-Picture (PIP)/Picture-by-Picture (PBP) Function ........ 16 Using the Sleep Timer ..............................................................
Introduction Functions and Features The DV3750 has many useful functions and features, including: • 1920 x 1080 image resolution • 550 nits brightness • 800:1 contrast ratio • Compatible with all digital television (DTV) formats, including 1080i, 720P, 576P and 480P • 2:2 Pull Down Recovery • De-Interlacing • Multiple picture modes • Picture In Picture and Picture By Picture display functions • Virtual Dolby Surround Pro Logic II surround experience • SRS TruSurround XT surround experience • Graphic OSD •
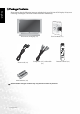
Package Contents English Please ensure that the following items are included with your DV3750 LCD Display. If any item is missing or damaged, contact an authorized dealer immediately. DV3750 LCD Display (x1) Power cord (x1) User's manual (x1) Composite (AV) video cable (x1) Remote control (x1) AAA batteries (x2) Actual number and type of cables may vary with the location of purchase.
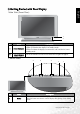
Getting Started with Your Display English Main Unit (Front View) 1 2 No. 1 2 Name Description • Lights up green when the display is powered on. Power indicator • Lights up red when the display is in standby mode. • Flashes red when the display is connected to a PC and the PC enters standby mode. Remote control Receives the signal from the remote control. Do not put any objects in sensor window front of the window in order not to hinder the reception of signals. Control Panel 5 No.
2 INPUT English • This button allows you to switch among signal sources. • When the OSD (On-Screen Display) menu is on, press this button to enter the submenu. 3 Channel / button • Press these buttons to sequentially select channels. • When the OSD menu is on, press these buttons to move the selection focus up or down or change settings. 4 Volume / button • Press Volume to increase the volume, or Volume to decrease it.
Main Unit (Rear View) English 12 12 11 10 No. 1 2 3 4 5 9 8 7 6 5 4 32 1 Name AUDIO OUT (L/R) Description Connect the audio input of an amplifier here. you to connect to the SCART output terminal of your DVD AV2 (SCART connector) Allows player or other AV devices. you to connect to the SCART output terminal of your DVD AV1 (SCART connector) Allows player or other AV devices. TV/CATV Antenna Connect your antenna to this input. RS232 This terminal is for service purpose only.
English 9 PC 10 DVI (Digital Video Interface) 11 12 AC INLET Speaker connectors • PC D-SUB (15-pin D-SUB computer signal input): For connecting to PC's analog video output. • PC AUDIO: For connecting to PC's audio output. • DVI (Digital Video Interface): For connecting to PC's digital video output. • DVI AUDIO (Audio input, L/R): For connecting to DVI's digital audio output. Connect the power cord to this input. Connect the external speakers to these connectors.
Connecting Composite (AV) Video Signal (RCA) English Connect the Composite (AV) output of your AV equipment to the Composite (AV3) signal terminal on the display using a Composite (AV) video cable (RCA connector) as illustrated. Composite video input is the most commonly used signal input. However, this type of input also provides a less optimal image quality. Many video sources can only output Composite video signals, for example, VCRs and camcorders.
Connecting S-Video Signals English 1. Connect the S-Video output of your AV equipment to the display's S-VIDEO terminal using an S-Video cable. Pay attention to the direction of the connector on the S-Video cable when inserting. 2. Connect the audio output of your AV equipment to the display's S-VIDEO AUDIO L/R input terminals using the AV cable or equivalent. S-Video cable An S-video signal provides a higher quality image to that of Composite video. It is recommended to use this input whenever possible.
Connecting RGB Signals (Mini D-SUB) English 1. Connect the analog video output of your PC to the PC D-SUB terminal on the display using a Mini D-SUB 15-pin cable. 2. Connect the audio output of your PC to the display's PC AUDIO input terminal using an appropriate cable. 1. If the signal resolution is greater than the default resolution, the screen may be unable to display image details clearly. 2. You will need a converter to connect a Macintosh computer video to the display using a PC D-SUB 15-pin cable.
Connecting Audio Output Signals English DV3750 provides extra audio output terminals for delivering audio signal to an amplifier or other audio devices. Connect the AUDIO OUT L/R terminals on the display to the signal input terminals of an amplifier or other audio devices using the AV cable or equivalent. Audio (AV) cable Connecting the Power Cord 1. Connect the female end of the AC power cord to the AC input on the display. 2. As shown in the diagram, connect the male end to a wall power outlet.
Initial Setup 2. Press the Power button on the display. The display will turn on. The following First Turn On screen will appear. 3. Press the Volume or Volume buttons on the display to select a screen display language, and then press the Channel button on the display to go to the next step. 4. Press the Volume or Volume buttons on the display to select your country, and then press the Channel button on the display to go to the next step. 5.
Remote Control English Below is the function description for each button on your remote control. 1. (Power) Press this button to power on the display. Press again to put the display to standby mode. 2. (Input) Press this button to select your desired input source. 3. (Backlight) Press this button to adjust screen backlight. 4. (Information) Press this button to display the TV channel message and other signal messages (including video or computer signals). 5.
English 13. (Teletext) Press this button to turn on the Teletext function. press this button again to turn it off. 14. PIP/PBP Press this button to simultaneously view signals from two different sources on the screen.You may choose picture-inpicture (PIP) mode or picture-by-picture (PBP) mode. 15. / / / and OK • : Press the or buttons to select settings. • : Press the or buttons to adjust OSD menu settings. • Press OK to execute selections, or to enter a submenu you have selected. 16.
Using the Remote Control English When using the remote control, aim it at the remote control sensor window on the display. If there is an object between the remote control and the signal remote control sensor window on the display, the remote may not operate. When using the remote control, please note: • Do not strike or drop the remote. Do not expose the remote control to liquids and do not place it in humid environments. • Do not install or place the remote control in direct sunlight.
Using the Remote Control English Power on, Power off and Standby Turning on the display 1. After plugging the display's power cord into a wall outlet, the display will turn on and enter standby mode automatically. The power indicator will light up red. 2. Press the Power button on the display, or press the (Power) button on the remote control. The display will turn on. (The power indicator changes to green.
channel 28, press the Channel entry button, and then the buttons on the remote control. English Using the Channel / , channel selection buttons to sequentially change channels Press the Channel or Channel buttons on your remote control, or press the Channel or Channel buttons on the display to sequentially select the TV channels available in your area. Using the channel return button to return to the previous viewed channel To return to the previous viewed channel, press the control.
English • PIP G on V: Enter PIP mode and display graphics in video. • PIP V on G: Enter PIP mode and display video in graphics. • PBP G by V: Enter PBP mode and display graphics by video. • PBP V by G: Enter PBP mode and display video by graphics. V (video)= TV, AV1, AV1-RGB, AV2, AV2-S, AV3, AV3-S, AV4, AV4-S input image. G (Graphics)= Component 1, Component 2, PC or DVI input image. Using the Sleep Timer 1. Press the (Sleep timer) button on your remote control to set the automatic sleep timer. 2.
On-Screen Display (OSD) Menu English OSD Structure 18 On-Screen Display (OSD) Menu
Navigating the OSD Menu Press the MENU button on your remote control, or the MENU button on your display to bring up the following main OSD menu on the screen: • Press the , , or buttons on the remote control, or the Channel , Channel , Volume or Volume buttons on the display to select items on the main menu, choose functions or change settings. • Press the OK button on the remote control, or the INPUT button on the display to enter the submenu.
English Balance Adjust left or right speaker volume level. This option will become unavailable if Audio Out is set to On. Select audio type (This option will only appear when AV1, AV1-RGB, AV2, AV2-S, AV3, AV3-S, AV4, AV4-S, PC, Component 1, Component 2 Sound Type or DVI is selected as the signal source). Use to increase right speaker volume, -12 to +12 to increase left speaker volume level. Use the and buttons on the remote control or the Volume and Volume buttons on the display to change selection.
Picture Menu 2. Press the or buttons to select Picture and then press OK to enter the submenu. 3. Press the or buttons to select an item. 4. In the Picture Menu, use the or buttons to adjust the setting or select the options. 5. To return to the menu one level up, press the MENU button on the remote control, or the MENU button on the display. Item Function Operation Use to increase conContrast Adjust image contrast. trast, or to reduce it. brighter blacks, Brightness Adjust image black level.
for more red concentration, for less red concentration. for more green concenGreen Adjust green in image. tration, for less green concentration. for more blue concenBlue Adjust blue in image. tration, for less blue concentration. for more yellow conYellow Adjust yellow in image. centration, for less yellow concentration. Press or buttons to the user situation different user profiles select Save Settings Two preset Personal 1 or Percan be set. sonal 2. Then press OK to save your current settings.
Feature Menu 2. Press the or buttons to select Feature and then press OK to enter the submenu. 3. Press the or buttons to select an item. 4. In the Feature Menu, use the or buttons to adjust the setting or select the options. 5. To return to the menu one level up, press the MENU button on the remote control, or the MENU button on the display. Item Function Operation Select which audio Use the and buttons on source you want to hear.
English Aspect Ratio Adjust image aspect ratio. Use the and buttons on the remote control or the Volume and Volume buttons on the display to change selection. Use the and buttons on the remote control or the Volume and Volume buttons on the display to change selection. Use the and buttons on Select video signal input the remote control or the Video source for PIP/PBP Volume and Volume Input function. buttons on the display to change selection.
PIP/PBP Functions are available with 480P, 576P, 720P and 1080i HDTV formats. 1. Press the MENU button on the remote control or the MENU button on the display to display the main menu. 2. Press the or buttons to select TV and then press OK to enter the submenu. 3. Press the or buttons to select an item. 4. In the TV Menu, use the or buttons to adjust the setting or select the options. 5. To return to the menu one level up, press the MENU button on the remote control, or the MENU button on the display.
Performing Manual Installation English The Manual Installation option allows you to manually adjust channel settings. 1. In the TV Menu, press the or buttons to select Manual Installation. and then press the OK button. The following Manual Installation menu will appear. 2. Press the or buttons to select a TV standard according to your local TV system. 3. Press the button to highlight Select CH and then press the channel you want to set up. or buttons to select a TV 4.
3. Press the button to highlight Edit Name and then press the for the channel. or buttons to enter a name Swapping Channels 1. In the TV Menu, press the ton. or buttons to select Channel Edit and then press the OK but- 2. In the Channel Edit menu that appears, press the button, and then the or buttons or the channel selection buttons to select the number of the channel you wish to change. 3. Press the button to highlight PR Swap and then press the tons to select the channel to be moved.
English • Locked: Enable Child Lock. Once enabled, the locked channels (Refer to "Locking (Preventing a Channel from Selection)/Unlocking a Channel" on page 27 for how to lock a channel) will be locked. • UnLocked: Disable Child Lock. 4. Press the MENU button to close menus. Changing Password 1. In the TV Menu, press the ton. or buttons to select Child Lock and then press the OK but- 2. Press the button to select Change Password and then enter a new 4-digit password using the channel selection buttons.
Troubleshooting TV Symptoms Possible Causes Ensure the power plug is securely inserted into the receptacle Power does not turn ON and wall socket. • Ensure the display power is ON (Indicated by the green Power indicator on the front of the unit) • Try a different input source to check whether the source is at There is no picture or sound fault. • Check for mis-connection of cables or for wrong input source.
There is no picture or sound, just noise. English Picture is not clear. No sound. • Make sure the antenna cable is properly connected. • Change channels to confirm if the symptom is still present. • Make sure the antenna cable is properly connected. • Change channels to confirm if the symptom is still present. • If PC is selected as the input signal source, use the Auto function in the PC Menu to let the TV adjust picture automatically. • Check whether you have selected Mute for Audio setting.
Specifications Video Signal inputs PC Signal outputs Scan format PC horizontal frequency PC vertical frequency Power supply Operating temperature Storage temperature English Model Size Aspect ratio Resolution Pitch Brightness Contrast ratio Viewing angle Response time Amplifier TV DV3750 94 cm (37 inches) 16:9 1920 x 1080 0.42675 x 0.
Supported Modes English Resolution 720 × 400 640 × 480 640 × 480 640 × 480 800 × 600 800 × 600 1024 × 768 Horizontal Freq. (khz) Vertical Freq. (Hz) Bandwidth (Mhz) 31.47 70.08 28.32 31.47 60.00 25.18 37.50 75.00 31.50 37.86 72.80 31.50 37.88 60.32 40.00 46.86 75.00 49.50 48.36 60.00 65.00 Notes DOS mode DOS mode VESA VESA VESA VESA VESA Optimal settings for this product are as listed above. It is suggested that you select appropriate settings from this table to obtain optimal performance.