
User's Manual


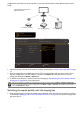

Table Of Contents
- Copyright
- Disclaimer
- Product support
- Power safety
- Getting started
- Getting to know your monitor
- How to assemble your monitor hardware
- Getting the most from your BenQ monitor
- How to adjust your monitor
- The control panel
- 5-way controller and basic menu operations
- Setting up your monitor for different scenarios
- Switching the inputs quickly with the looping key
- Working with the Quick Menu
- Available menu options to each Color Mode
- Adjustable OSD settings
- Working with the HDRi hot key
- Adjusting screen brightness automatically (Bright Intelligence Plus)
- Working with HDR technology
- Choosing an audio scenario
- Adjusting display mode
- Choosing an appropriate color mode
- Connecting the monitor to your MacBook series product
- Enabling color vision accessibility (Color Weakness)
- Activating FreeSync Premium
- Working with Video Format Support technology
- Initial setup for playing games at 144 Hz
- Navigating the main menu
- Troubleshooting
25
How to install on Windows 7 system
1. Open Display Properties.
Go to Start, Control Panel, Hardware and Sound, Devices and Printers and right-click the name of
your monitor from the menu.
Alternatively, right-click the desktop and select Personalize, Display, Devices and Printers, and
right-click the name of your monitor from the menu.
1. Select Properties from the menu.
2. Click the Hardware tab.
3. Click Generic PnP Monitor, and then the Properties button.
4. Click the Driver tab and the Update Driver button.
5. In the Update Driver Software window, select the option Browse my computer for driver
software
.
6. Click
Browse and locate the driver files downloaded from the Internet as instructed in Downloading
the LCD Monitor driver files from the Internet on page 20.
7. Click
Close.
You may be prompted to restart your computer after the driver update is complete.