FP2091/FP2092 LCD Color Monitor 20.
i Copyright Copyright © 2006 by BenQ Corporation. All rights reserved. No part of this publication may be reproduced, transmitted, transcribed, stored in a retrieval system or translated into any language or computer language, in any form or by any means, electronic, mechanical, magnetic, optical, chemical, manual or otherwise, without the prior written permission of BenQ Corporation.
i Table of Contents Getting started ...................................................................................................................... 5 Getting to know your monitor ............................................................................................ 7 Front View ...................................................................................................................7 Back View (1) .........................................................................................
Table of Contents
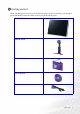
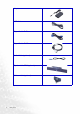
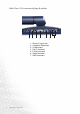
1 Getting started When unpacking please check you have the following items. If they are missing or are damaged, please immediately contact the dealer at which you purchased the goods.
Adapter USB Cable Signal Cable: D-Sub Signal Cable: DVI-D Audio Cable (optional) Speaker Unit: SRS (optional) Webcam Unit (optional) 6 Getting started
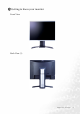
2 Getting to know your monitor Front View Back View (1) Getting to know your monitor 7
Back View (2): Locations of plugs & sockets 1 2 1. 2. 3. 4. 5. 6. 7.
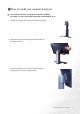
3 How to install your monitor hardware If the computer is turned on you must turn it off before continuing. Do not plug-in or turn-on the power to the monitor until instructed to do so. 1. Unpack the package and place the monitor stand firmly. 2. Align the slots on the monitor against the notches on the monitor stand. 3. Place the monitor on the monitor stand and push it forward until you hear a clicking sound.
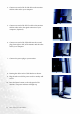
4. Connect one end of the D-Sub cable to the monitor and the other end to your computer. 5. Connect one end of the DVI-D cable to the monitor and the other end to the signal connector of your computer. (Optional). 6. Connect one end of the USB cable into the second plug (from right to left) of the monitor and the other end to your computer. 7. Connect the power plug to your monitor. 8. Routing the cables in the Cable Bracket as shown. 9. Plug the other end of the power cord in a nearby wall socket. 10.
Adjusting Your Monitor Monitor Height To prevent from the springing out of the monitor stand, please press the top edge of monitor stand while you press the release button to adjust the monitor at a preferred height.
Adjusting Monitor Orientation While making a rotation, please push the monitor to a forward tilt angle or lift up the monitor to avoid causing any damage to the monitor base.
4 Getting the most from your BenQ monitor Monitors and USB hubs Your BenQ FP2091/FP2092 LCD Monitor is a modern state-of-the-art device. It not only utilizes the latest LCD display technology currently available – it contains a built-in 3 port USB 2.0 hub. Using only one USB 2.0 port on your computer (freeing the others up for other uses), the built-in hub provides close, handy, easy-to-use access for your USB devices.
How to install the monitor on a new computer This instruction details the procedure for selecting and installing the BenQ LCD Monitor driver software on a new computer which has never had a monitor driver installed before. This instruction is only suitable for a computer which has never been used before, and for which the BenQ LCD Monitor is the first ever monitor to be connected to it.
How to upgrade the monitor on an existing computer This instruction details the procedure for manually updating the existing monitor driver software on your Microsoft Windows computer. It is currently tested as compatible (and recommended only) for Windows 98, Windows ME, Windows 2000, and Windows XP Operating System (OS).
How to install on Windows XP systems 1. Open Display Properties. The quickest shortcut to Display Properties is through the Windows desktop. Right-click the desktop and select Properties from the popup menu. Alternatively, the Windows menu to Display Properties is located in Control Panel. In Windows XP version, Control Panel is located directly under the main Start menu item. The menu options displayed will depend upon which type of view is selected for your system.
How to install on Windows 2000, ME, & 98 systems You do not need to follow this instruction if you are installing onto a computer which has a Windows XP (or later) version system. In that case, see the instructions at How to install on Windows XP systems. 1. Open Display Properties. The quickest shortcut to Display Properties is through the Windows desktop. Right-click the desktop and select Properties from the popup menu. Alternatively, the Windows menu to Display Properties is located in Control Panel.
How to complete the Windows Upgrade Device Driver Wizard 1. Load the BenQ LCD Monitor CD-ROM which came with your monitor. Insert the CD-ROM into a CD drive on the computer you attached the monitor to. The autorun User’s Guide language selection page will display in your web browser. You can select a language and view the online version of this manual from the next window. You could then print it out for reference if you wish to work off-line.
Should you wish to do so, this is where you can change the screen resolution (area and color). See How to adjust the screen resolution for details. 14. Click OK. This will close the Display Properties window, and if you made any changes to the screen resolution, Windows 2000 will prompt you for confirmation to effect the changes, and further confirmation to accept the changes. Click OK and Yes respectively. Alternatively, Windows ME or 98 will ask you if want to make the changes and reboot or not reboot.
151 1How to adjust the screen resolution Due to the nature of liquid crystal display (LCD) technology, the picture resolution is always fixed. The best possible picture for your FP2091/FP2092 is achieved with a resolution of 1600x1200. This is called “Native Resolution” or maximal resolution – that is, the clearest picture. Lower resolutions are displayed on a full screen through an interpolation circuit. However flaws do occur with the interpolated resolution.
161 1How to adjust the screen refresh rate You don’t have to choose the highest possible refresh rate on an LCD display, because it is not technically possible for an LCD display to flicker. The best results are obtained by using the factory modes already set in your computer. There is a table with the factory modes in the specification section of this User’s Manual. You can choose 60 Hertz for the native resolution of 1600x1200. 1. Double click the Display icon in Control Panel. 2.
171 1How to set the picture optimization The easiest way to obtain an optimal display is to use the i key function. Press the i key to optimize and adjust the screen settings automatically for you. Refer to How to adjust your Monitor for button locations and functionality. If you wish to, you can always adjust the screen settings manually using the buttons on the monitor panel.
8 How to adjust your monitor A Look at the Control Panel 1 2 3 4 5 6 7 There are 7 keys for user’s control including “Enter”, “t”, “u”, “Exit”, “Input” and “iKey” and a power switch. The following descriptions are the introduction of these keys & switch. 1. “Power”: Turn the power on or off. 2. “Enter” key: Activate OSD, enter sub menu, select items, confirm selection. 3. t (Up) key: For Up/Increase adjustment. The key is also the hot key for Brightness. 4. u (Down) key: For Down/Decrease adjustment.
Hot Key Mode Brightness and Contrast hot key Press t to enter Brightness menu, press t or u key to adjust the degree of brightness and press “Exit” to exit OSD. Press uto enter Contrast menu, press t or u key to adjust the degree of Contrast and press “Exit” to exit OSD. Input hot key Press the "Input" key to enter Input menu, and press t or u key to indicate the input source and press "Enter." When done, press “Exit” to exit OSD.
Luminance sub menu Press t or u key to adjust the degree of Brightness, press “Exit” to return to the previous menu. Press t or u key to adjust the degree of Contrast, press “Exit” to return to the previous menu.
Geometry sub menu Press t or u key to adjust the Horizontal Position, press “Exit” to return to previous menu. Press t or u key to adjust the Vertical Position, press “Exit” key to return to previous menu. Press t or u key to adjust the value of the Pixel Clock, press “Exit” to return to previous menu. Press t or u key to adjust the degree of Phase, press “Exit” to return to previous menu.
Color sub menu User Preset: User may set the color balance of Red, Green and Blue.
OSD sub menu Press t or u key to adjust the Horizontal Position of the OSD, press “Exit” to return to previous menu. Presstor u key to adjust the Vertical Position of the OSD, press “Exit” to return to previous menu. Press t or u key to adjust the display time of the OSD, press “Exit” to return to previous menu. Press t or u key to determine activation or inactivation of OSD rotate display. When done, press "Enter" to activate the settings. Press "Exit" to return to previous menu.
Languages sub menu PIP sub menu Press t or u key to indicate the PIP Source as S-Video or Composite, or choose Off to disable this function. When done, press "Enter" to activate the settings. To return to previous menu, press "Exit.
Press t or u key to specify the PIP Size. When done, press “Enter” to initiate the settings. Press “Exit” to return to previous menu. Press t or u key to set the PIP Brightness value between 0 and 100. When done, press “Enter” to initiate the settings. Press “Exit” to return to previous menu. Press t or u key to set the PIP Contrast value between 0 and 100. When done, press “Enter” to initiate the settings. Press “Exit” to return to previous menu.
Press t or u key to adjust the value of Saturation between 0 and 100. When done, press “Enter” to activate the settings. To return to previous menu, press “Exit.” Recall sub menu Press t or u key to confirm Color Recall, press “Enter” to recall color settings, or press “Exit” to return to previous menu. Press t or u key to confirm Recall All, press “Enter” key to recall position and color settings, or press “Exit” key to return to previous menu.
Miscellaneous sub menu Input Select: Select D-sub (analog), DVI (digital), S-Video, or Composite input. Display Information.
9 Troubleshooting Frequently Asked Questions (FAQ) The image is blurred: Read the How to adjust the screen resolution section, and then select the correct resolution, refresh rate and make adjustments based on these instructions. How do you use a VGA extension cable? Remove the extension cable for the test.
The image is distorted, flashes or flickers: Read the How to adjust the screen resolution section and then select the correct resolution, refresh rate and make adjustments based on these instructions. The image is displaced in one direction: Read the How to adjust the screen resolution section and then select the correct resolution, refresh rate and make adjustments based on these instructions.
10 Supported operating modes Incoming display mode (Input timing) Resolution Horizontal Frequency (KHz) Vertical Frequency (Hz) 640x350 720x400 640x480 640x480 640x480 640x480 800x600 800x600 800x600 832x624 1024x768 1024x768 1024x768 1024x768 1152x864 1152x870 1152x900 1152x900 1280x960 1280x1024 1280x1024 1280x1024 1280x1024 1600x1200 31.47 31.47 31.47 35.00 37.86 37.50 37.88 48.08 46.87 49.72 48.36 56.48 60.02 60.24 67.50 68.68 61.80 71.81 60.0 64.00 75.83 80.00 81.18 75 70.08 70.08 60.00 67.00 72.
11 Specifications BenQ FP2091 Model FP2091 Display type 20.1" , active, TFT Viewable diagonal 51.05 cm Native (maximum) resolution 1,600X1,200 Colors 16.7 million Contrast / Brightness 400:1 / 250 cd/m2 Response time 16 ms Viewing angle (left/right, up/down) Line frequency 88/88, 88/88 (CR=10) Image frequency Image checks 50 - 76 Hz modes within these parameters Digital, OSD Technology, iKey (automatic image setting) Controls 6 buttons and iKey.
Certifications Operating voltage TCO 03, TÜV/Ergonomics, TÜV/ GS, FCC Class B, ISO 13406-2, VCCI, UL, CB Report, CE, C-Tick, BSMI, Fimko, GOST Automatic switched mode power supply, 90-264 V, 47-63Hz Dimensions (W x H x D) 461.2 x 445.2 x 242.6 mm Weight 8.
BenQ FP2092 Model FP2092 Display type 20.1" , active, TFT Viewable diagonal 51.05 cm Native (maximum) resolution 1,600X1,200 Colors 16.7 million Contrast / Brightness 700:1 / 300 cd/m2 Response time 16 ms 12 ms (GTG) Viewing angle (left/right, up/down) Line frequency 88/88, 88/88 (CR=10) Image frequency Image checks 50 - 76 Hz modes within these parameters Digital, OSD Technology, iKey (automatic image setting) Controls 6 buttons and iKey.